Studio


Since October 2021,
I have been the sole UI / UX Designer for Studio.


The simplified design tool for craftspeople.


A video I put together to show an example full flow of using Studio Screen recordings and edit by me, Original live action footage beautifully captured by Tania Yeo

Why?


Users of precision fabrication tools such as CNCs are often untrained or unfamiliar with the CAD or graphics programs required to create digital cut files.

My favorite user quote:

I am 75 years old and with what time I have left I would like to do woodworking, not computerworking. Hell, I wouldn’t want to do computerworking if I were 25.

Designing Studio means having somewhat a counter-intuitive mindset: that success comes from our users spending the least amount of time possible in our tool (so that they can get to making things with other tools).


Cross-device Design


A part of making Studio accessible to the every-day craftsperson, we wanted to make it available on essentially any device. To achieve this, Studio is delivered as a web-application, from anywhere that can load a website, including phones! As such, an important (and challenging) aspect of Studio is that it is also designed for mobile use.


Here is a video from our launch to demonstrate use on mobile:
https://youtu.be/6hnnR7kc_D0


Planning & Review


In addition to allowing users to quickly generate 2D designs, we also wanted to give them tools to help ‘plan’ for fabrication, by setting intention for type of cut, depth, bit diameter, and offset.


The ‘Review’ mode in Studio shows an approximate render of your design, given the ‘Plan’ that has been set. It’s a quick way to sanity-check your fabrication plan, and make sure that your planned cuts match your vision for your project.

I came up with the idea and designs to use 2D shading techniques to generate inexpensive, but convincing renderings:


See some secret things I did >

(you’ll need a password)


More things I am proud of


  • I created and have been managing the entire design system for Studio (in Figma).
  • I designed and implemented a feature to collect feedback and bug reports from users and make them easily accessible in our team slack.
  • I originated a new process for engineering handoff called ‘SoTs’ (Source of Truths) which would allow for easier navigation by engineers, and a consistent place to reference for QA testers. Ask me what I want to improve about this process!
  • I maintain a great relationship with the engineers on our team and have been told that I write excellent tickets!
  • I built 2 new single-line fonts for our users.
  • Ask me about prototyping tricky interactions in paperjs and grasshopper :)


More coming soon!


Breakaway App


In Summer 2020, I designed an app for a stationary bike.


I also created an animation to show the app dynamically alongside a demo of the product:


Earlier iterations were brighter and more colorful:


Sports Bra Design Optimization


If you’re curious for more details, feel free to read my thesis or the more condensed published paper on this research:

The goal of my masters thesis was to better understand the sports bra design space and how changes in designs could affect their performance objectives. In order to answer those questions, I created several software tools (in Grasshopper 3D) to: extract measurements from body scans, generate bra designs, simulate breasts, and test the generated designs according to the simulated breasts.

These tools and how they are used together are illustrated in this diagram:


Measuring and mapping body scans:


I created a grasshopper afnd python tool to automatically detect landmarks on (almost) any female body scan and applied it to a data set of 583 body scans.

Landmarks identified:


This resulted in numerical data on the body shape and size of (almost) 583 women, which I then performed simple machine learning analysis on to map body scans to 8 clusters based on band measurements and cup volume:

Parallel coordinate plot of body parameters


Averaged images of body scans to visualize clusters


Generating bra designs:


A large part of this research was to define new, scientifically motivated design directions for improving sports bra performance. While there are many objectives we can try to achieve to improve sports bras, I've focused on reduced range of breast motion and reduced average pressure.

In order to understand the affect of different design parameters on bra performance, I needed to be able to create designs with specific parameters for testing, and create many of them to determine trends. I created a grasshopper tool to generate simplified bra designs based on 6 parameters:


Here, you can see a sampling of some of the bras generated with the design tool:


Simulating breast loads:


Breast and bra simulations were calculated using the force density method (FDM), which I implemented by writing a custom Grasshopper component in C# and Visual Studio.

These following images show an initial FDM breast with uniform loading, a later (more accurate) step with non-uniform loading representing hydrostatic pressure, and the same model when loaded upside down (this is used to test range of motion)


Evaluating performance:


Each bra design is then tested using data from our breast simulation, and their performance (estimated pressure and total movement between loading scenarios) is recorded. These tests can be visually checked using images saved by the tool. See for example, these three generated bras and their visually represented performance under each loading scenario:
(plots generated in grasshopper)

The performances of these designs can now be plotted against design variables to get a sense for how variables in the design process effect performance, and what designs could be optimal:

(plots generated in matlab)

Additional 3-axis plots were generated to identify bi-variable impacts on performance results, with the most significant results suggesting that increased pressure was predicted for designs where stiffness was more distributed:
(plots generated in matlab)

This diagram serves as a rubric for how the varying ratio and angle parameters relate to the relative stiffness (represented by stroke weight) of each direction of the mesh:

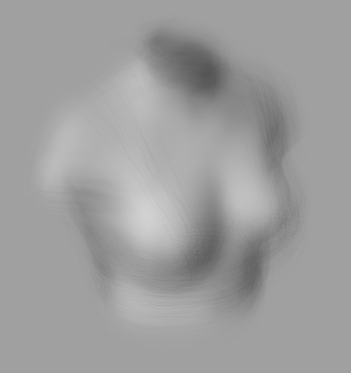
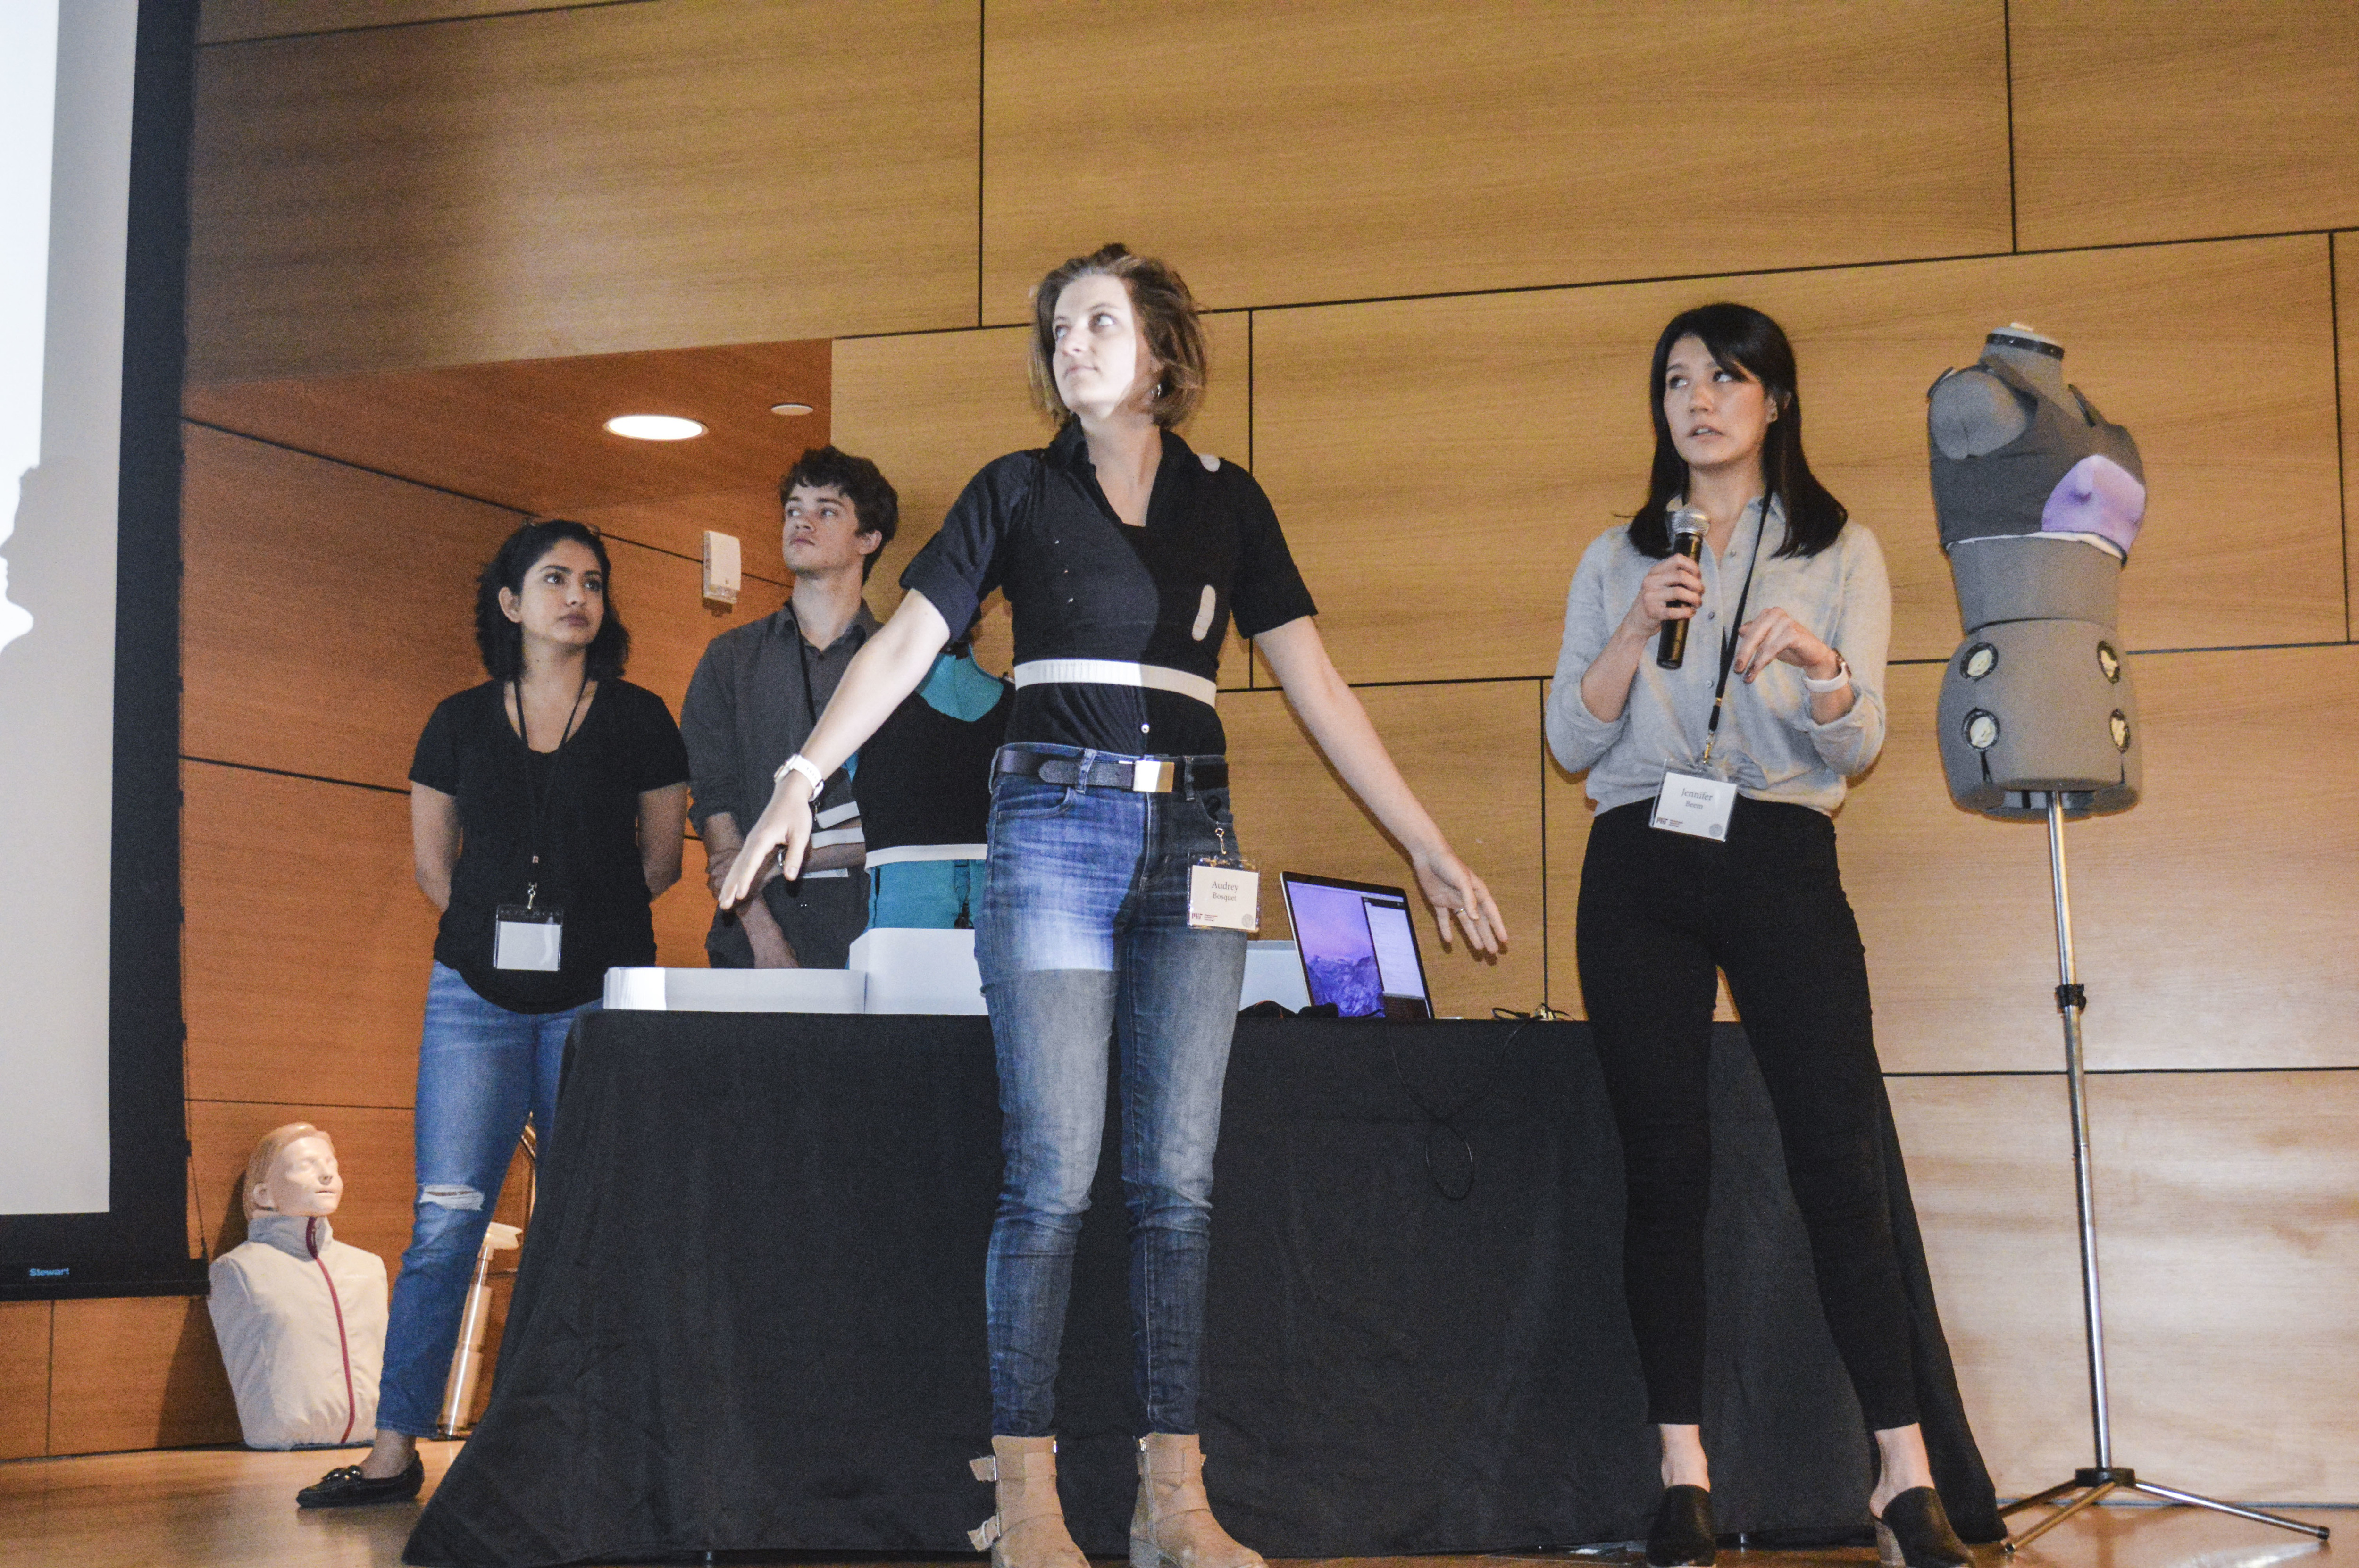
Stiff Sports Bra Design


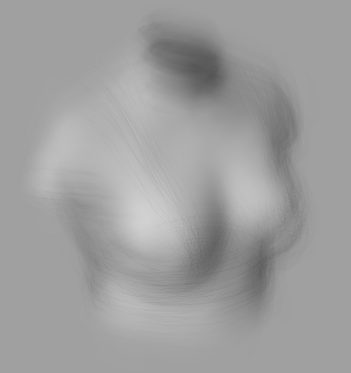
In an effort to test how stiffness in sports bras could work towards their efficacy at reducing motion, I designed (in CAD) and fabricated several iterations of sports bra prototypes.

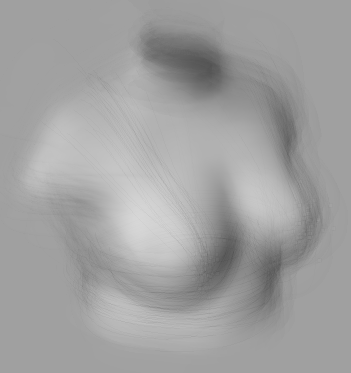
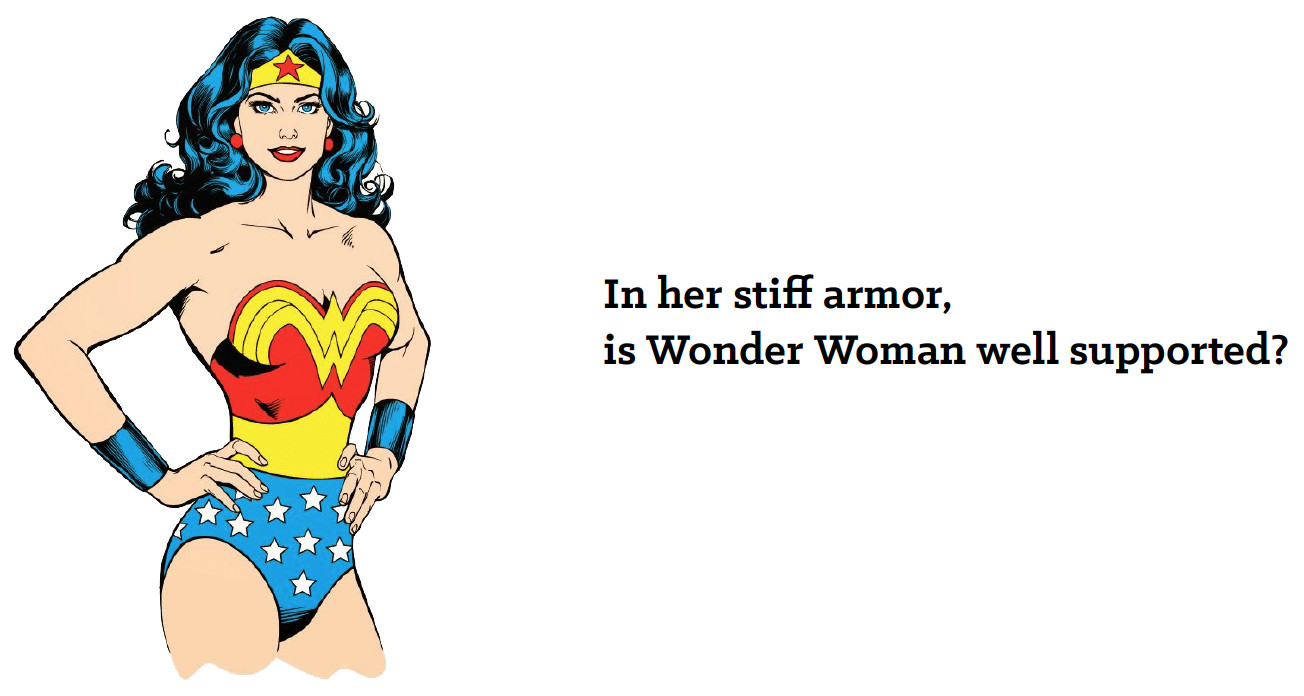
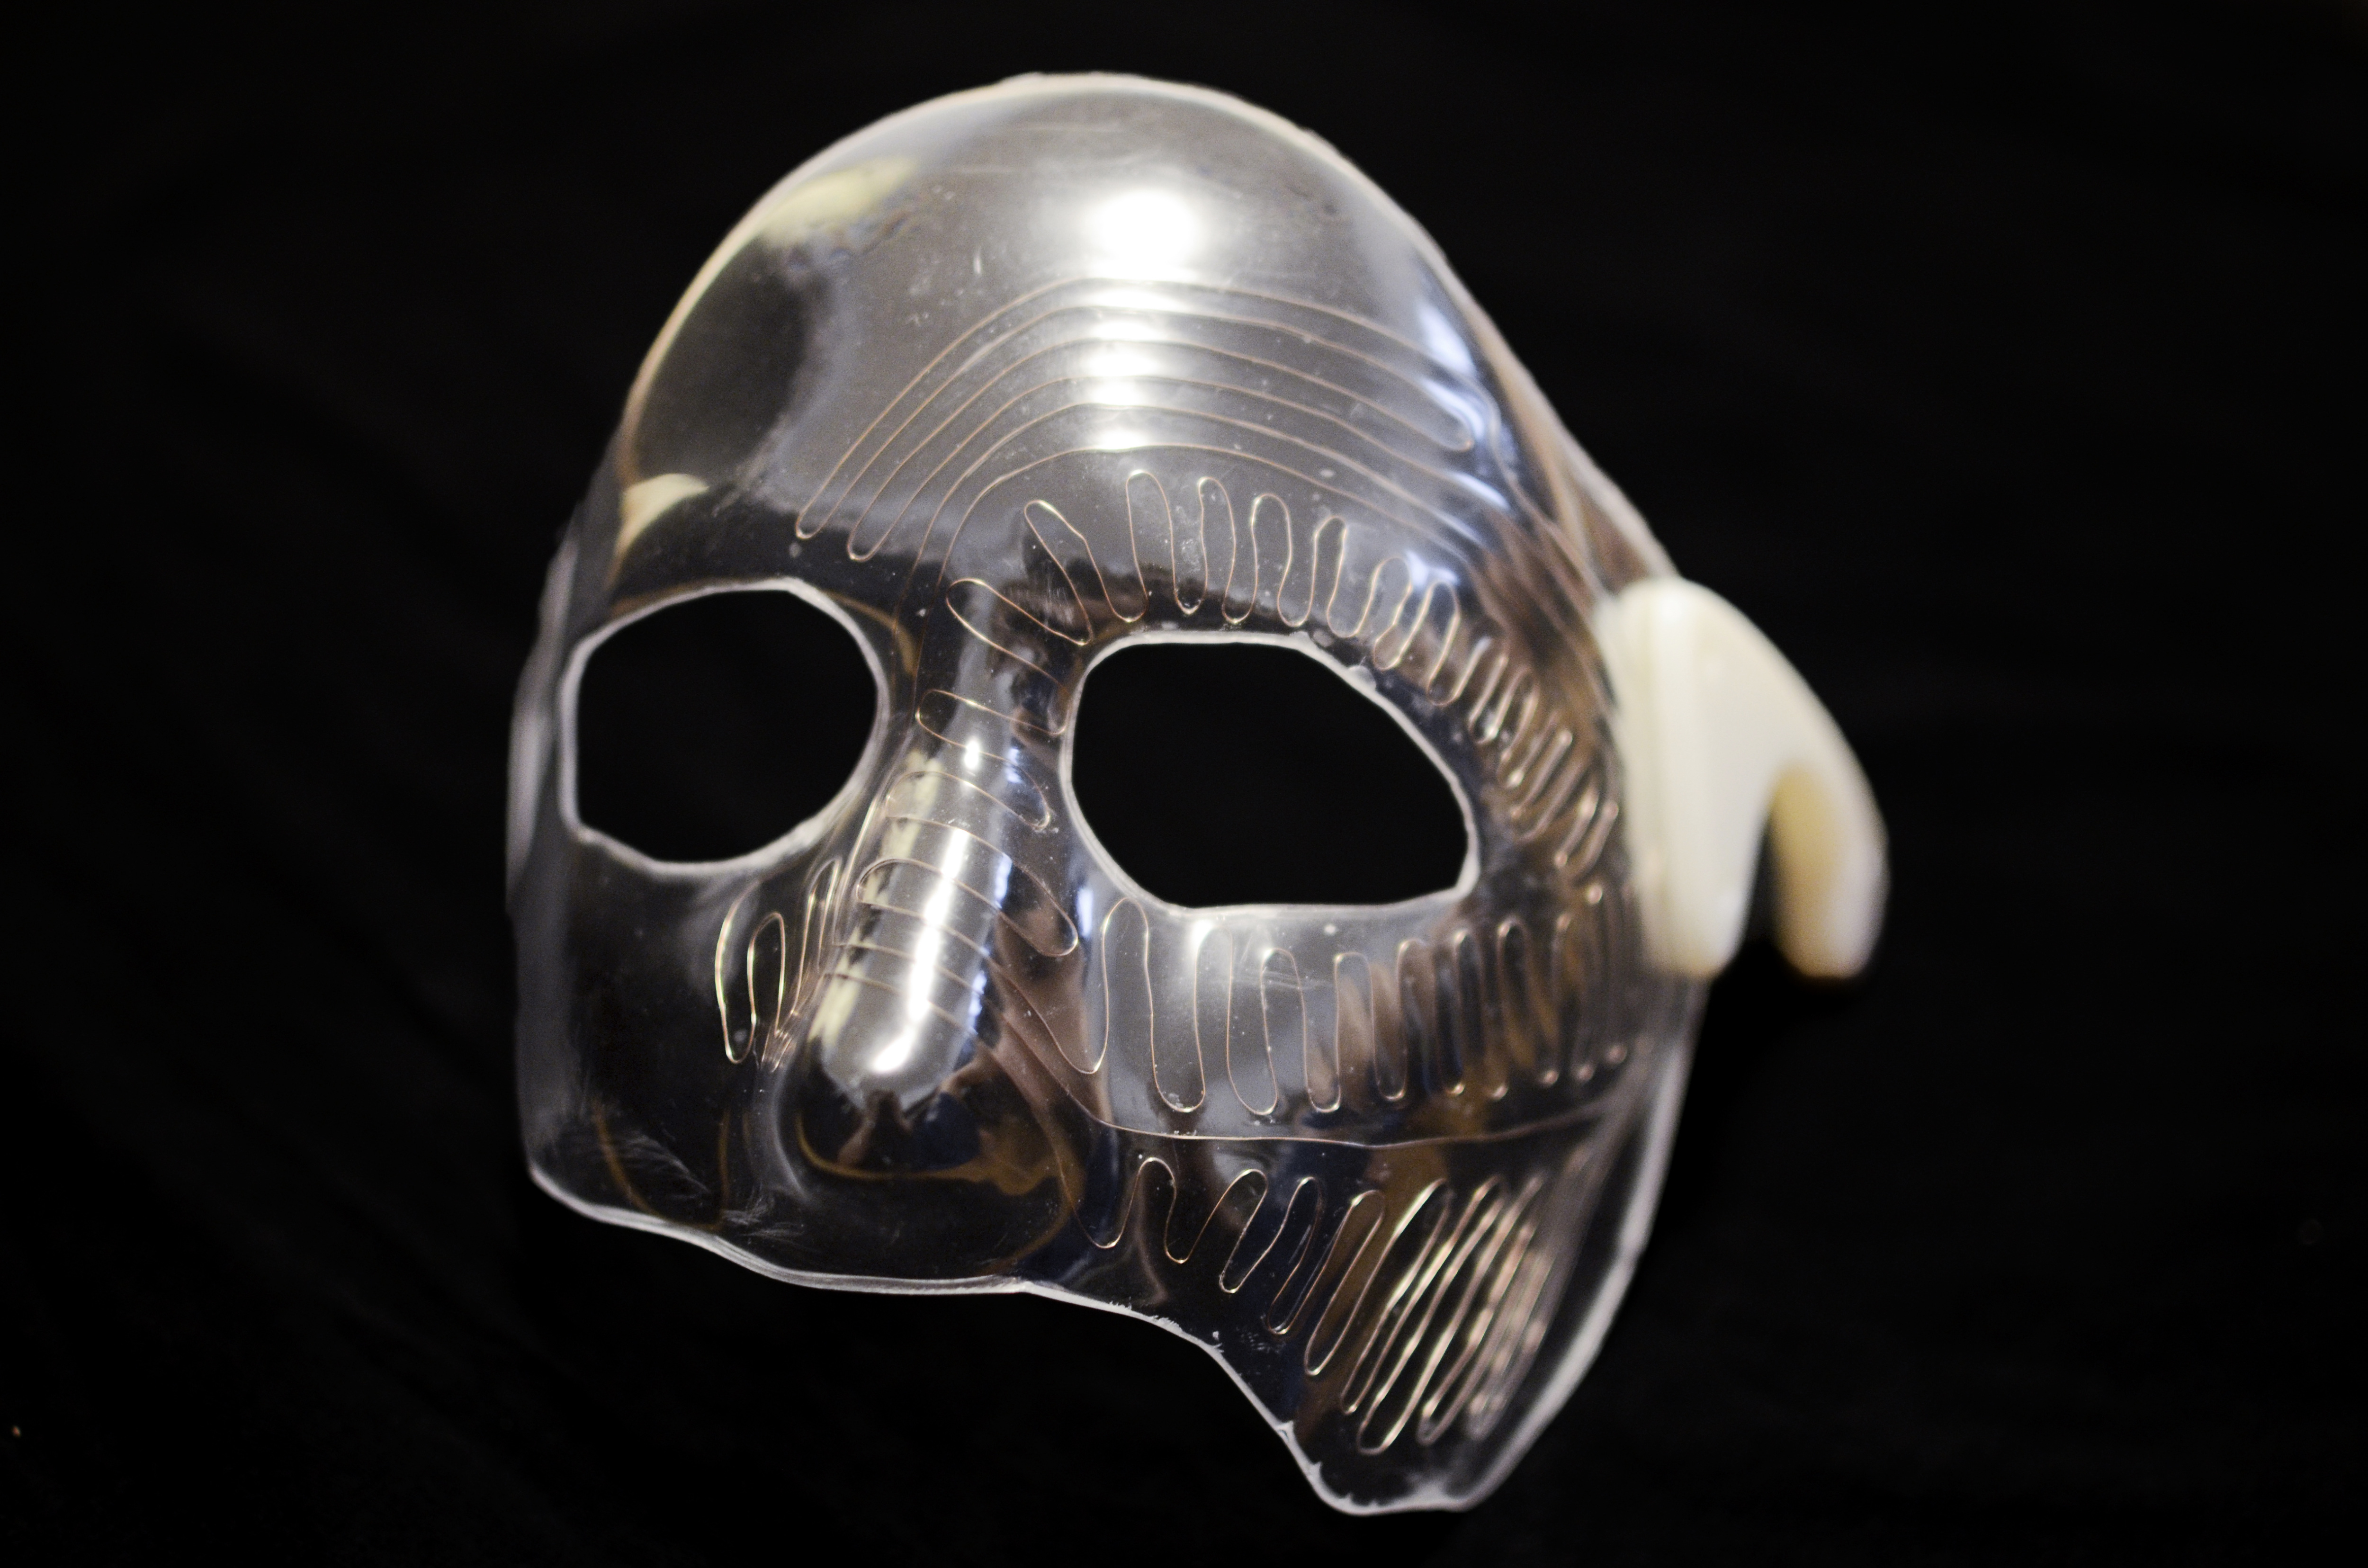
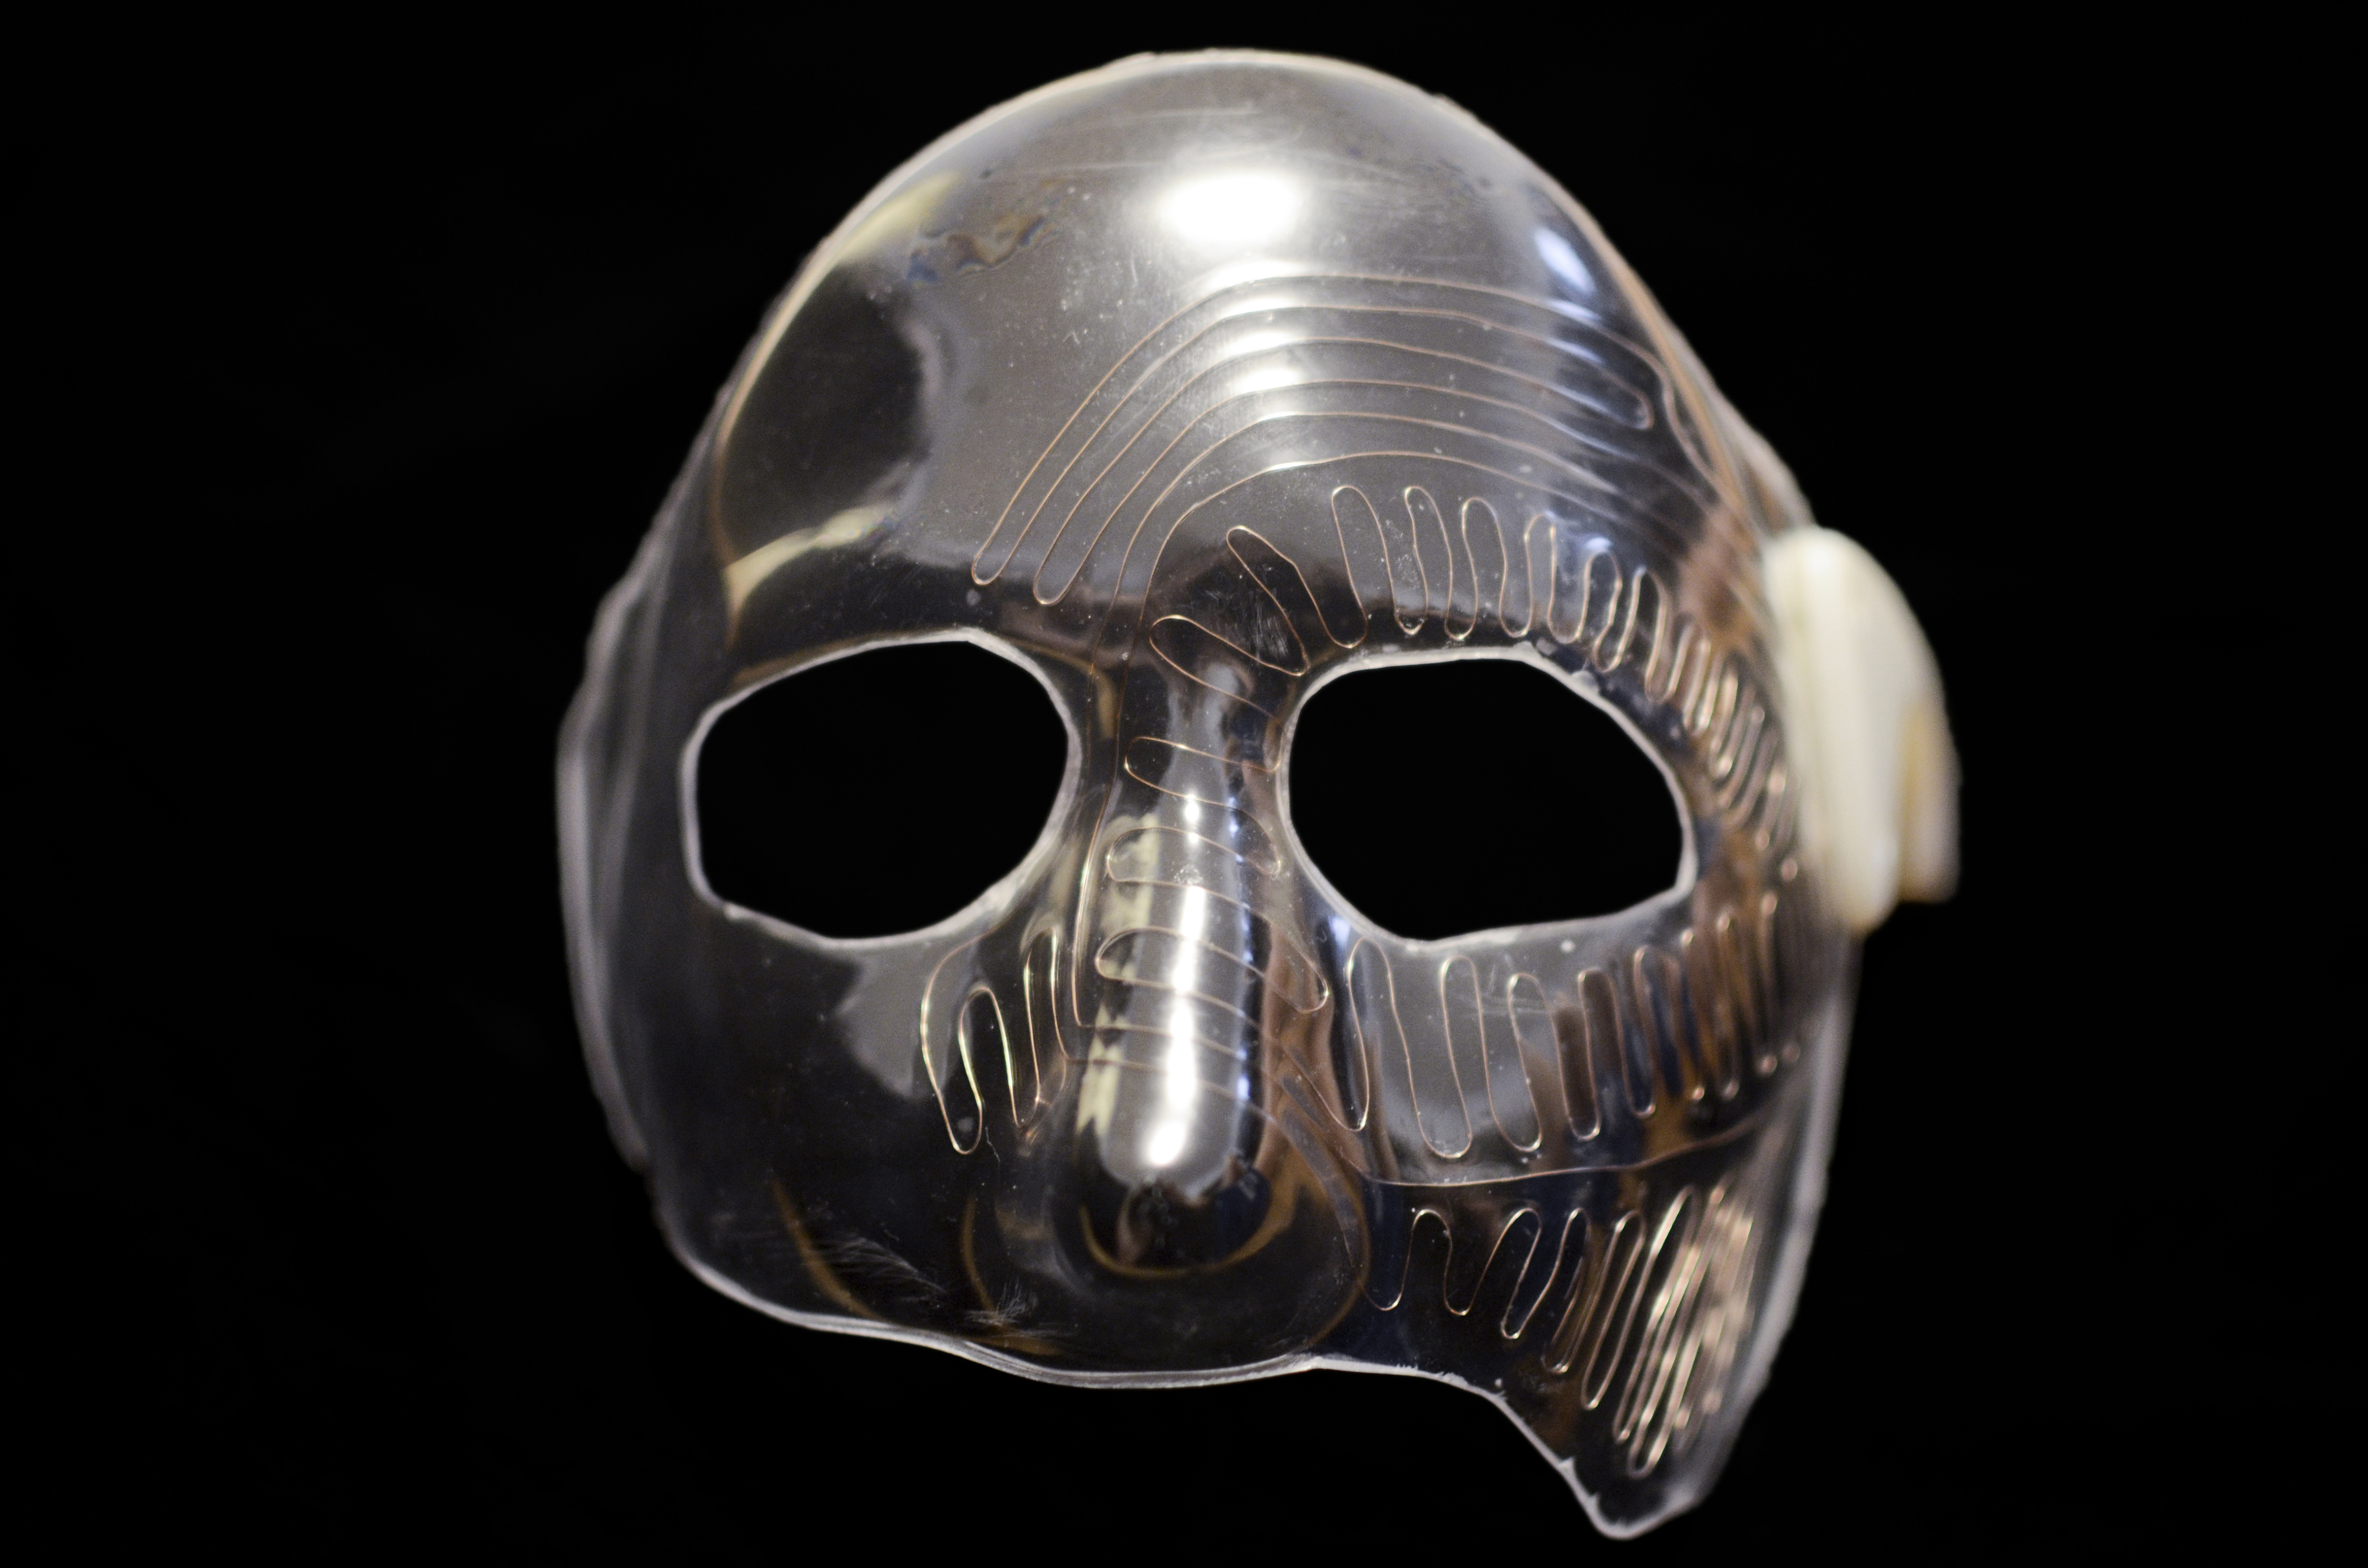
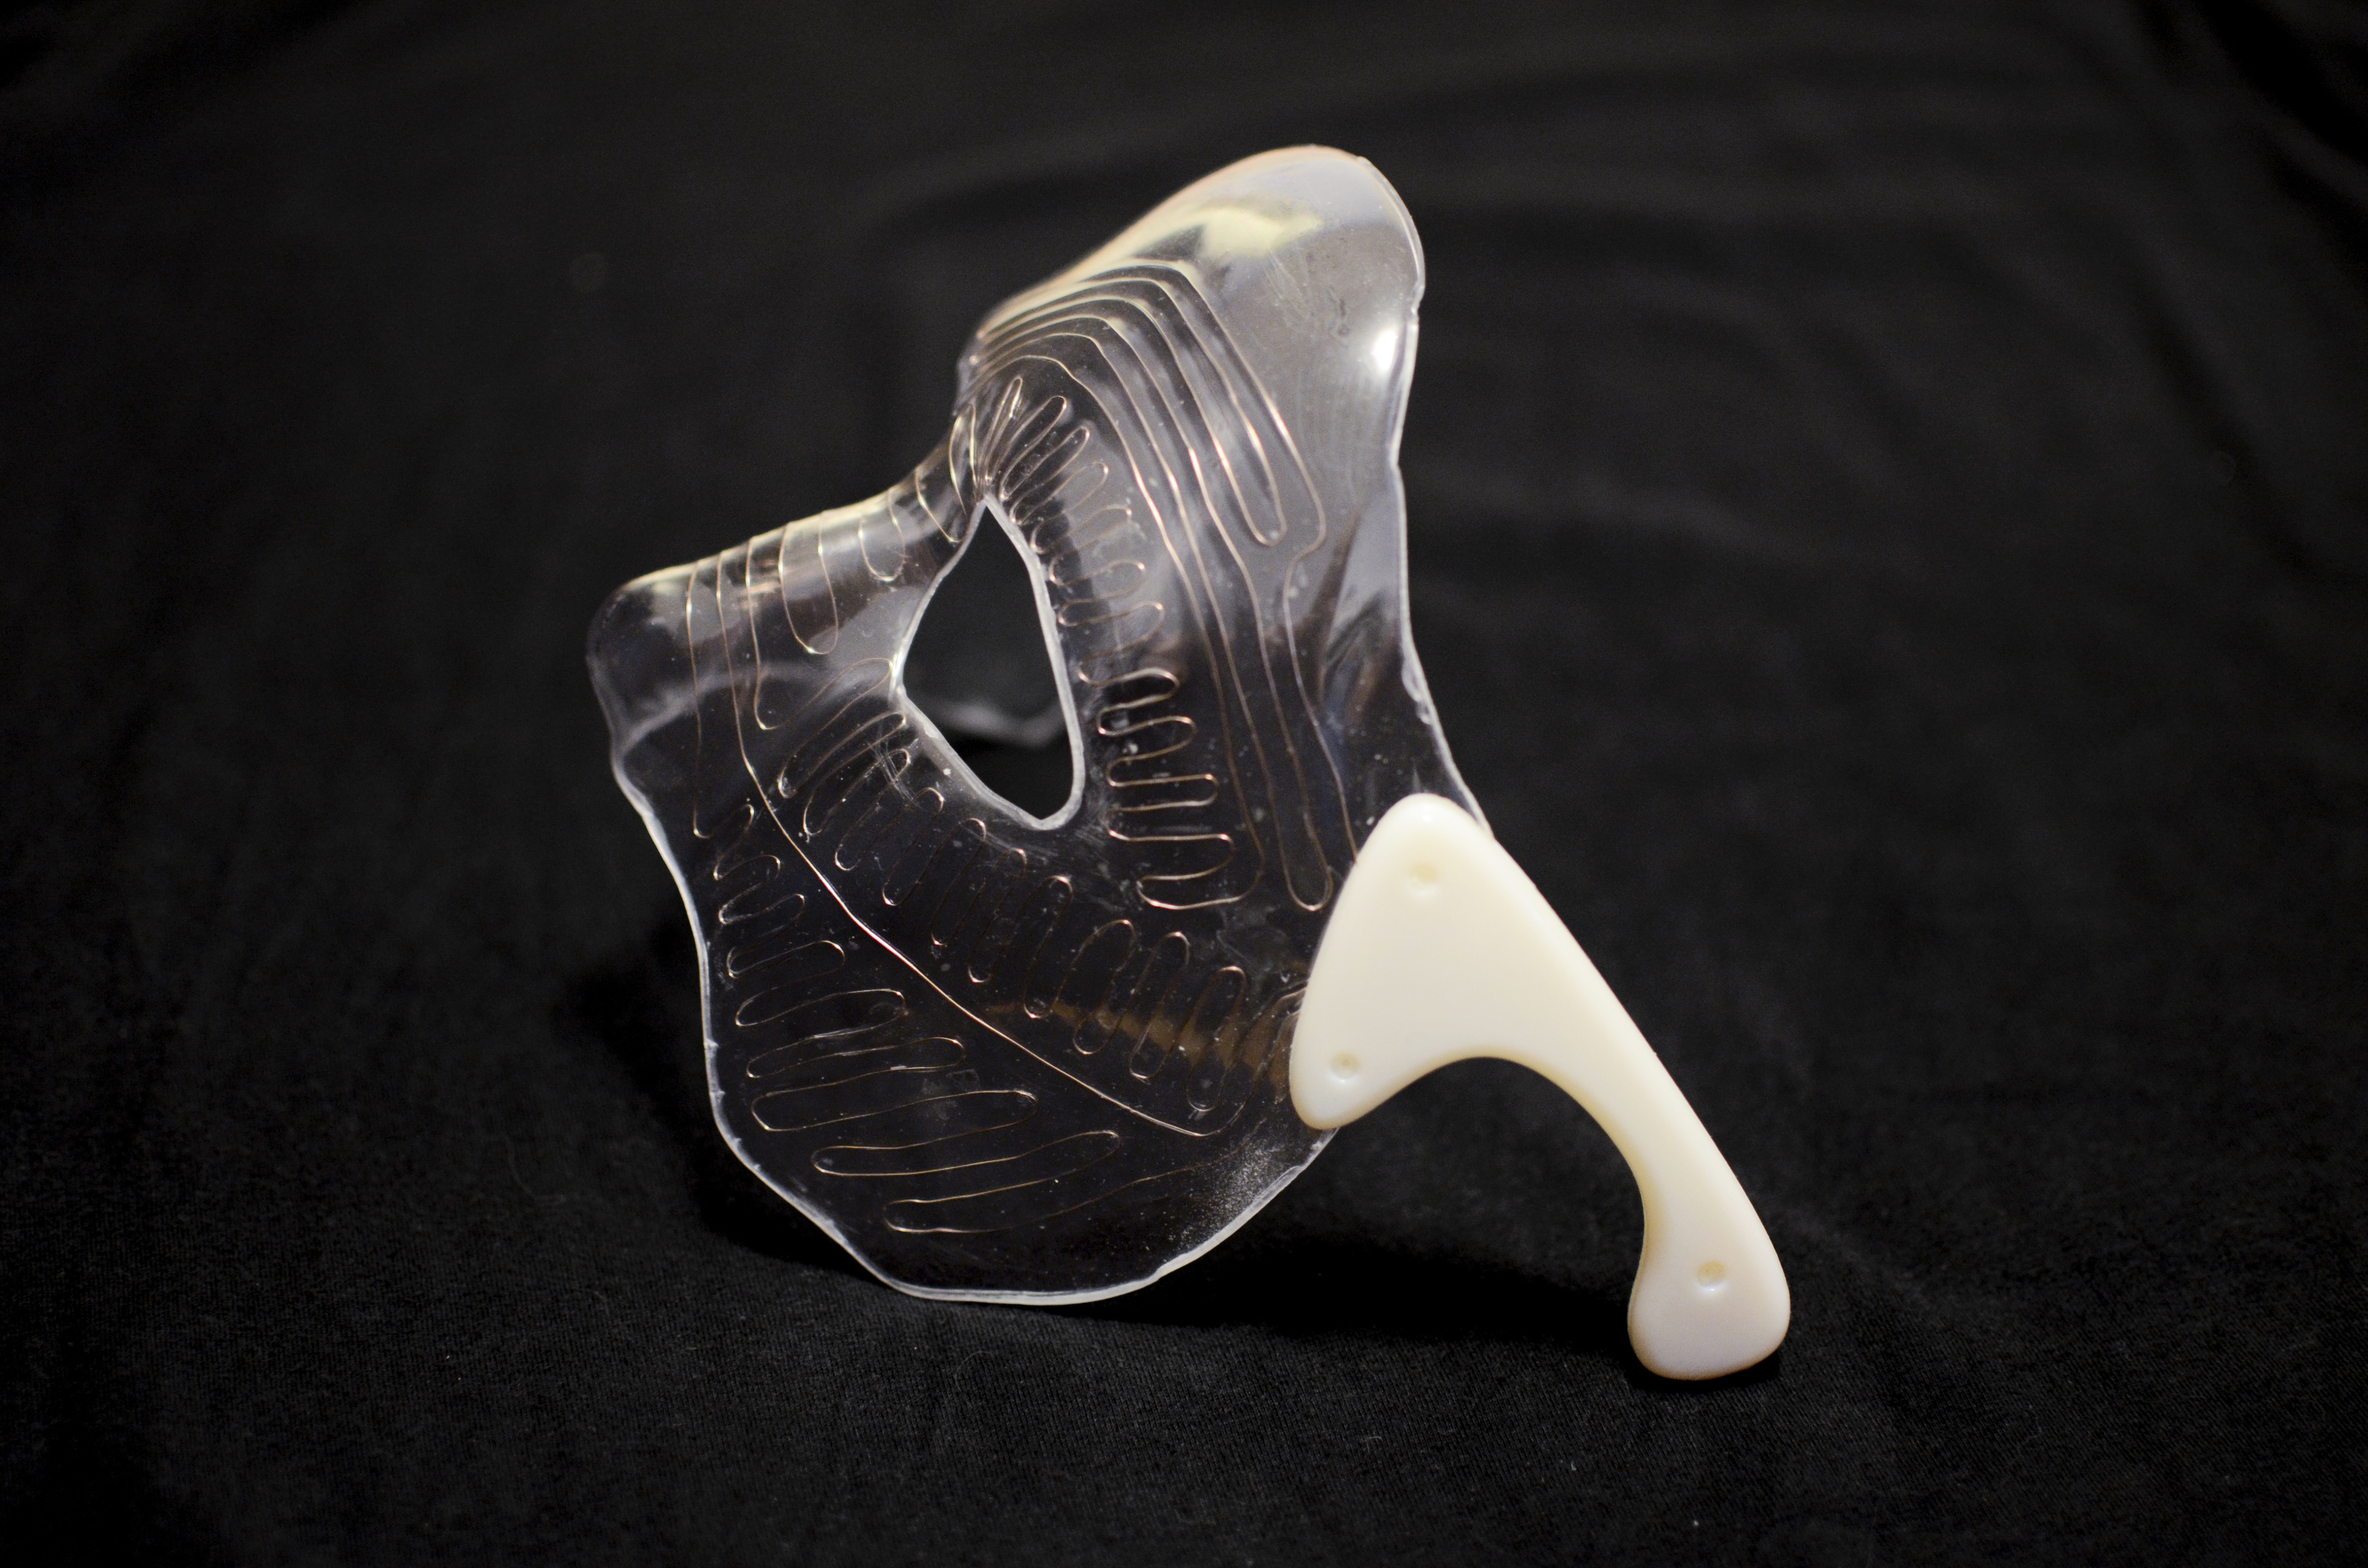
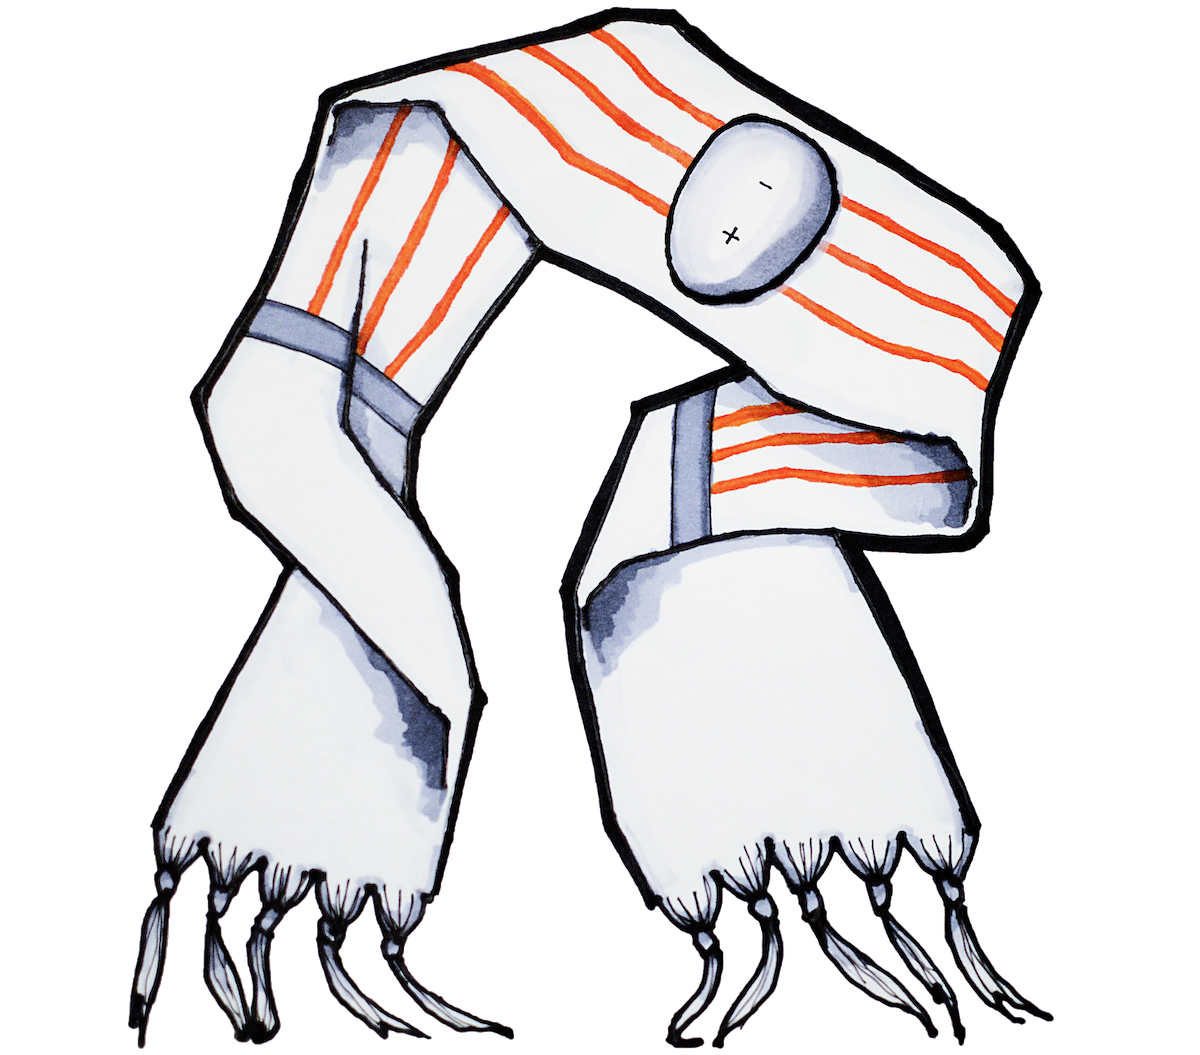
The initial inspiration for exploring stiffer bras came from considering examples of armor in comic book characters and movies. I'm sure I'm not the first to ask:
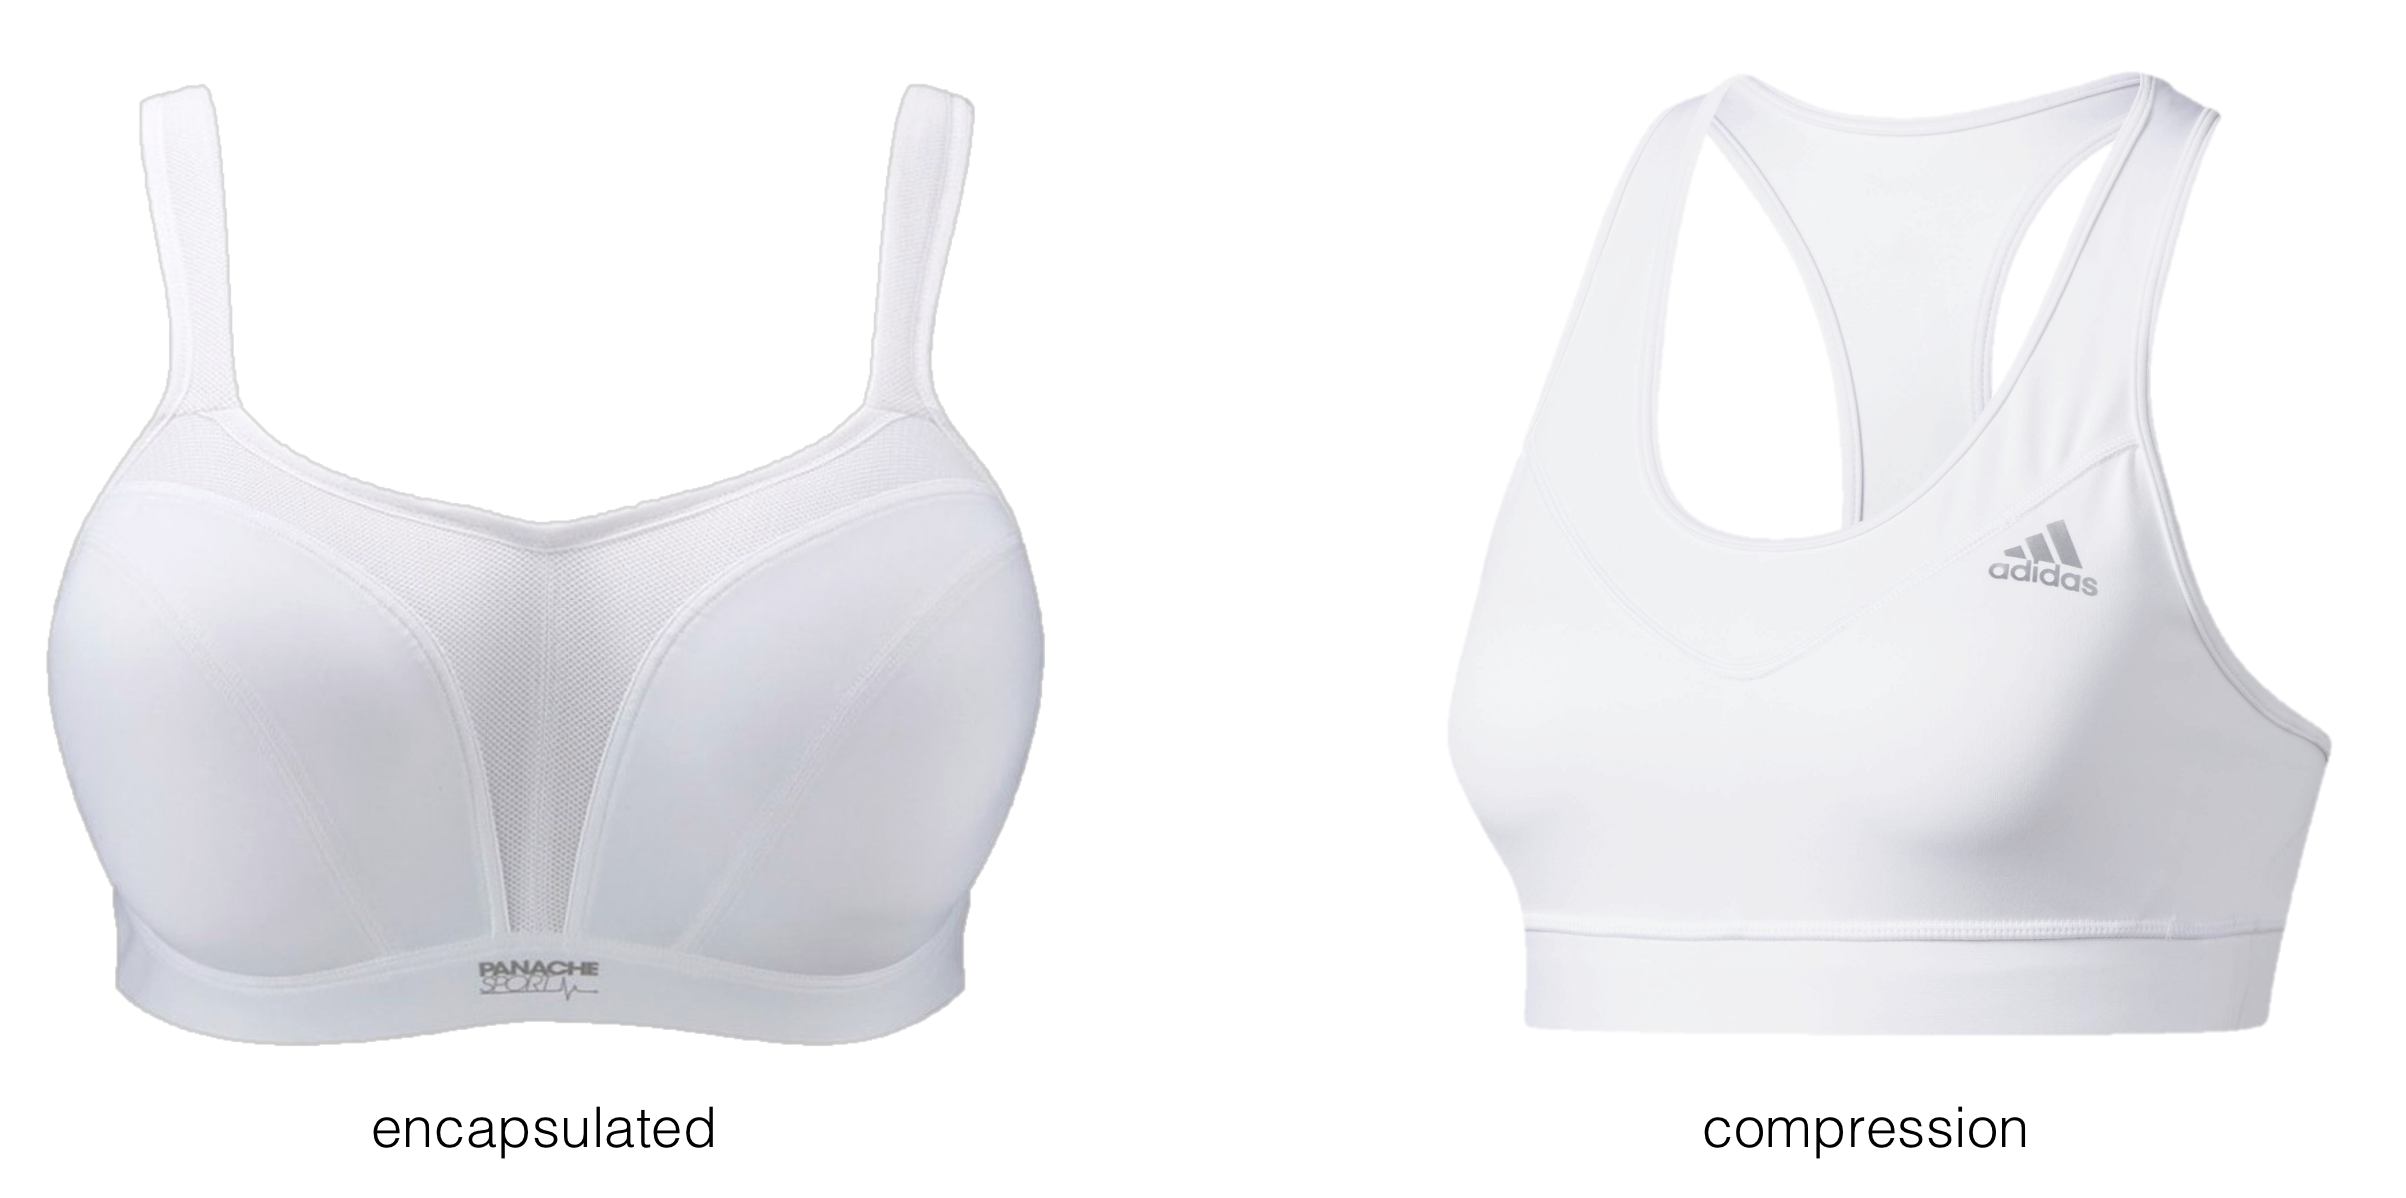


Armor-like bras is not entirely fiction. Encapsulated bras exist that are usually composites of molded foam, underwire, some stiff fabric, and some elastic fabric. These bras are usually marketed towards larger-breasted women because they are more supportive than their compression bra counterparts. They achieve armor-like stiffness thanks to underwires, molding, and often complex construction. Although they are typically more supportive, many women dislike the encapsulated bra style because they feel it is overbuilt.
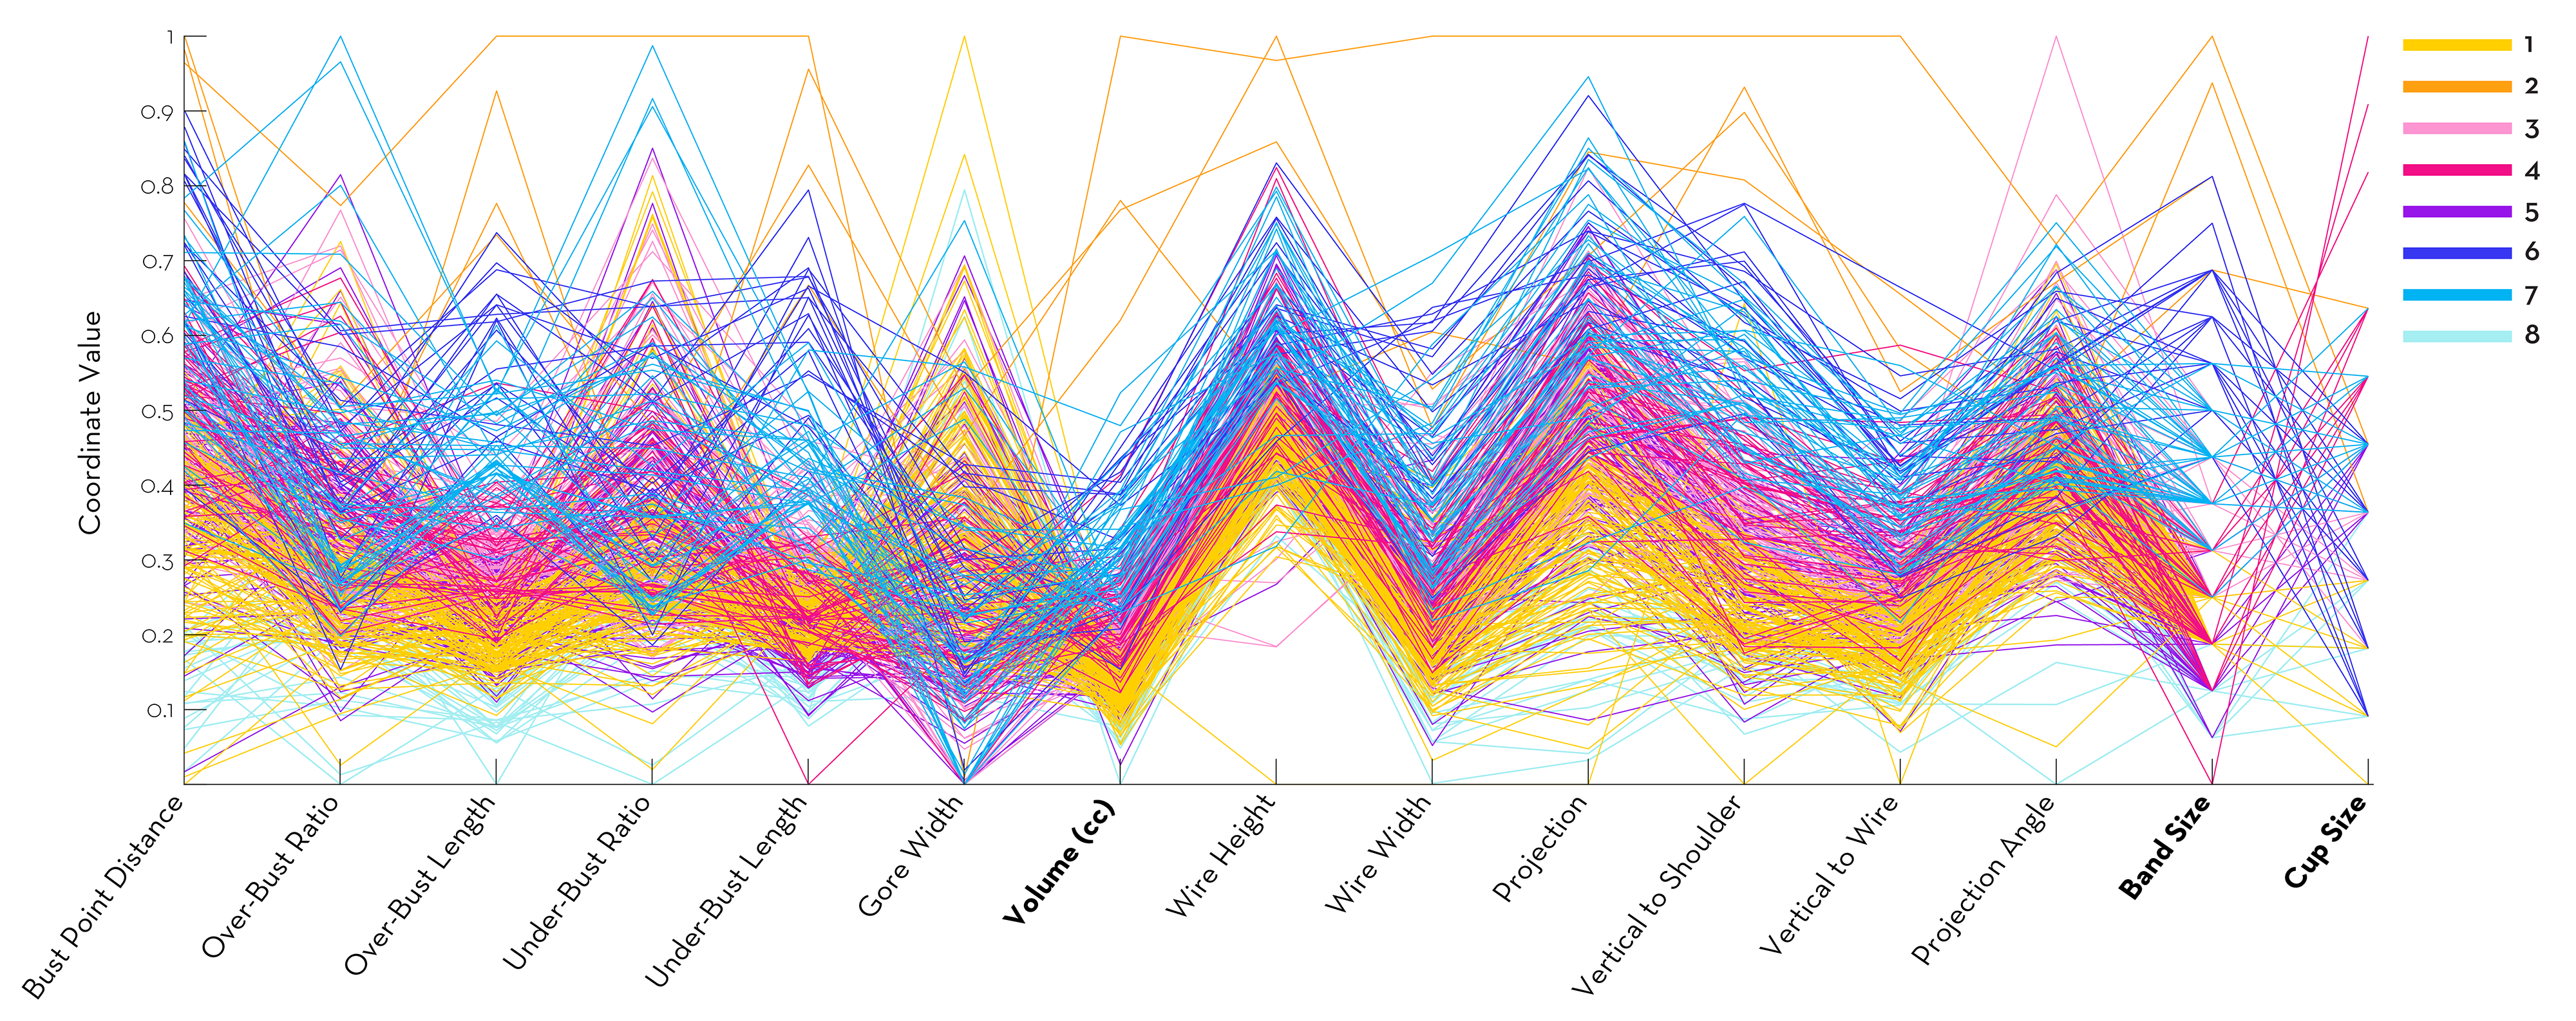
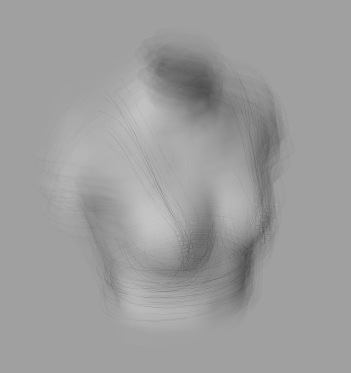
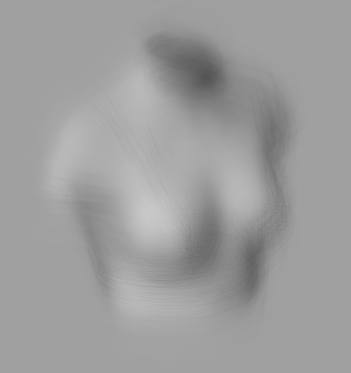
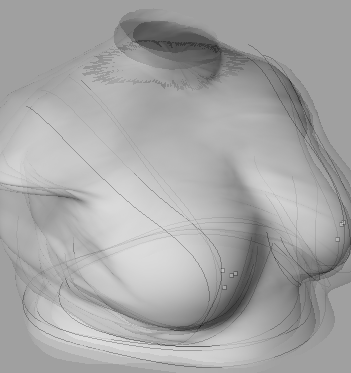
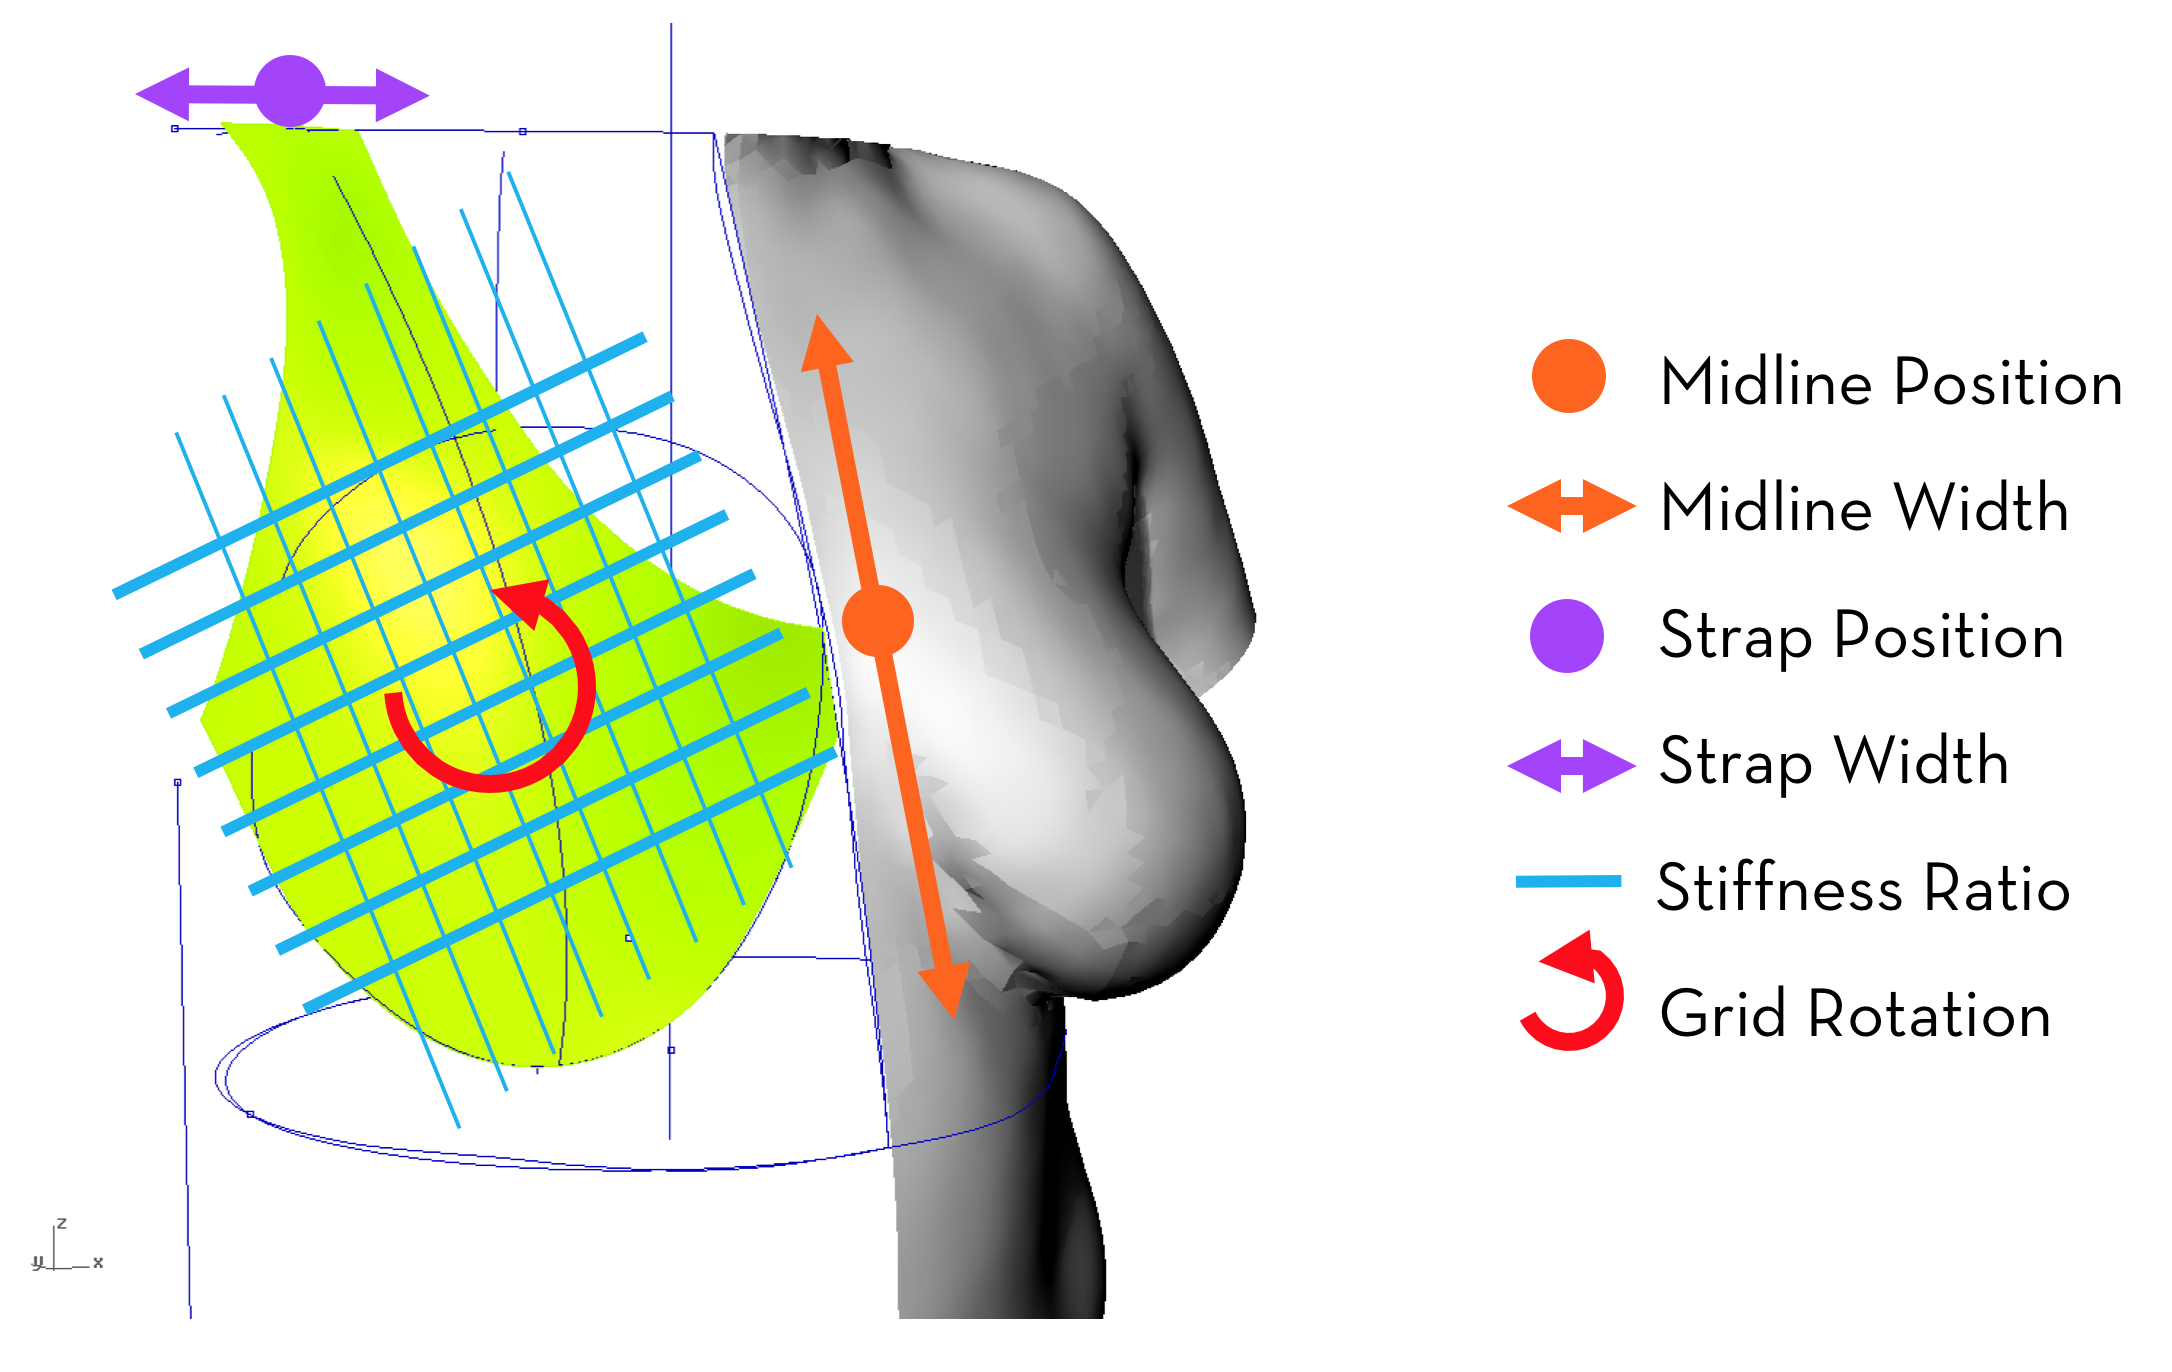
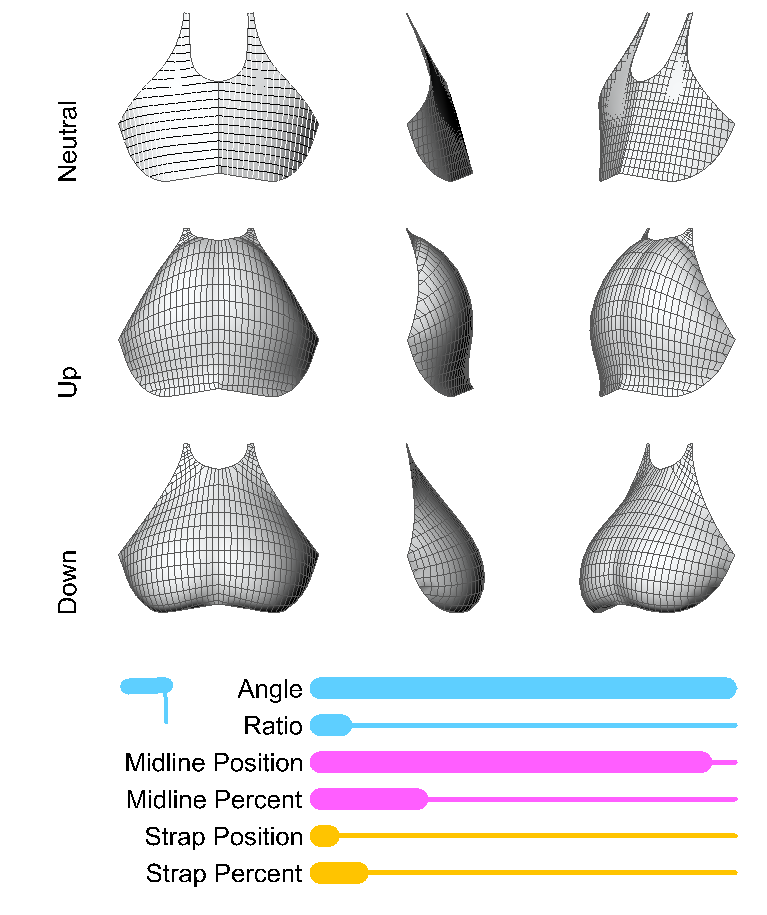
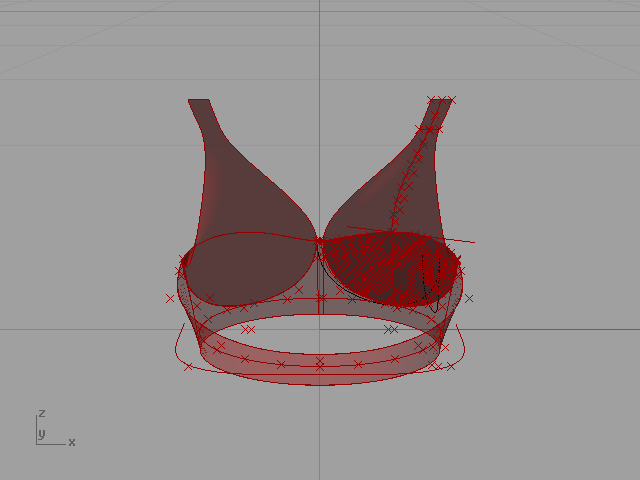
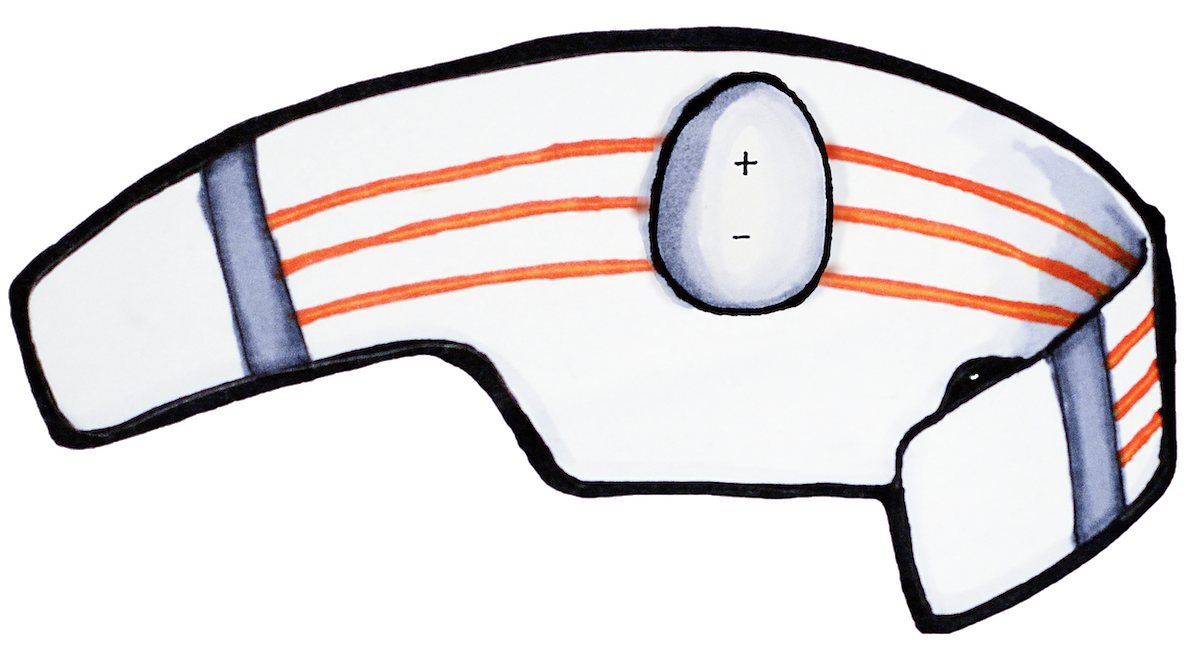


Generative Custom Fit Design:

My hypothesis was that if the bra were custom designed to perfectly fit its wearer, then I could design a bra using developable stiff panels, removing the need for the underwires and molding of encapsulated bras. This would mean a bra with the benefits and support of an encapsulated bra, but the simplicity and lightness of a compression bra.

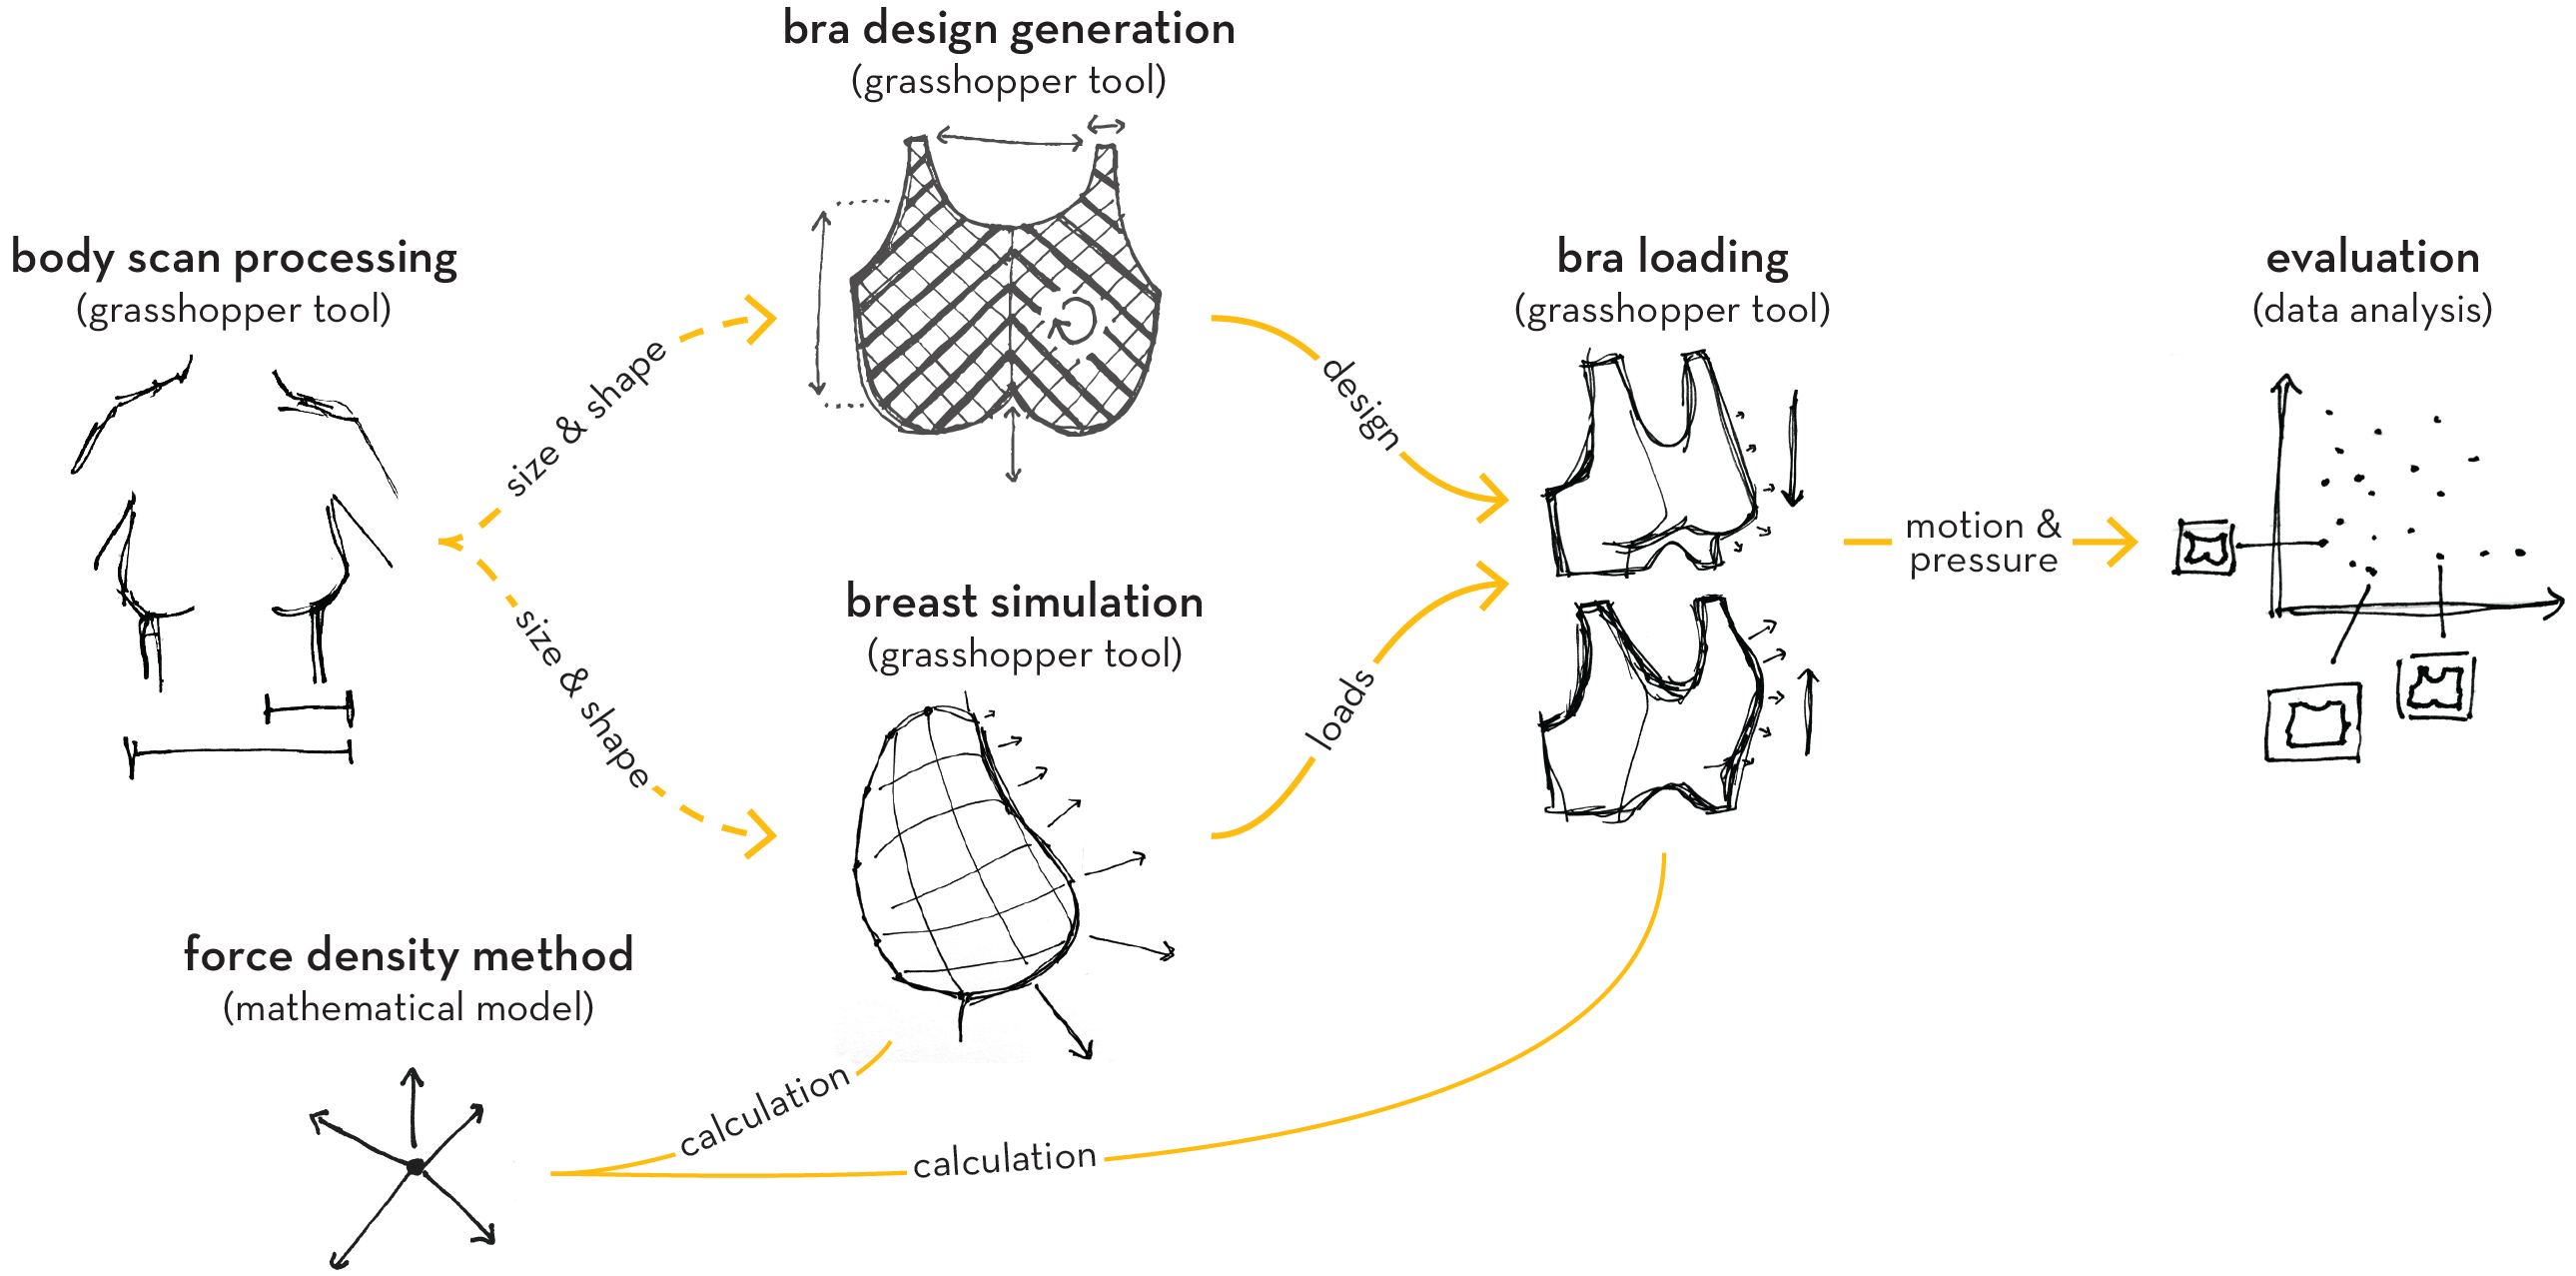
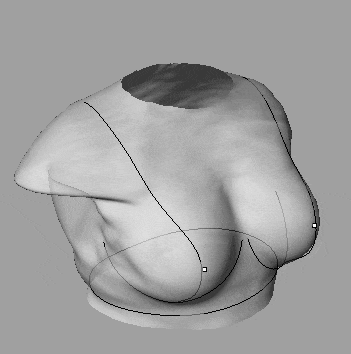
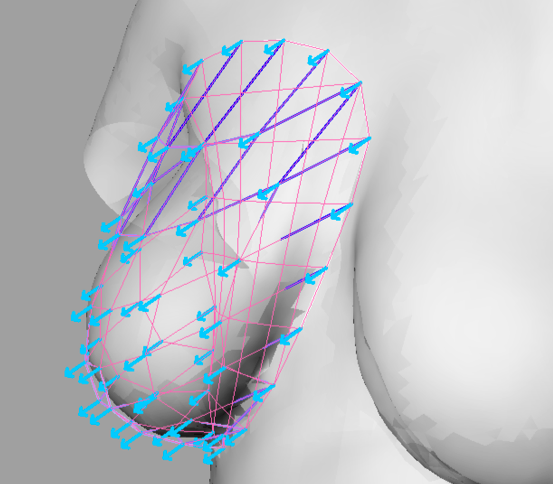
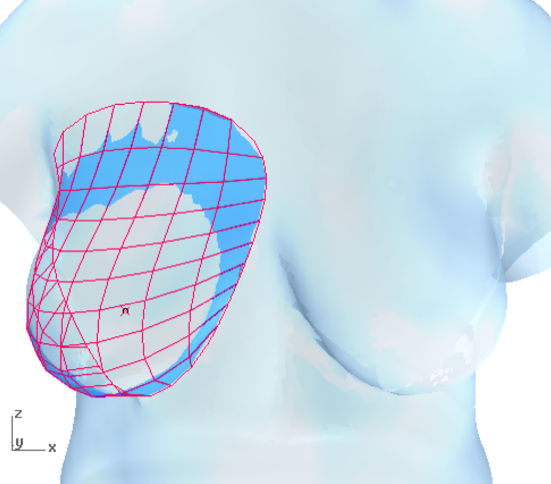
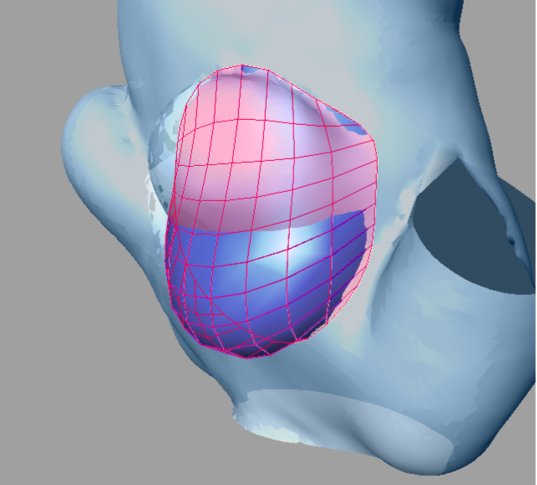
In order to fit a person perfectly, I created a tool in grasshopper to generate a bra design based on measurements from the intended user:
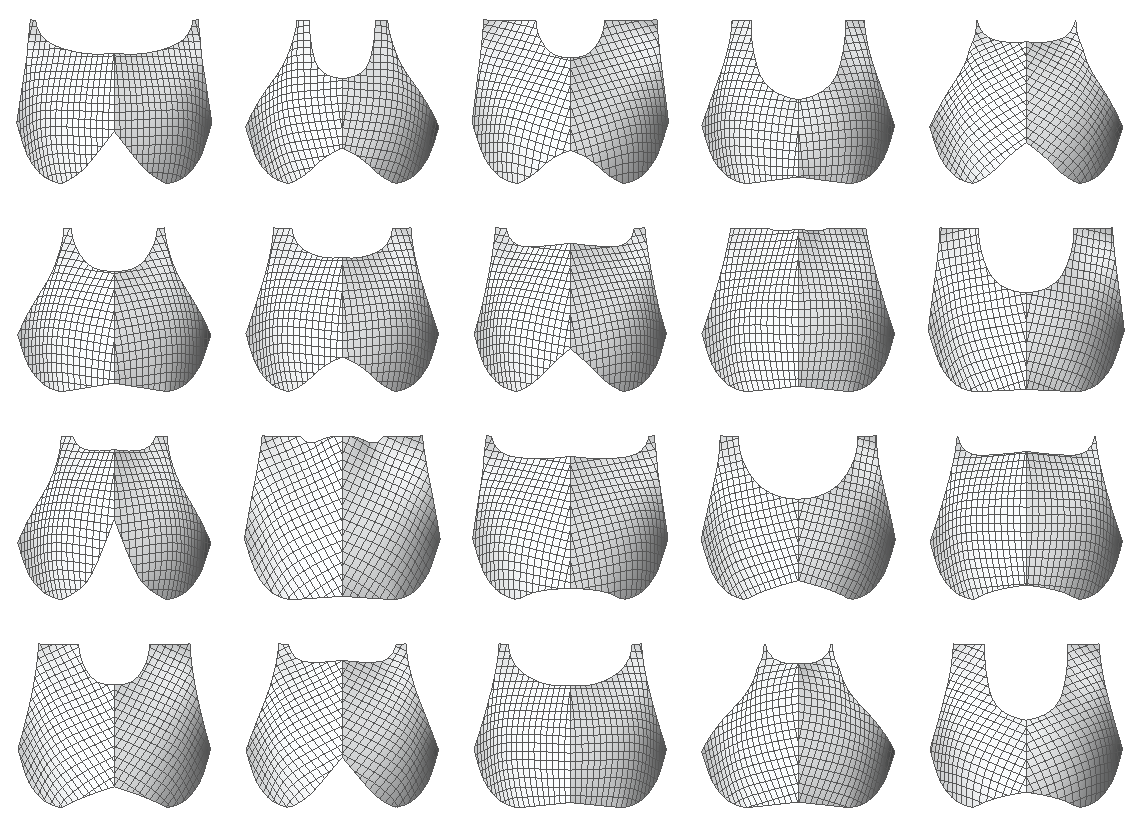
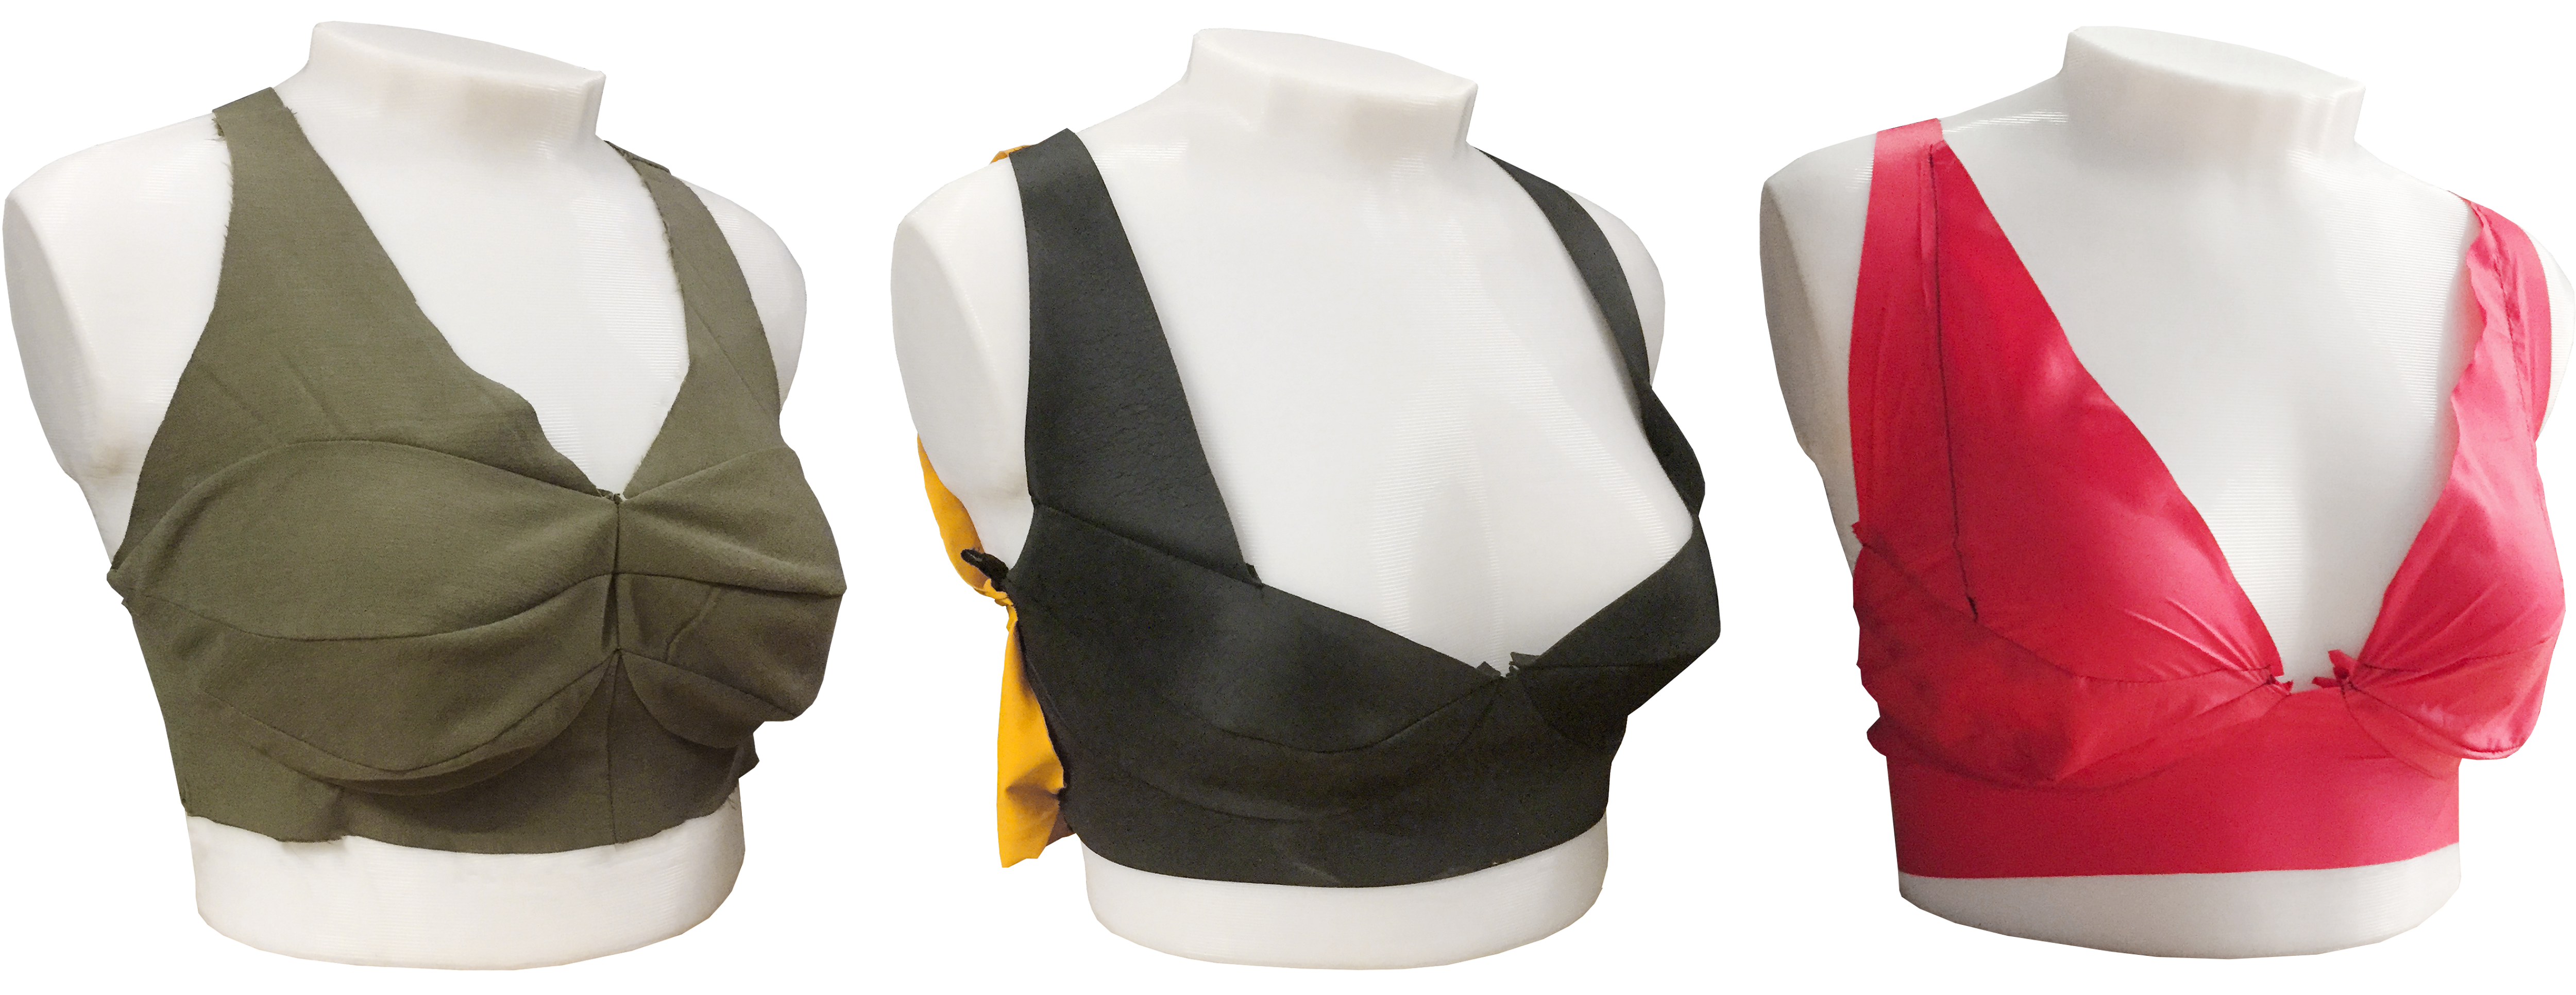
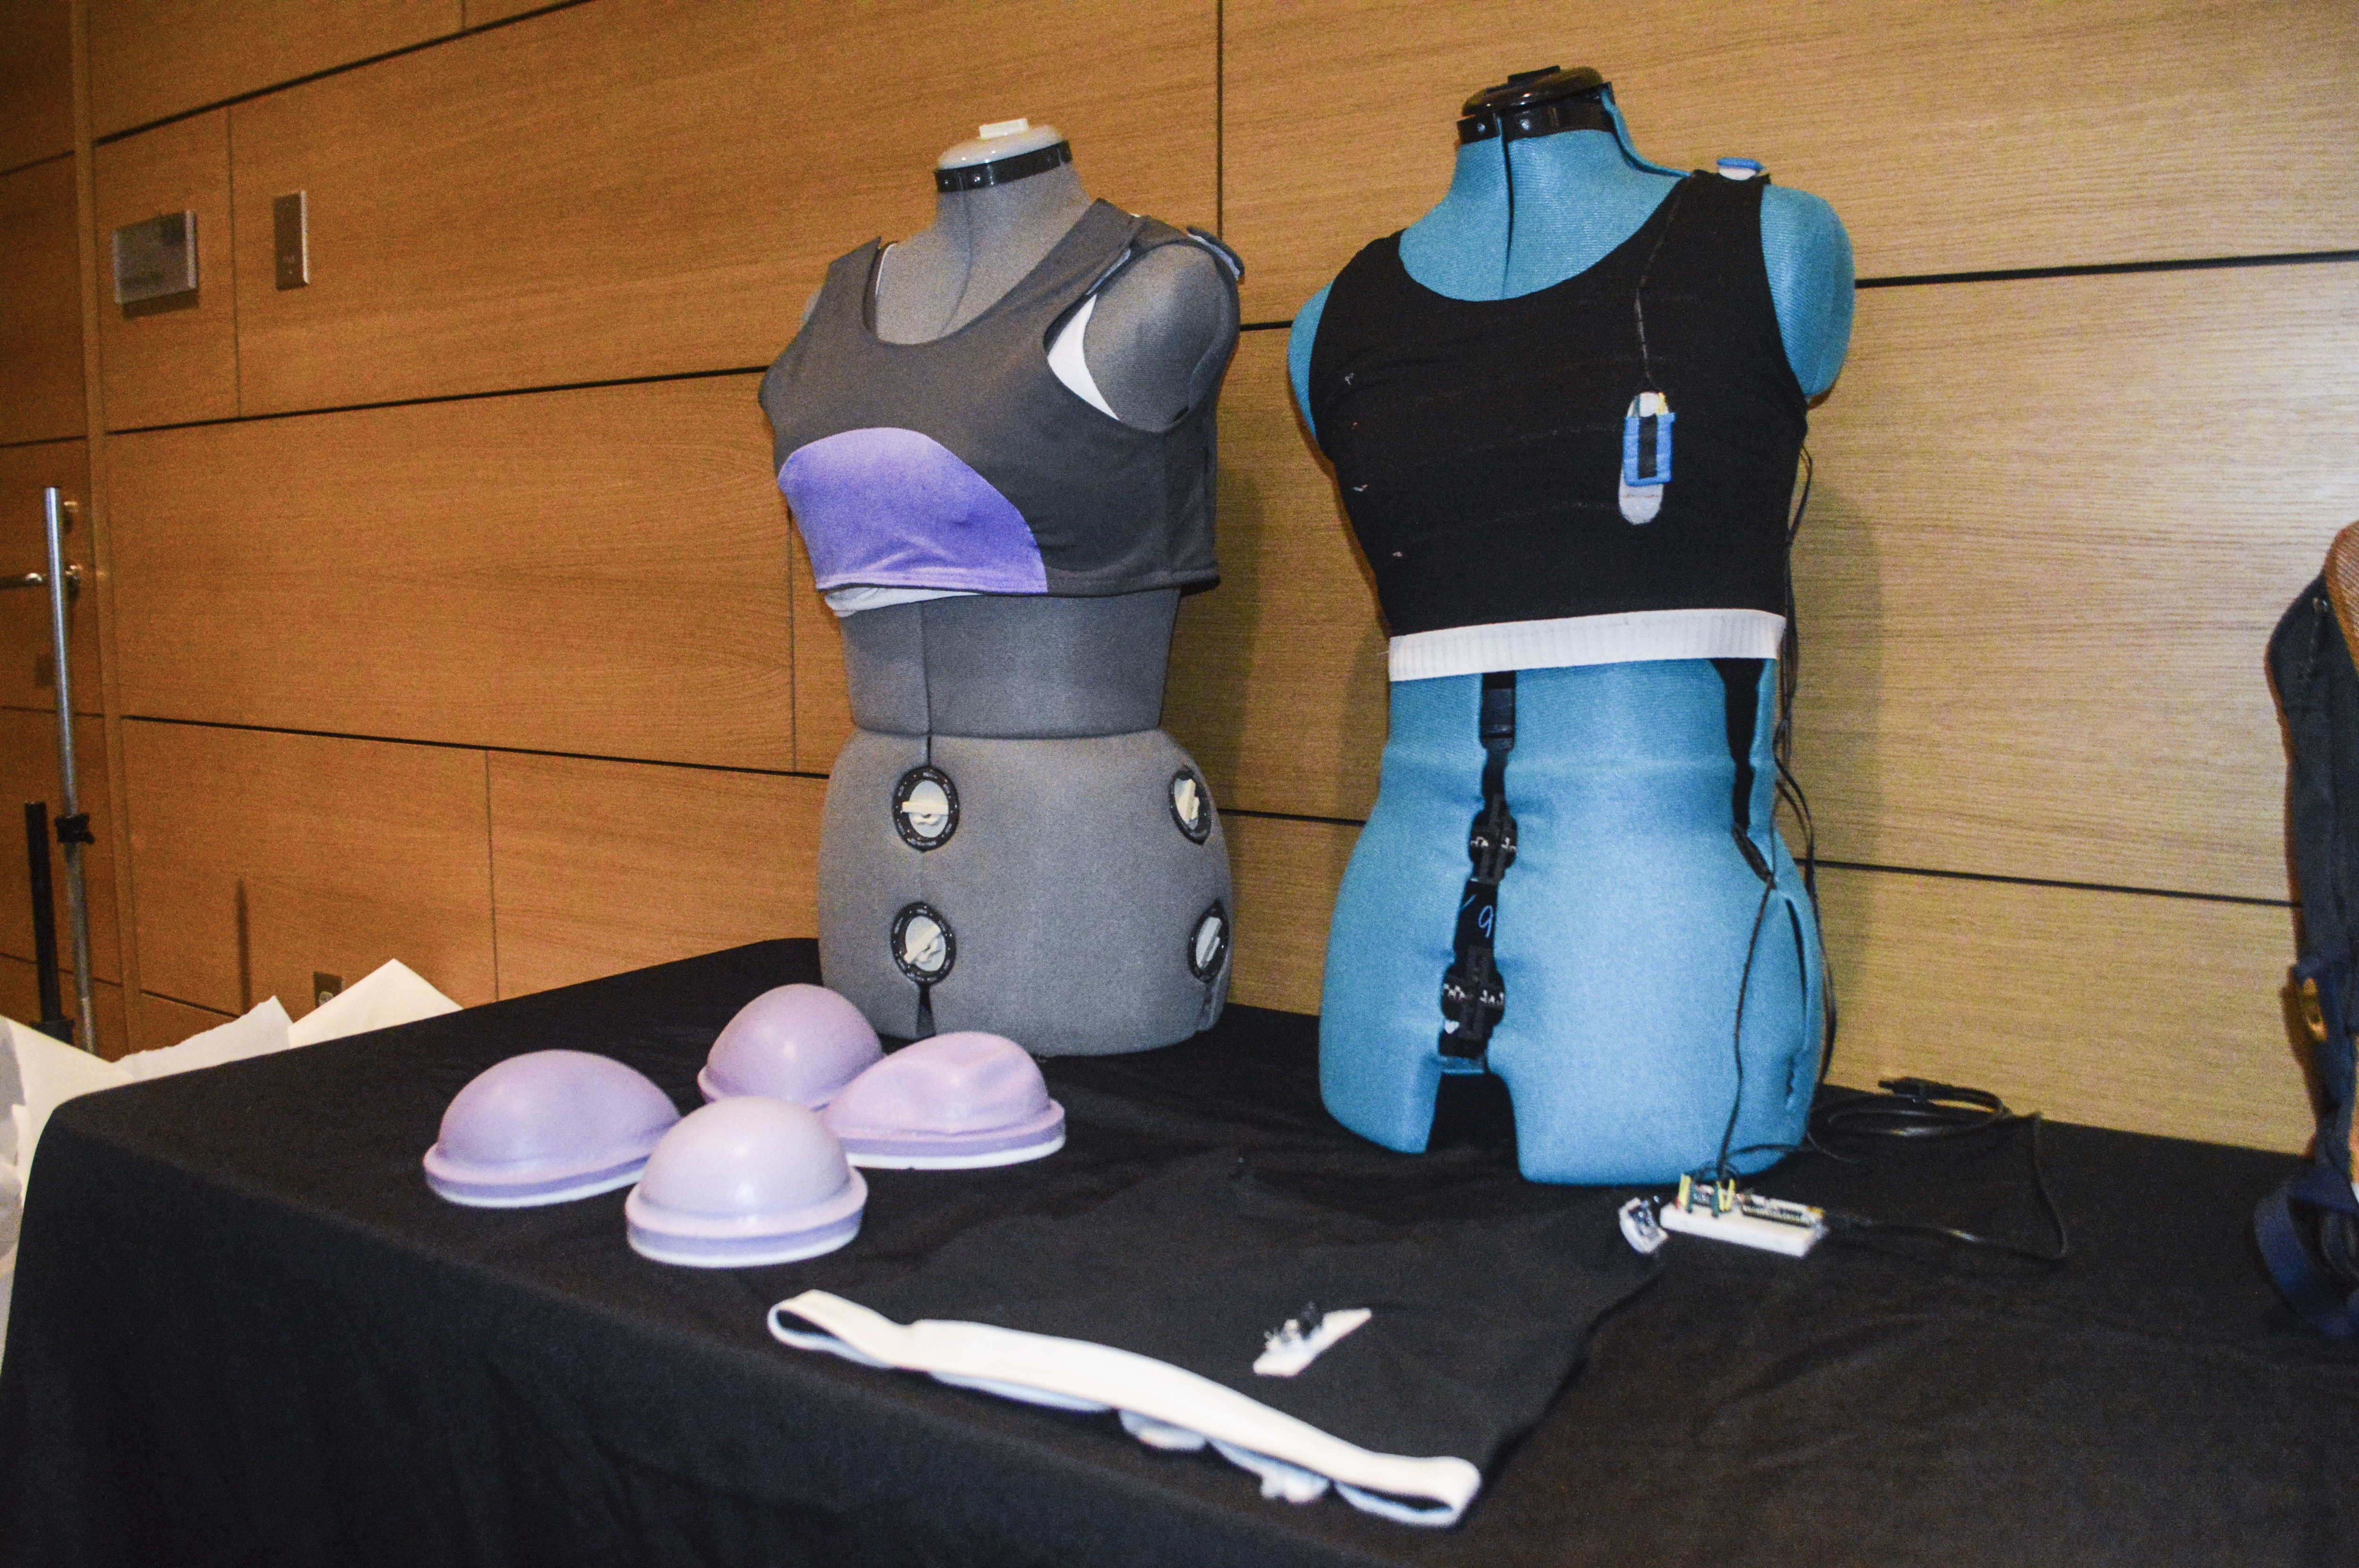


Initial Prototypes:

Using the grasshopper tool, I iterated through 3 prototypes before creating final bras to be tested. In order to fabricate these bra designs using stiff fabric, extra steps were taken in CAD to adapt the designs to developable panels that could be unrolled flat.

These 3 initial prototypes were critical to understanding how stiffness interacts with sports bras, and how bra shape can impact its effectiveness. These main learnings are bolded in the explanation below.


The first prototype (left) was made entirely from a non-stretch cotton fabric. Immediately, it was apparent that while the bra fit well, it did not provide much support. I realized that the tension provided by a stretched fabric around the torso and over the shoulders is necessary to counteract gravity, as well as looseness of skin (if you're curious - see how much your skin moves when you push it around).

Moving forward, all of our prototypes introduced this tension through an elastic back, but kept stiffness in the front of the bra. My second prototype (middle) tested targeted stiffness. It demonstrated that targeted stiffness won't work by itself, as leaving other areas bare will encourage movement to those areas.

The third prototype (right) was created to see how an incredibly thin and light material like Nylon would perform, given that it still met our requirements for stiffness. The bra fit well, and was more supportive than the first prototype, however it also showed that the shape of the cups needed to be redesigned. I had been designing the bra to match measurements and shape of someone in an everyday bra, so despite the added tension from having an elastic back, the cup shape was still encouraging the breasts to hang in a more "natural" and less supported way. Instead of designing cups to meet this natural breast shape, cups needed to be designed to meet the ideal breast shape under tension.

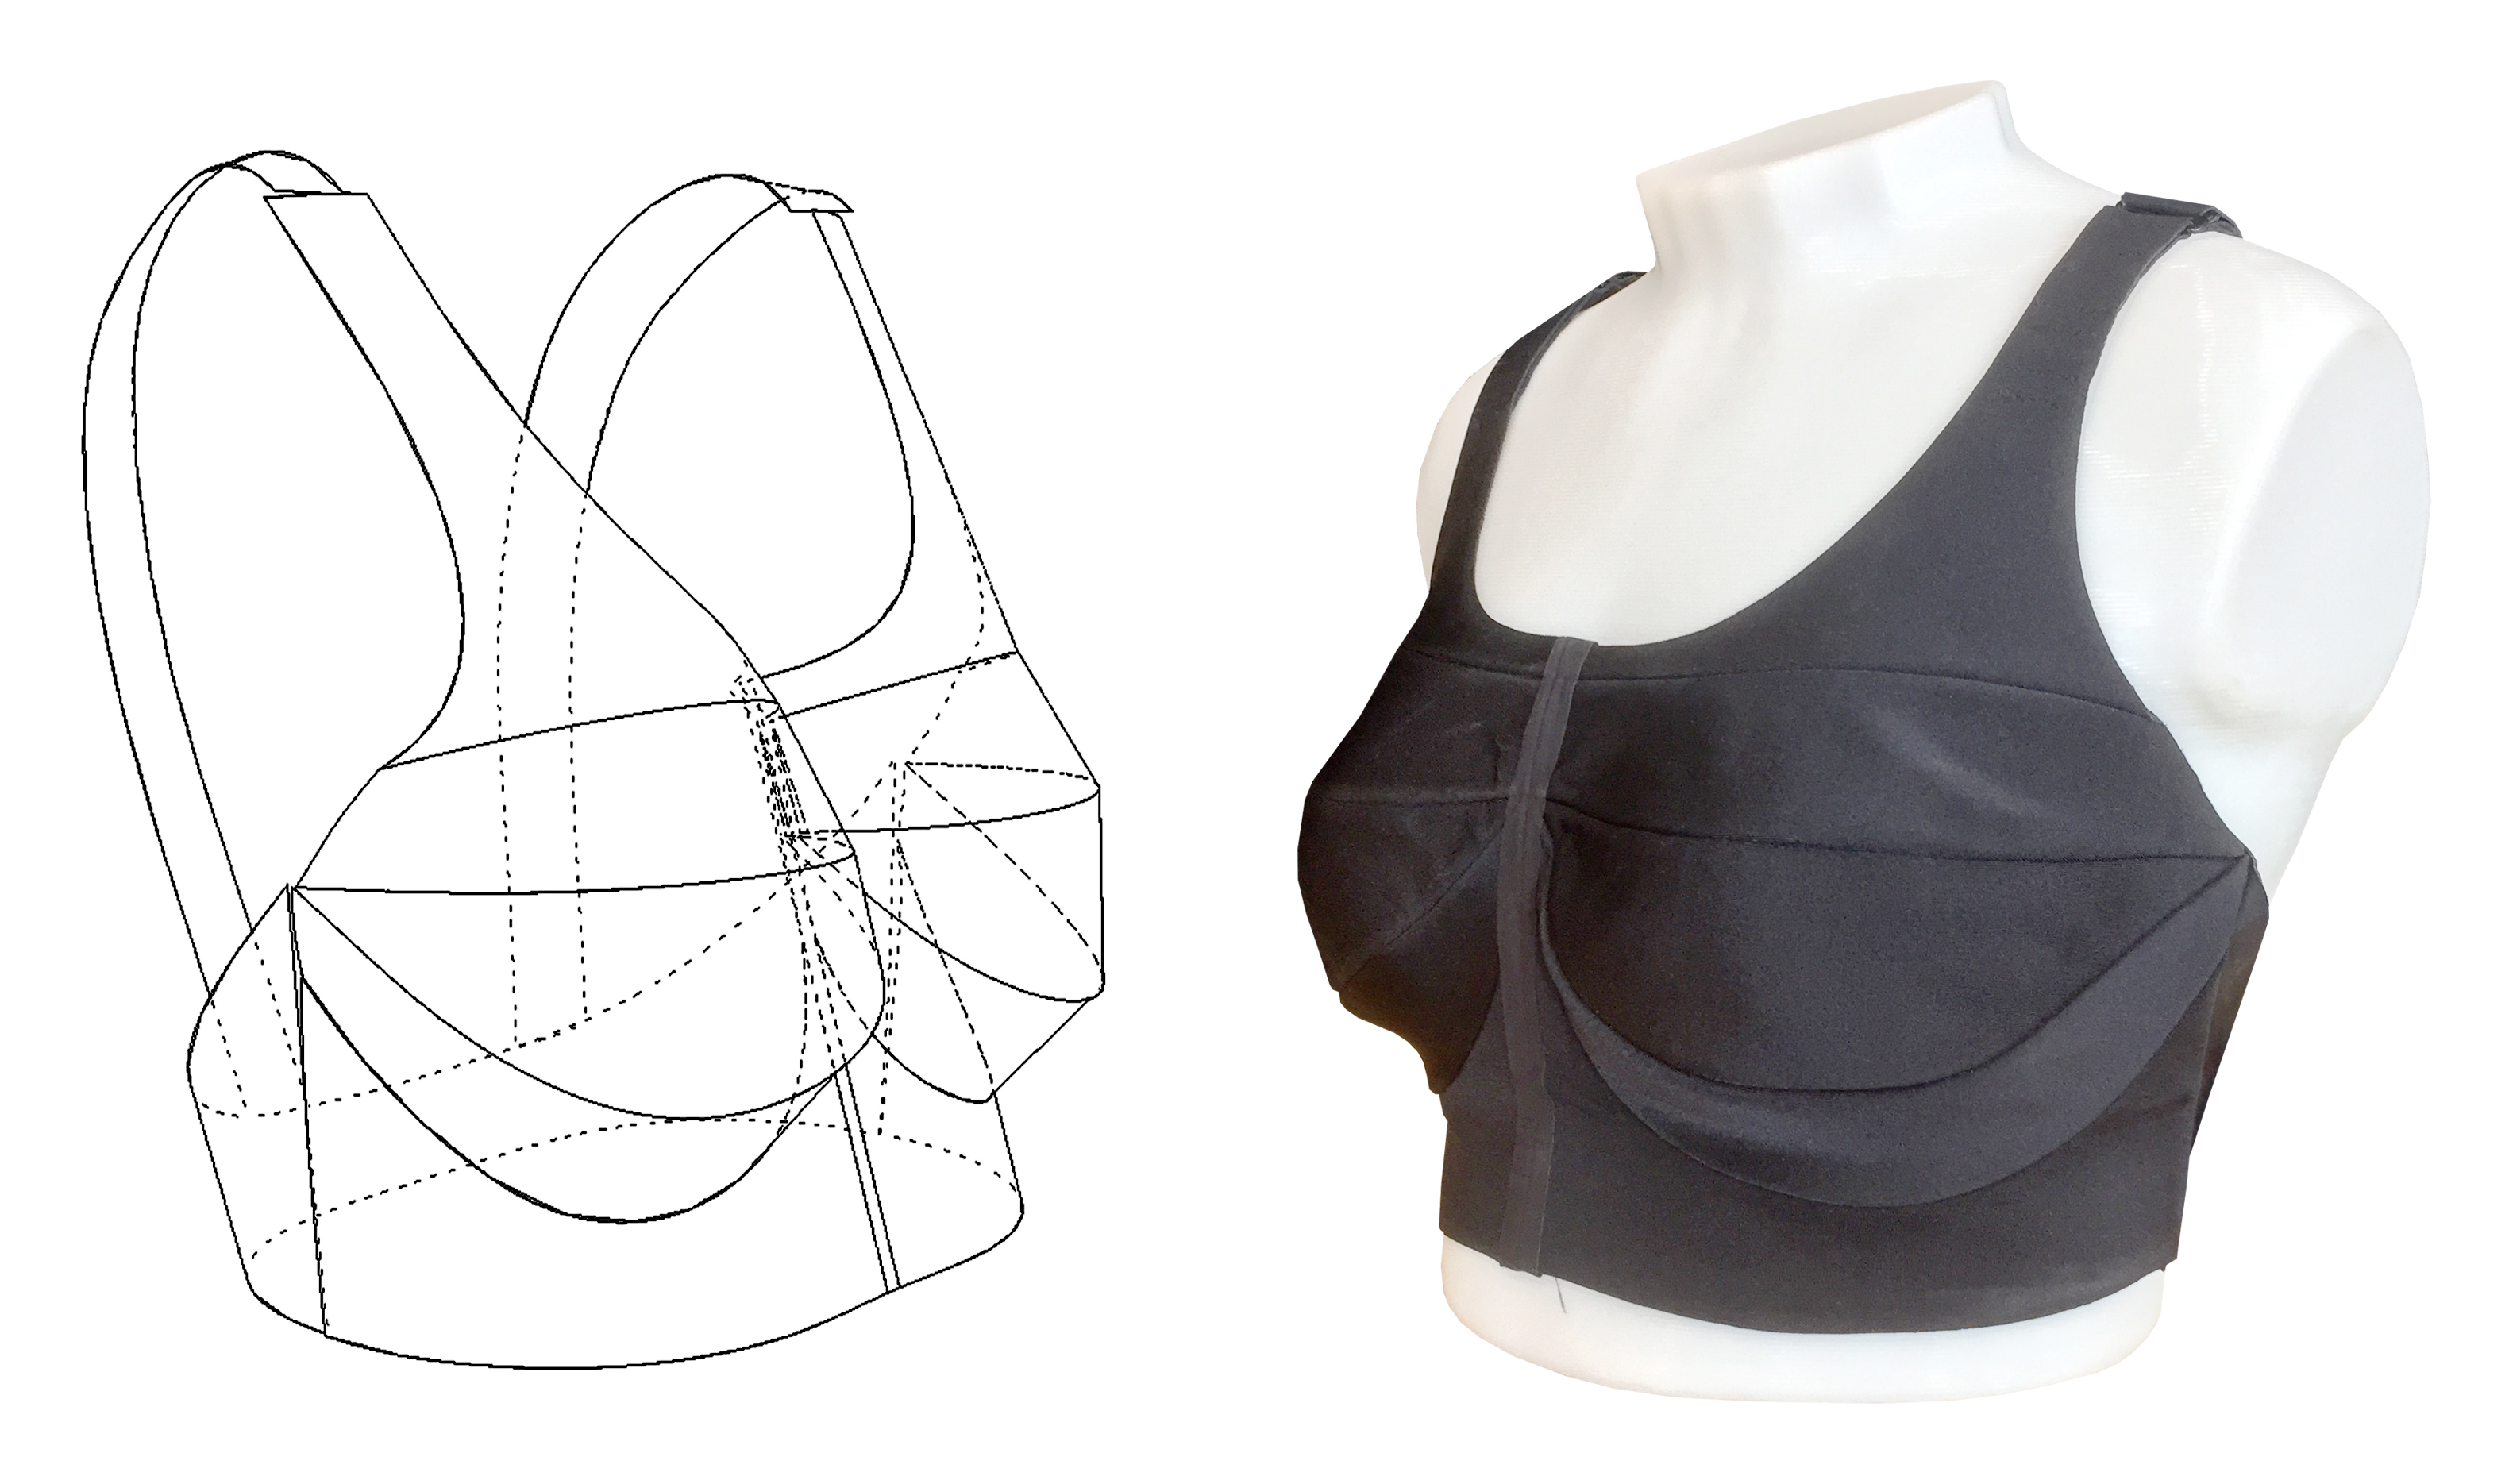
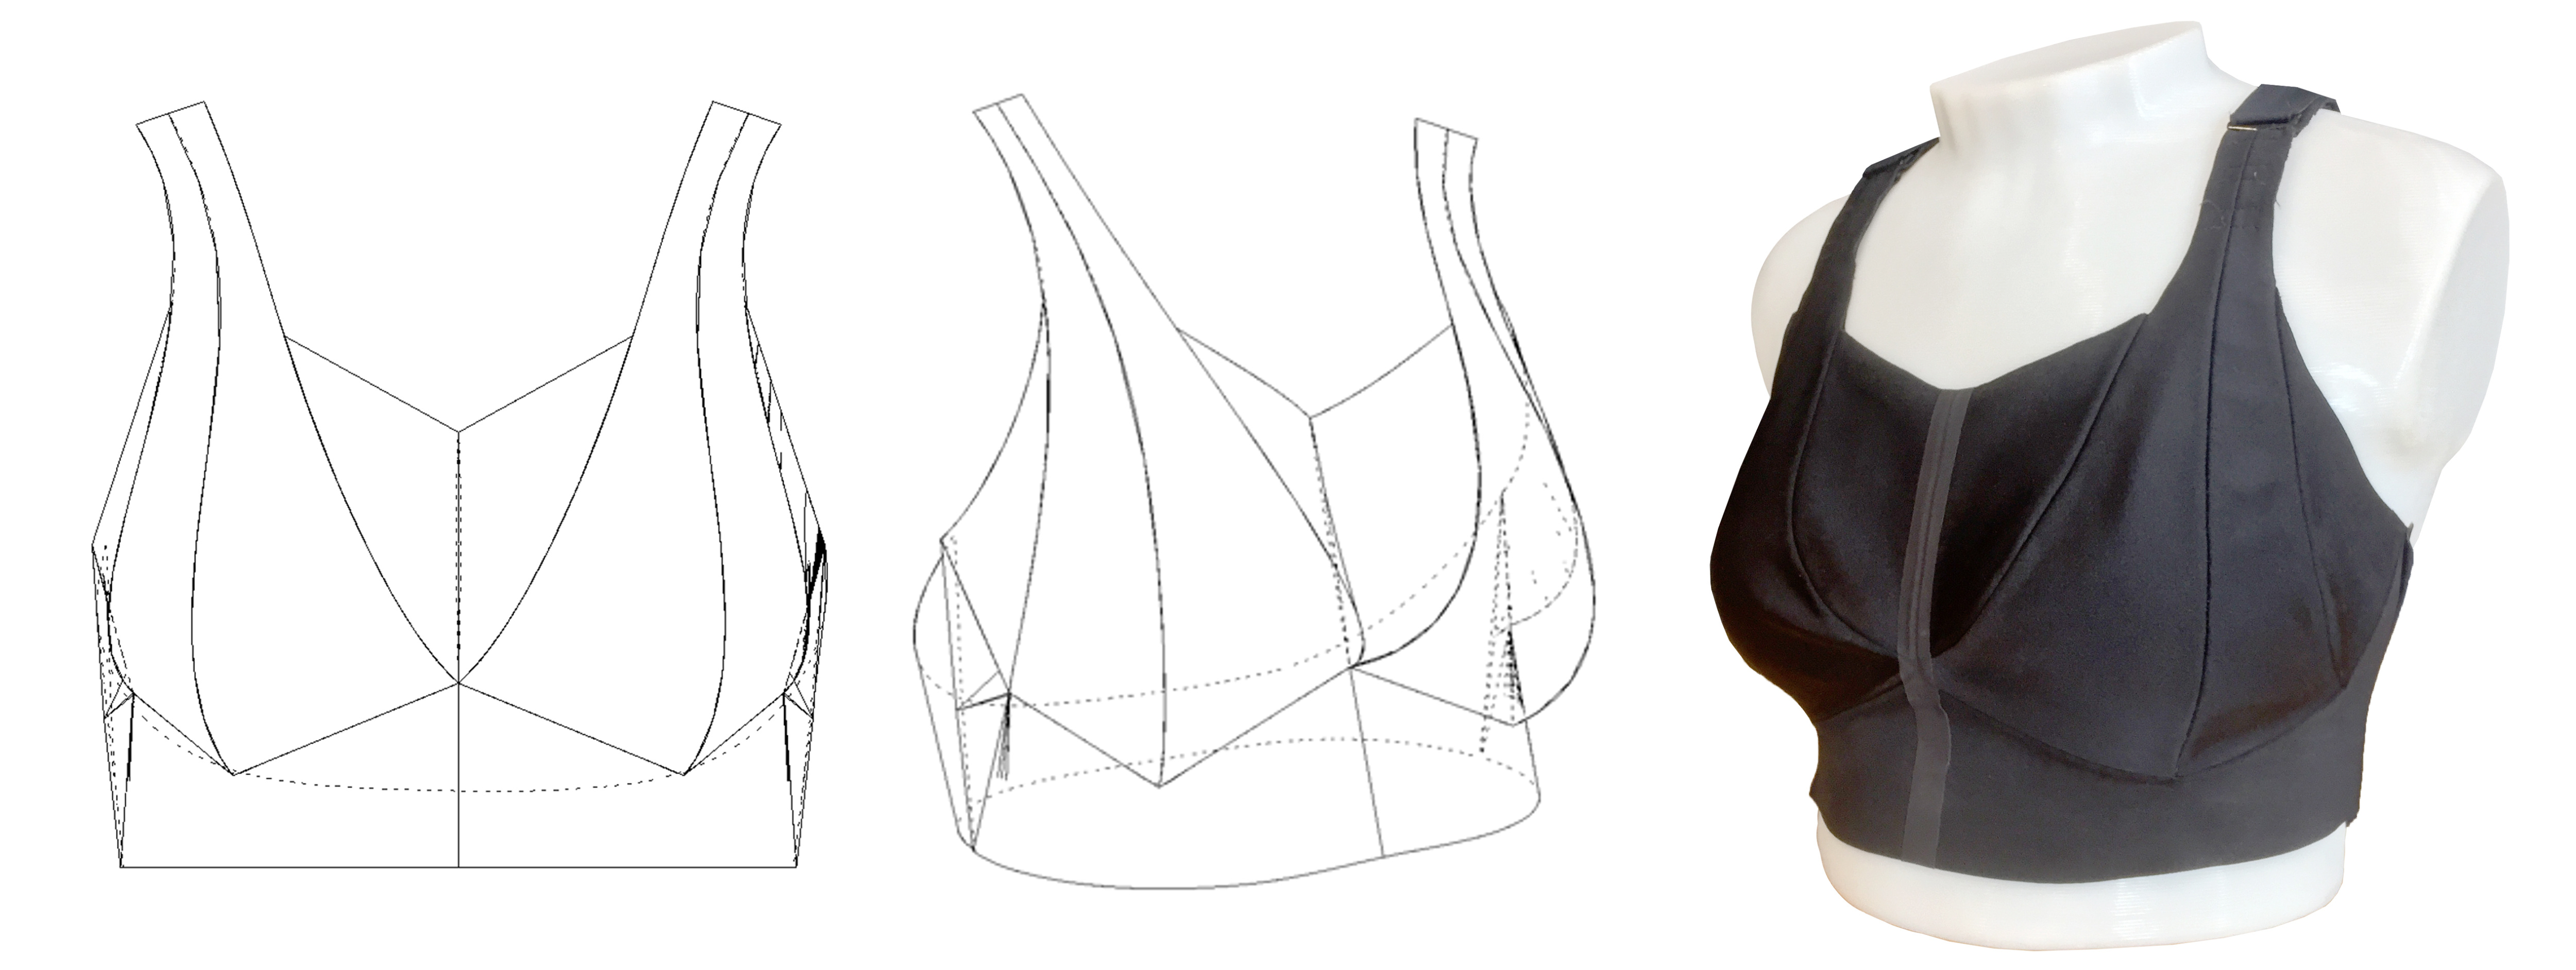
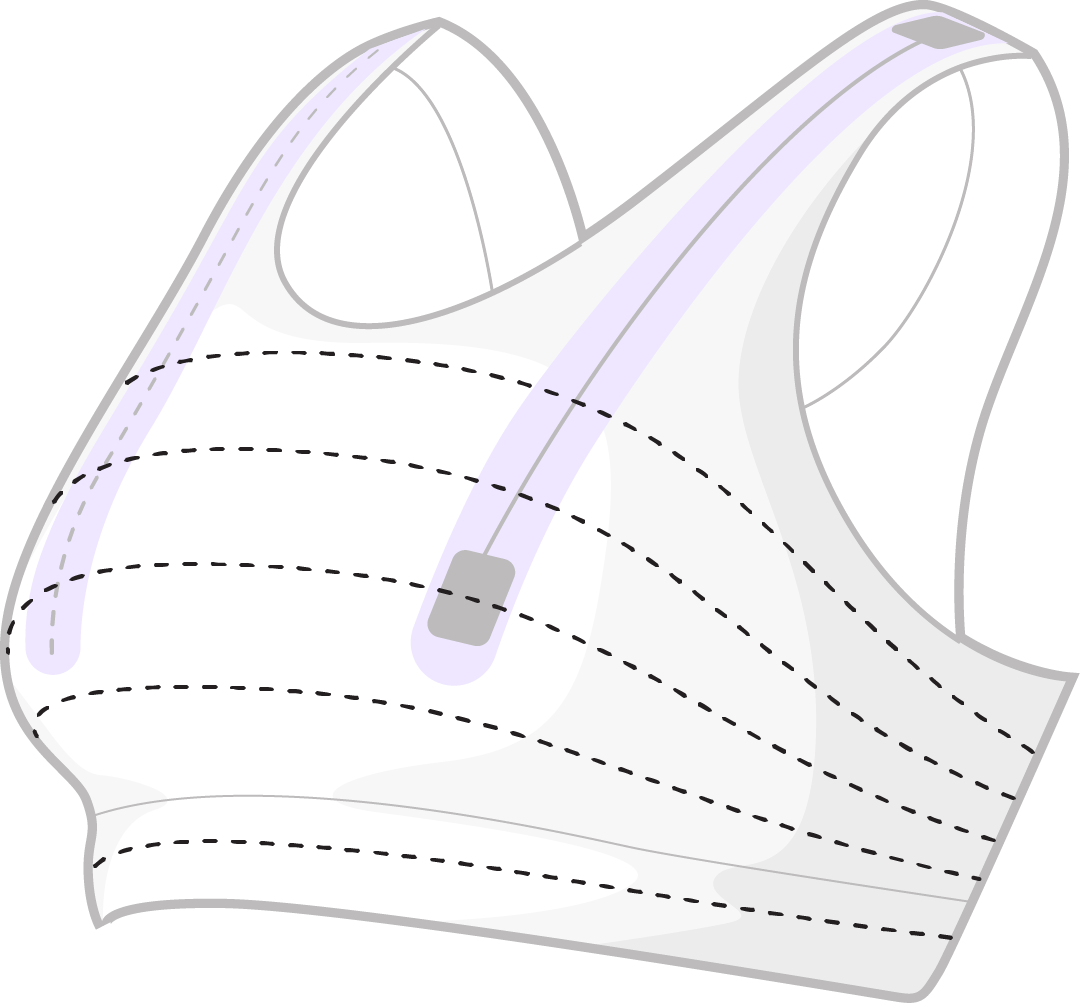
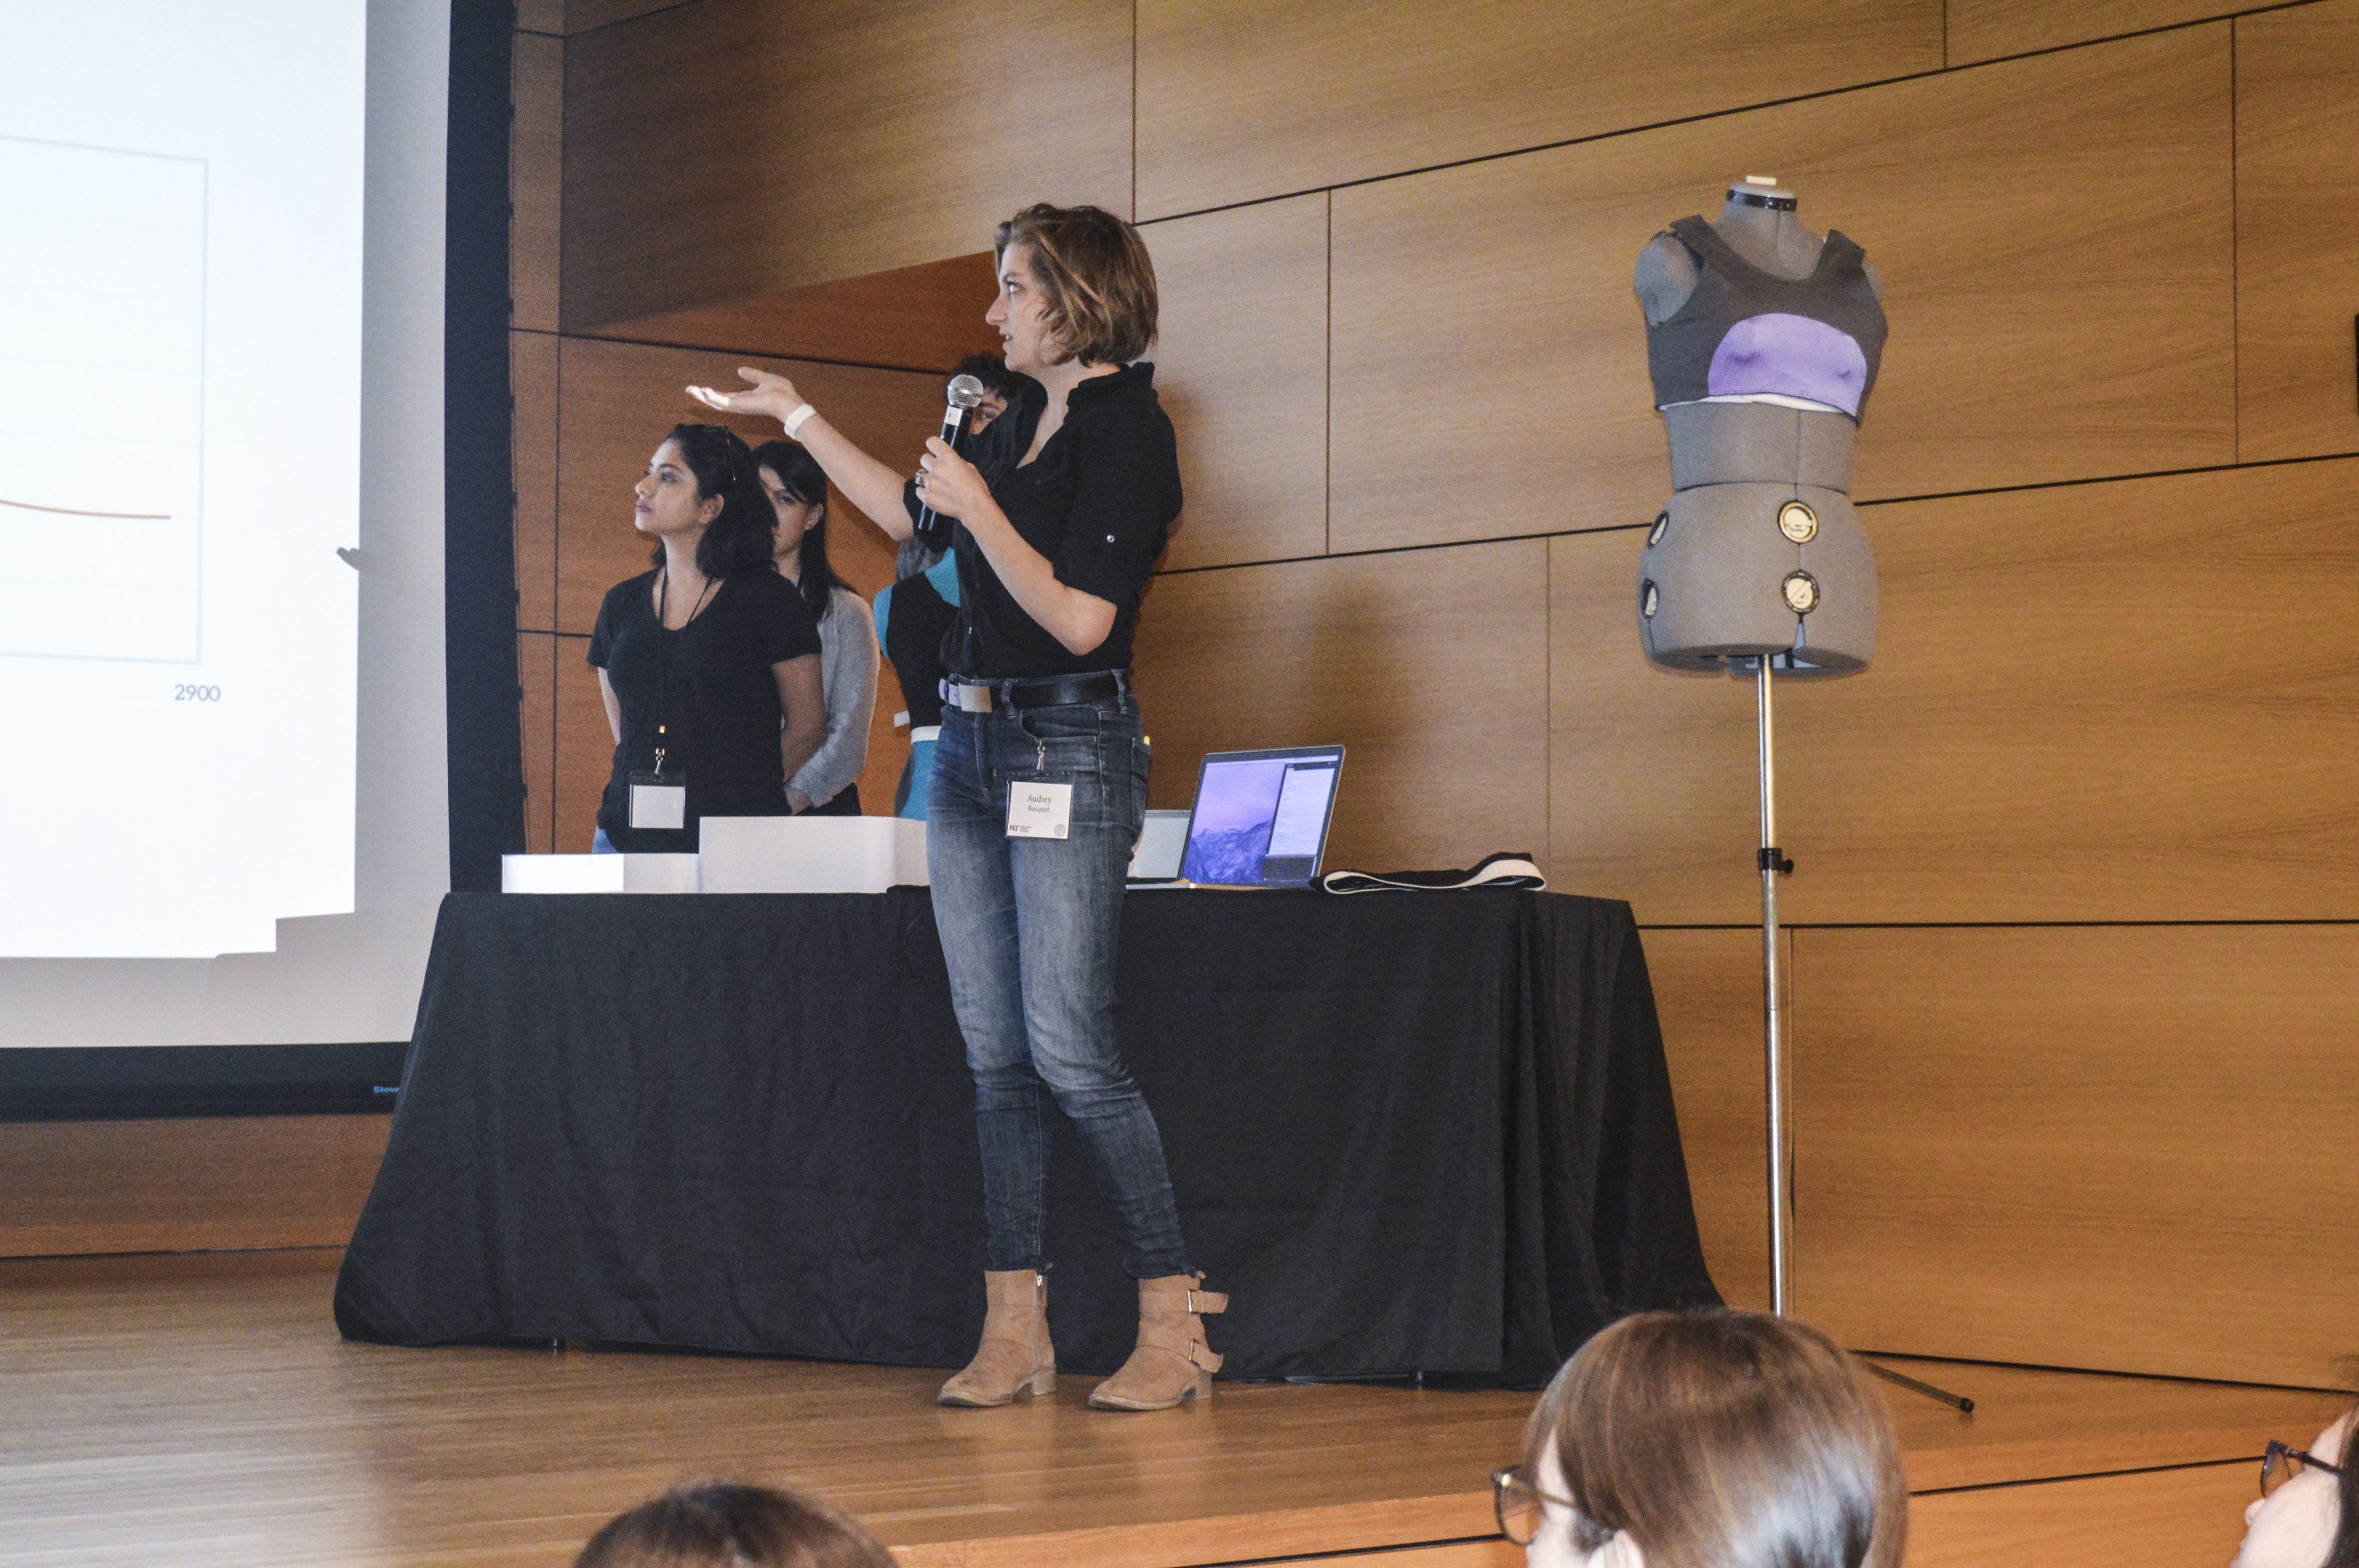
Final Prototypes and Testing:

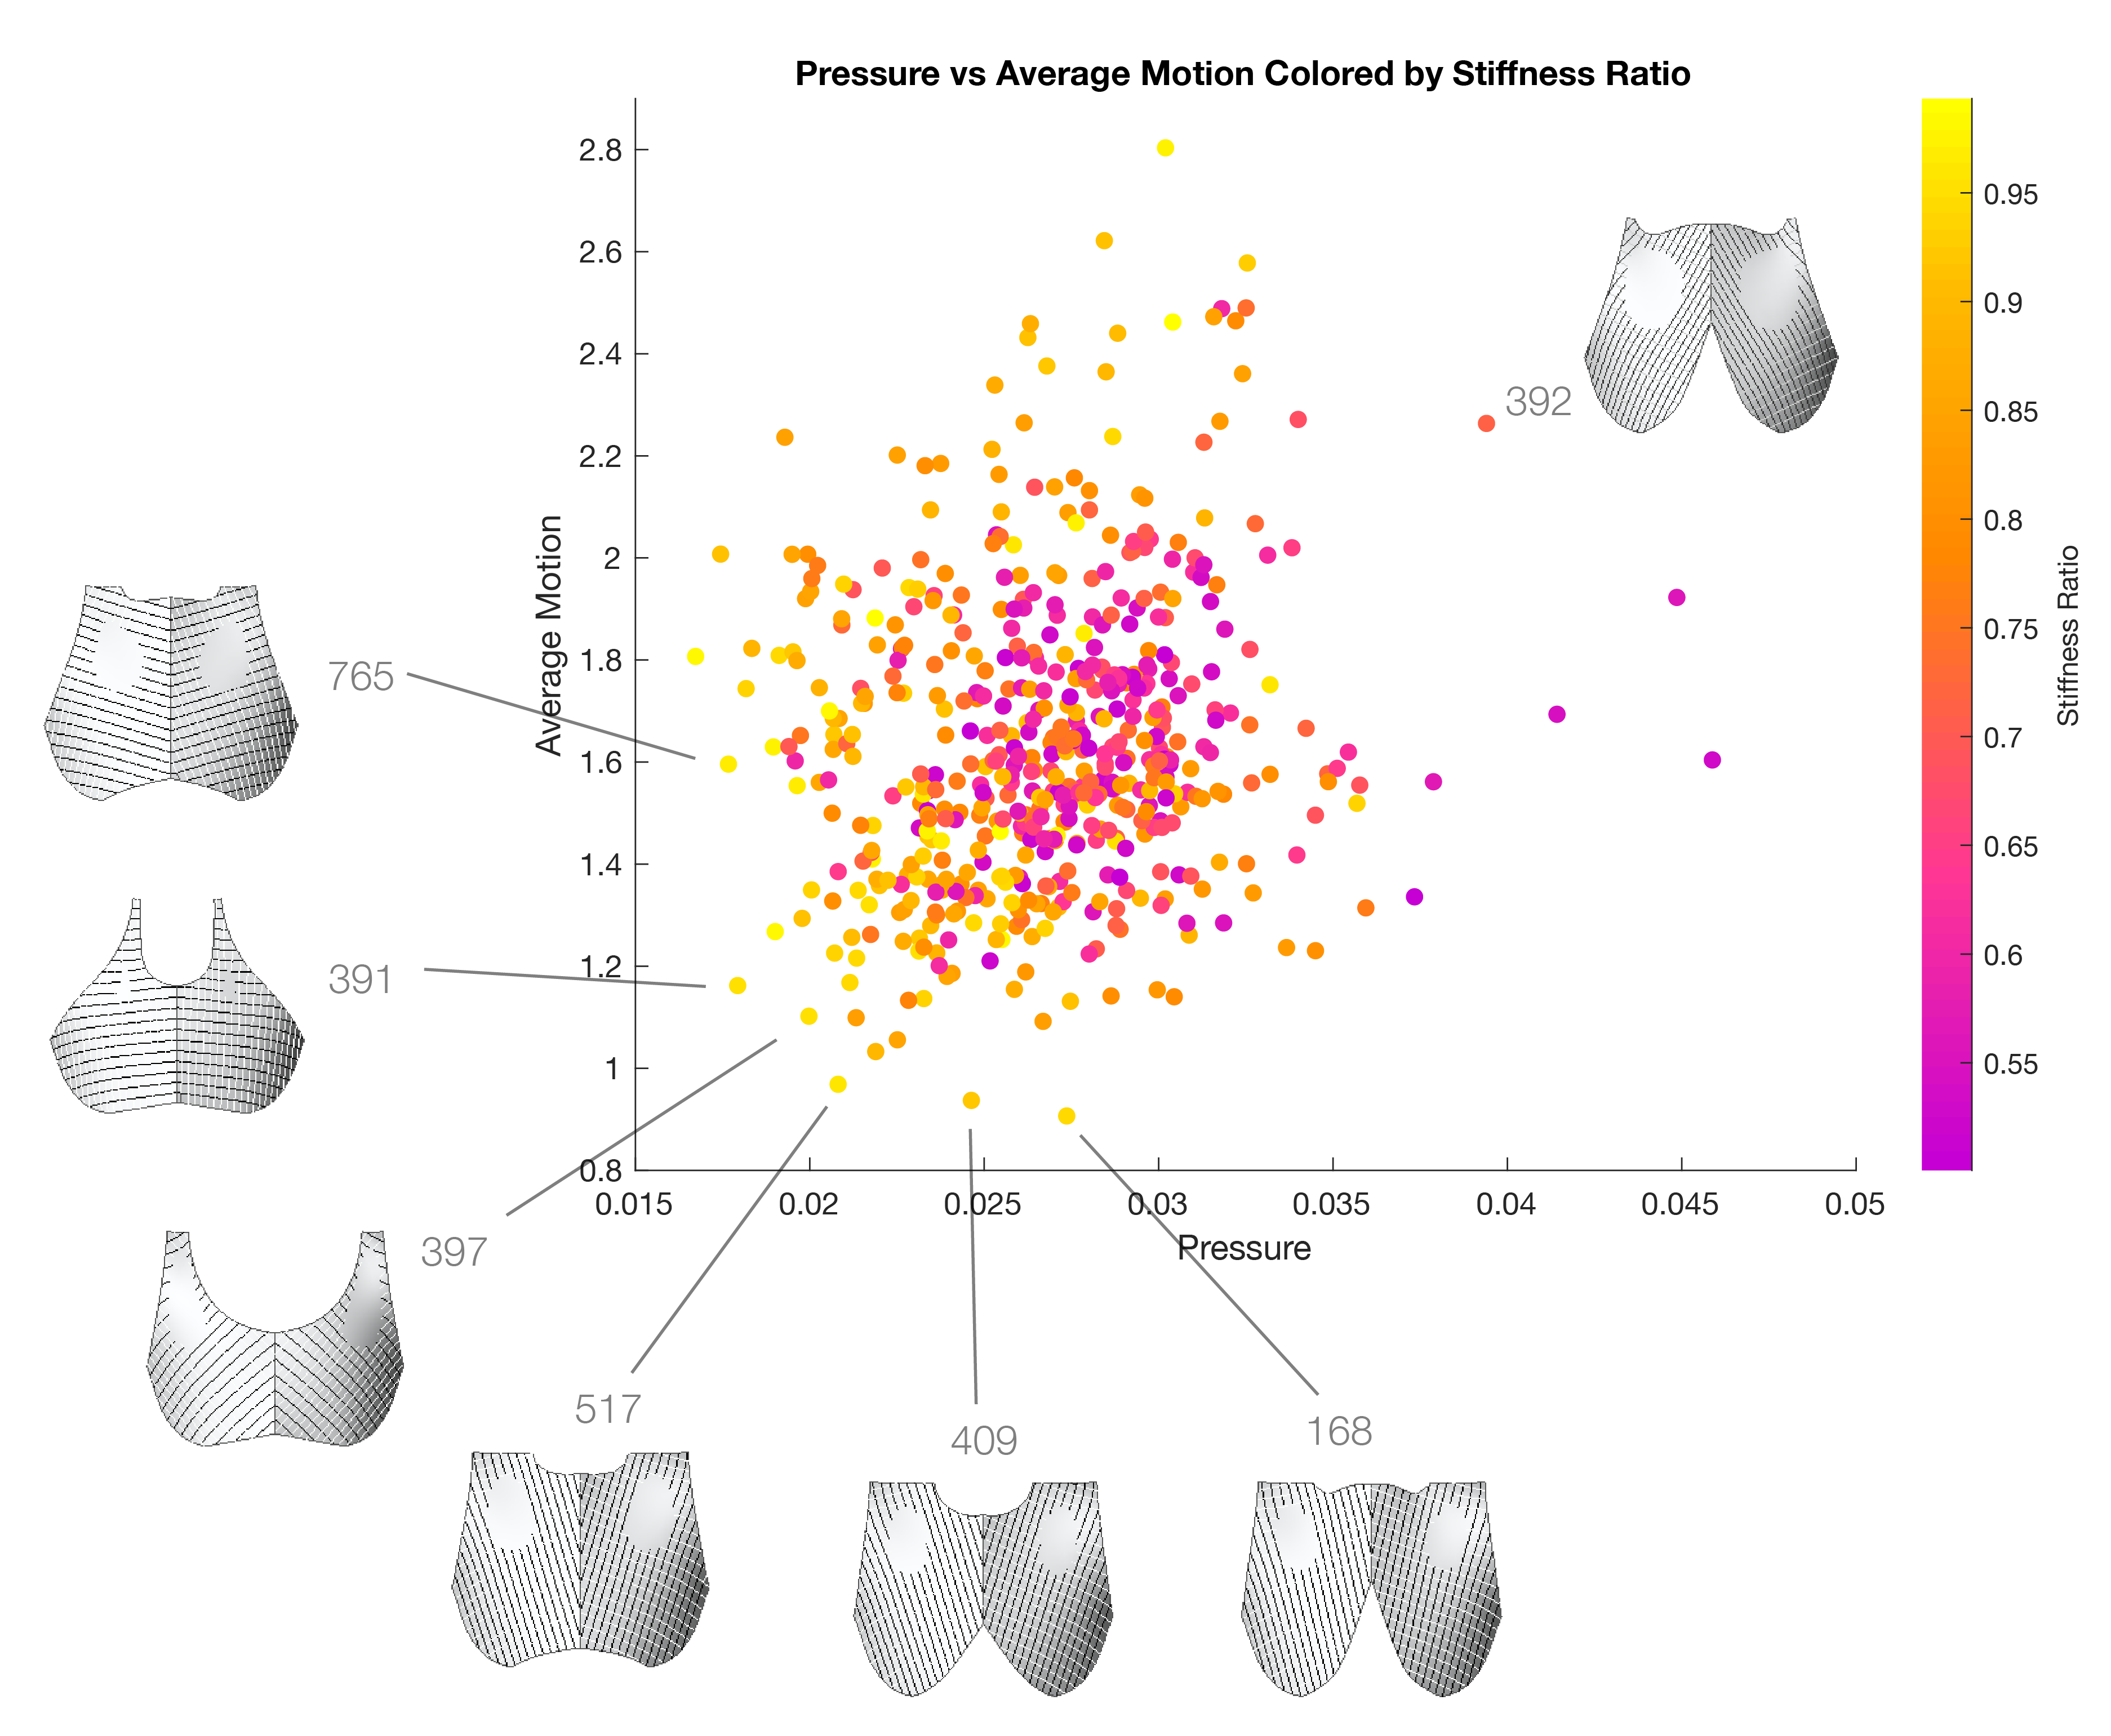
Taking into account my learnings from the three initial prototypes, I designed and fabricated two final prototypes (see below). The prototypes were identical, with the exception of the directional paneling being either horizontal or vertical. The straps in the prototypes were designed with multiple attachment points in order to allow for measurable adjustments in strap tightness. The prototypes were made by laser cutting the pieces, sewing them together using a flat stitch machine, and adding heat bonded trim to seams for comfort. The elastic backs for these bras were made of two layers of spandex, heat bonded together, for a technical feel and stronger performance.


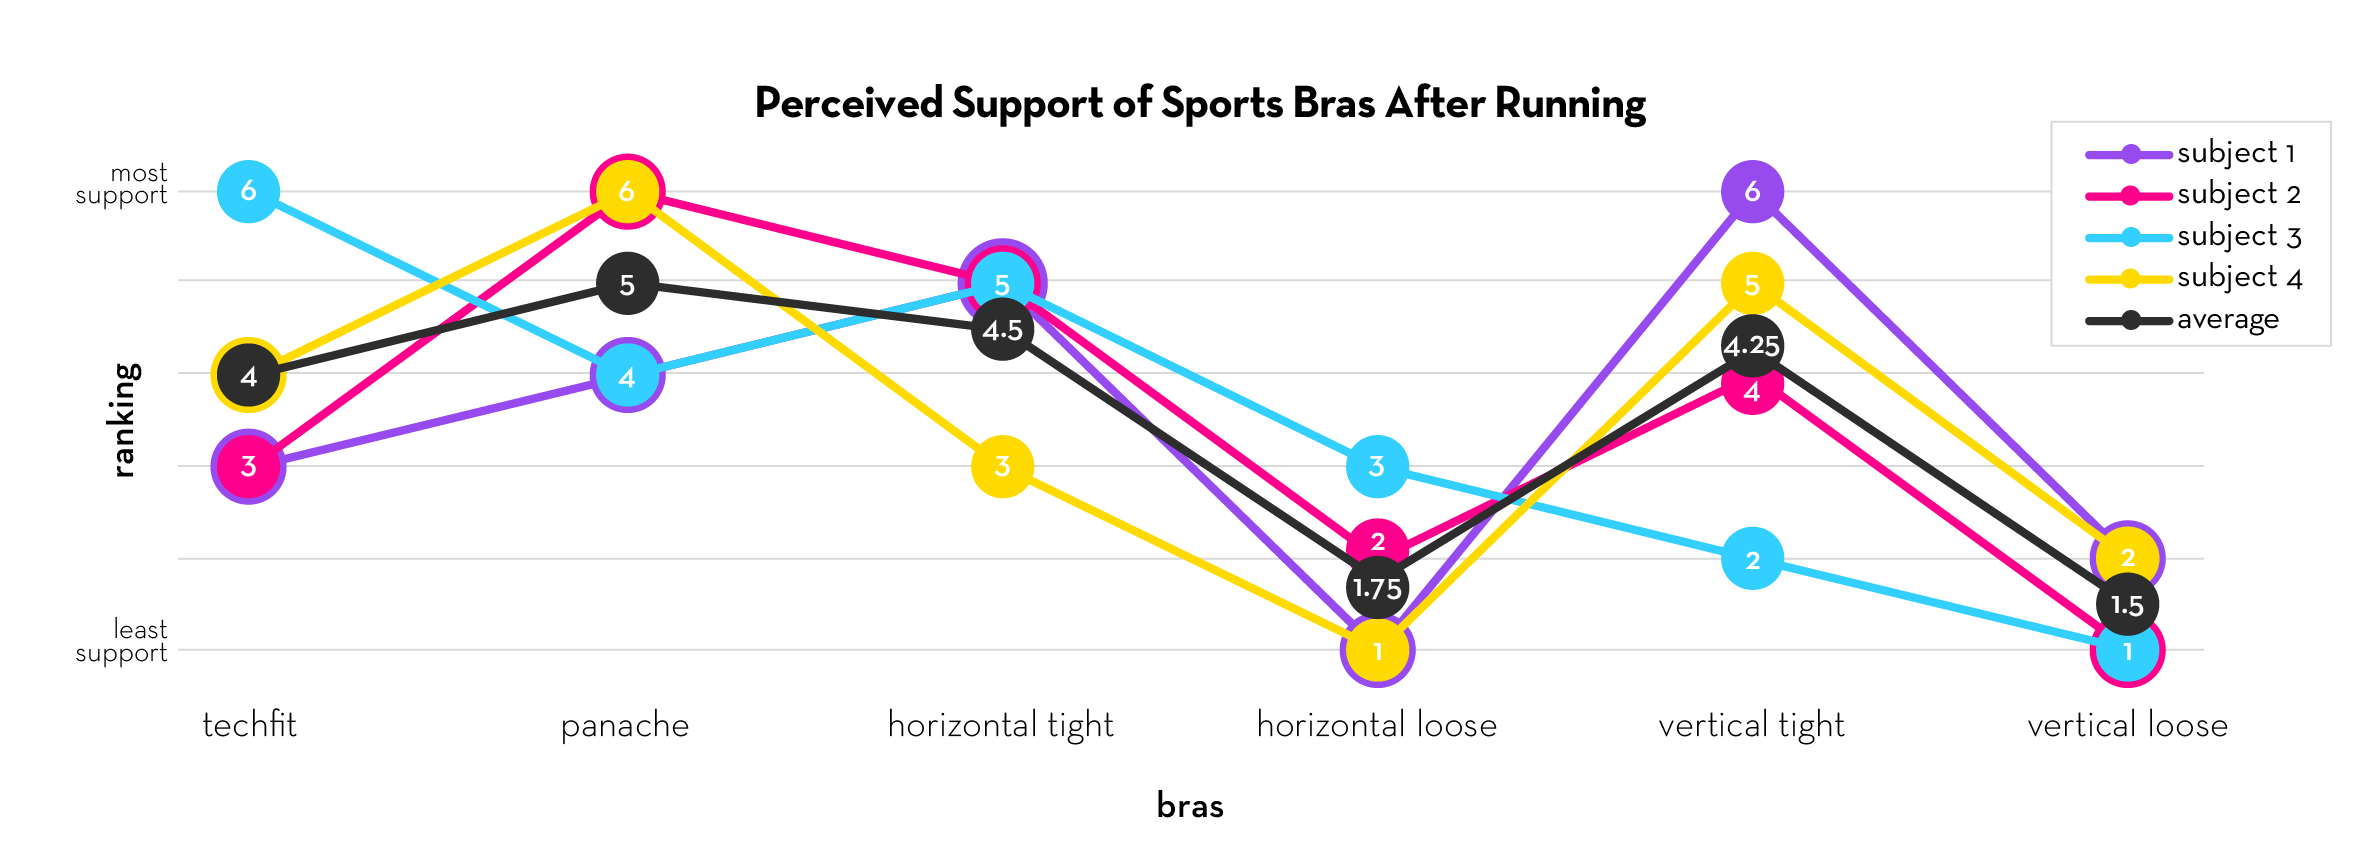
In order to get more empirical data on the role played by stiffness and tension in bras, I performed kinematic testing on these prototypes as well as industry standard bras: the adidas Techfit - a standard compression (stretchy) bra, and the Panache Underwire Sports Bra - a standard encapsulated (molded) bra. Four subjects were tested while running on a treadmill in each bra.

Although motion data was collected using a magnetic marker system, the results from that data were inconsistent and I was unable to make any conclusions from it. However, I also collected perception feedback from testers throughout the test using a survey and interview questions. Based on these answers, we saw that all testers perceived the bra prototypes are more supportive when they were adjusted to a tighter setting in the strap.


Without accurate motion data, it's hard to be conclusive about how these prototypes affected breast motion during exercise. However, it's incredibly promising that these prototypes, made by an amateur seamstress (me), could be tested alongside real sports bras, and be so positively received.

Rho Measurement Bra


Left to right: Sam Zaref, Kanika Kumar, Laurel Marcus, Me, Dan Barnes, Jennifer Beem

For MIT's graduate Product Development class 2.739, I worked on a team of 6 - 2 Mechanical Engineers (myself included), 2 Business Students, and 2 Designers from RISD - to conceptualize, design, and fabricate a breast density measurement bra.


(I made this diagram)


Right: First (bottom) and second (top) works like prototypes created by Jennifer and myself
Top left: a looks like prototype created by RISD students
Bottom left: Prototype of cast surrogates with different densities

I presented on some of the more technical aspects of our design during the final presentation:


And demonstrated our works like bra onstage:

Fast Assembly RC Car


2.810: Manufacturing Processes and Systems was a class in 2 parts:
Part one was learning about manufacturing, and part two was exercising that learning through a constrained manufacturing RC project, leading to a competitive race.

In this page, I'll cover the second part - designing, fabricating, assembling, and finally racing a fleet of RC cars! Here's our final result:


The car challenge has roughly the following constraints:
1) The team must make as many cars as there are team members
2) The car fleet must share one control + power hub, that will be swapped at each lap during the race
3) The chassis must be waterjet cut and fit within a prescribed footprint
4) The car must be enclosed in a thermoform shell
5) Wheel hubs will be injection molded, and wheels are limited in diameter
6) All motors and electrical components are provided and cannot be substituted
7) You may not exceed $20 of extra material spent per car.

Team B (after a crucial pre-race practice):
From left to right: Blake Cole, Aliza Khurram, Me, Michael Bell, Peter Godart, Sally Miller, William Sawyer

Our team (pictured above), was comprised of 7 Mechanical Engineering graduate students. From our first meeting, it was clear that we all had unique ambitions and exciting technologies that we wanted to contribute to our car, and we decided to throw caution to the wind and do them all.

These ambitions were:
A front decoupled suspension using spring steel flexures
A rear suspension through a spring loaded hinge for the rear drivetrain
Bowden cable steering, to allow for independent wheel suspension in the front wheels
Spring loaded "Cassette" control box design, for fast swapping between cars
A beautiful, well crafted, and carefully detailed 2 part thermoform shell design (my ambition)

Car shells made in previous years of the class were all designed as organic, rather blobby forms, and I wanted to create something wildly different.

Examples of previous thermoform molds from the class:


I set out to design a faceted shell with the goal of minimizing the number of necessary facets, while still achieving an exciting shape and working with the design of the chassis and control box. It should perhaps be noted that this project was in 2017, two years before the Tesla Cybertruck reveal.

Some sketches brainstorming early concepts for form:


An early iteration:

I created a quick foam and paper model to share with teammates and test fit:

It was quickly obvious from this model that it would make removal of the control box difficult, as the through hole was too small, and hard to fit one's hand into, so future iterations moved towards a larger front section of the shell.

Final Iteration:


Video of milling the thermoform mold:


Thermoforming:
Completed Fleet:

Avisly


Custom Heat Therapy Masks


Avisly is a therapeutic heating face mask for people with trigeminal neuralgia(TNG) - a condition which causes chronic and / or acute pain in areas of the face. I started this project because my mother, Mia, developed trigeminal neuralgia, and was faced with no existing medical resources to help her manage her pain without relying on mind-numbing painkillers.

Being an engineer herself, by the time I started this project Mia had already created many of her own solutions: 


Because of the chronic nature of TNG pain, Mia needs to wear a mask for large parts of the day, meaning she is often wearing one in public. The masks sometimes make her a target for unwanted glares or social discomfort.

My goal with Avisly was to make a mask that would be almost invisible.


Using 3D scanning and CNC milling, I created a custom mold on which to thermoform masks, which allowed us to use clear materials (PETG). I used cuprothal wire as a heating element and secured it by thermoforming a second time over the wires.

Milling out the mold:

After a lot of sanding, priming, and sanding and priming again, the mold was ready for thermoforming:


Beyond the custom mask and its integrated heating coil, Avisly also needed a system for powering and controlling the heat output of the coils. I designed a battery pack that could easily and comfortably be slipped in a pocket (or as Mia suggested in a bra), as well as an over-ear plastic enclosure to protect the fragile interface where heating wires exit the plastic mask and are connected to power:


Future Ideation:


After completing the latest iteration of Avisly and seeing how thin heating wires could be, I imagined being able to integrate heating wire into garments, and created these marker renderins of a glove, scarf, and back brace:


Previous Generation:


If you’re curious to see how much the masks improved over time, here are some images of an earlier stage of development, where the heating wires were much thicker, and the mask less defined:

Topographic Release Posters


For each new major feature release of Studio, I designed a new poster. Since our releases were named after significant mountains (in size or in personal meaning), and as I have a soft spot for maps, I landed on this topographic design scheme. The first three posters were created using a program called QGIS-LTR to extract contour data from real locations, then processed in Rhino 3D and Illustrator. The fourth mountain being a fictional place (a volcano in Hyrule from the Zelda game series) meant finding a suitable stl online and generating contours myself. Each poster also contains artwork to reference the new features and major changes that came with the release.


MIT Sports Summit Branding


I was in charge of creating new design, branding, and some marketing for the MIT Sports Summit Conference in Fall 2019.


Me with the banners I designed (photo from the event when I handed my camera to a friend):


I started by designing a new logo:


and then designed email invitations (through mailchimp):


I made posters to put around campus:


I made the name badges in inDesign, so that they could be generated from a spreadsheet:

And designed the programs in inDesign:


Also made for the event, but not pictured here: campus-wide digital display ad, teaser posters before full sized posters, invite graphic for alumni event, gobos for event projections, event presentation template, resume book cover.

I was also photographer for the event!

Illustrated Environments


This year (in 2020) the theme was:

kindness


As a long-time collaborator on the product design class at MIT that is 2.009 (and in pandemic times - 2.s009), I was invited to help create the animation that would kick off the class's final presentations. My role for this animation was to provide illustrations to be used as backgrounds, specifically for the second half (starting at 59s). I was asked to help imagine and create a futuristic “kindtopia” landscape merged with MIT’s campus, to be shown in a night-time setting.

And here's the result!

Music for this video was composed and performed by the very talented Sam Watkinson.

The animators responsible for the story, the first 59 seconds, and characters and motion for the entire animation are Or Oppenheimer and Marwa AlAlawi.


To see them in more detail, here are some of my favorite backgrounds that I made for this animation:

I was also responsible for coming up with a design for a "firework hauling futuristic vehicle". Although I had other concepts, we went forward with the more humorous firework-shaped hover truck:

Final illustration of the truck:


Isometric Animals


In Toy Product Design at MIT, students are organized into 16 teams, each with a unique animal. While I was a TA for Toy Product Design in 2017, I designed playful isometric representations of each animal:


Most of the animals were developed through sketches in my notebook (and there were a few non-animals as well):


I also used the animals indesigning the "play"-sentations poster to invite community members to the class' final presentations:


In addition to being on our signage, the animals were plotted and mounted to foam core to be used as table markers for students and audience members to find each team after the event:

Super Graphics


The Class Theme:


Every year, the capstone product design class at MIT presents a new theme, meant to inspire students as they brainstorm ideas for new products. In 2017, the theme was:

SUPER!


I created graphics along this theme, to be used throughout the class. An important factor in this project is that the class is always divided into 8 teams, each represented by a unique color:

Red, Orange, Yellow, Green, Blue, Purple, Pink, and Silver.

My first step was to do some research on superheroes and superpowers. I put together this association chart to help the staff and students define "super" and to encourage diversity in their brainstorming:


Visual Theme & Product Man:


I decided to embody the "super" theme for teams by assigning each team a shape, which could later be represented as shields with emblems:


The mosaic containing these shields was also used as a cape for our new super-hero character "Product Man" (aka, Professor David Wallace). Here is James modeling the cape when it was first sewn (by talented co-TA Georgia Van De Zande):


The real Product Man:
My sketch of Product Man:


Sub-Theme Emblems:


Several weeks into the semester, teams are assigned a subtheme based on the team's most promising proposed product ideas. In order to give teams as much time as possible to work with their sub-themes, the staff only have a few hours to decide on subthemes and create graphics for them.

I had started brainstorming potential subthemes and icons ahead of time and had some doodles ready in my notebook:


Later, I recorded my screen during this design session, so you can see how I went about making 7* new emblems in ~2.5 hours at ~50x speed:
*the 8th team emblem (for pink team) was designed by another talented artist, Chuck Xia.

The finished emblem designs and their associated superpowers:


The emblems would later be used on real shields by teams during the famed "build challenge," an obstacle-course like competition event that provides team-building and stress relief from recent design critiques:

Animated Rube Goldberg


Project inspired by Honda "Cog" commercial, attempts to realistically simulate and render Rube Goldberg Machine. Models are mostly sourced from GrabCAD, all animation and rendering completed by myself in Autodesk 3dsMax, using MassFX and MentalRay rendering.

Camera Animation and Rendering


Project focusing on camera animation and applying material bitmap. Models mostly sourced. Extra energy put towards walls and concrete floor materials to look natural and fit seamlessly. Assembled and rendered in Autodesk 3dsMax, using Radiosity.

Coming Together


Community Center Design


Project prompts the creation of a place for the community of Boston's North end to converge. It is placed between two brownstones and must provide facilities to improve the neighborhood.

This proposed design explores the effect of a steep, angled, negative space going through its core. The core is created to catch sunlight and rainwater, directing these through a normally dark site to give light and energy to an open-air ground floor. A wide range of uses (Cafe, Restaurant, Art Studio, Music rooms, Classroom, Conference rooms, and private “Escape” rooms) attracts users and invites them through each floor as they connect through a central elevator and circulation ramps. The core creates a division in each floor into two main spaces, giving way to a logical split program which benefits from the large, free spaces created.

Program moves from public to private as users experience commercial spaces first, then more intimate sharing spaces, and finally private rooms for meditation, communicating online, and exploring the history of the community.

PLANS:
(From top left to bottom right: Floors 1, 2, 3, and 5)


SECTION B:


SECTION A:


Built Model:


Perspective Inside and Atrium Views:

Connect


Parametrically Determined Space

This project is from my first year in architecture design and is about creating dynamic space abstracted from rule-based Processing drawings. The concept follows logic based on kinetic social networking, concluding in a proposal of a connective space surrounded by an inflated ambulatory corridor.

A 3D social network is simulated in Processing, variables include number of nodes, maximum distant of connection, degree of movement, and attraction. Nodes behave socially, making connections as they move through space and time, and flocking with their neighbors, although still acting independently. This creates a mesh of varying density and few outliers, showing that almost every node is connected.


The second stage of this project translates the 3D line drawings into a solidified, buildable mass. In this design, the mass is created by enveloping the line mesh so that the mass is defined by the dense areas of connections and the paths created between them. The created space is explored through the construction of a mold (size of a cubic foot), then it's use to create a plaster representation of the space.


Drawings anticipate the mold and plaster cast:


The solid space was also 3D printed:


The final stage sees the space become a social facility, employing an inflatable skin which responds to daylight. In its inflated state, the pocket in between the structure and its outer walls creates a secondary means of connection throughout the spaces. Areas where the mesh was most dense become larger public areas, and users are encouraged to create new social connections as they can ambulate through both the main space and the pocket space by day. The inflatable skin filters sunlight, providing heat and soft light throughout the spaces.


Normal and Inflated States:


Plan and Sections, showing use and connectivity:

Emergency Spa


This project prompted the creation of an emergency spa in Boston’s Fort Point neighborhood, serving the breadth of community members in need of physical or emotional healing. My design focuses on using space and experience to actively heal users.

Mood Models & Conceptual Exploration


Starting with many different generative design strategies for 3-dimensional shapes, the quality of space created was evaluated by 3D-printing the resulting designs. These were photographed and assessed for the resulting mood they evoked and inspired.


The aspect of mood-affecting spaces was further explored through sketches, inspired by the generated surfaces:


Ultimately, I chose to pursue the feeling of:

cavernous


Development of Program


Function Rooms


Section showing interior of building, and its relationship to the designated setting (Fort Point):


More sections and floorplans:


Rendering Final Spaces


Larrisa & Scott


May 2018


Alice & Rob


July, 2017


Squid Hat


The Problem:


As a toy product design instructor, it would be my job to introduce my student team at their final play-sensations, and all of the instructors were going to present dressed up as their team animal.

I was the instructor for squid team, and this squid costume wouldn’t do.

The Plan:


If I was going to be a squid, I was going to be an awesome squid.

I made a sketch of a costume that I thought would be a more true squid representation, with a lot more dignity.


I cut rough sections of blue foam and glued them together around an extra hard hat we had on hand
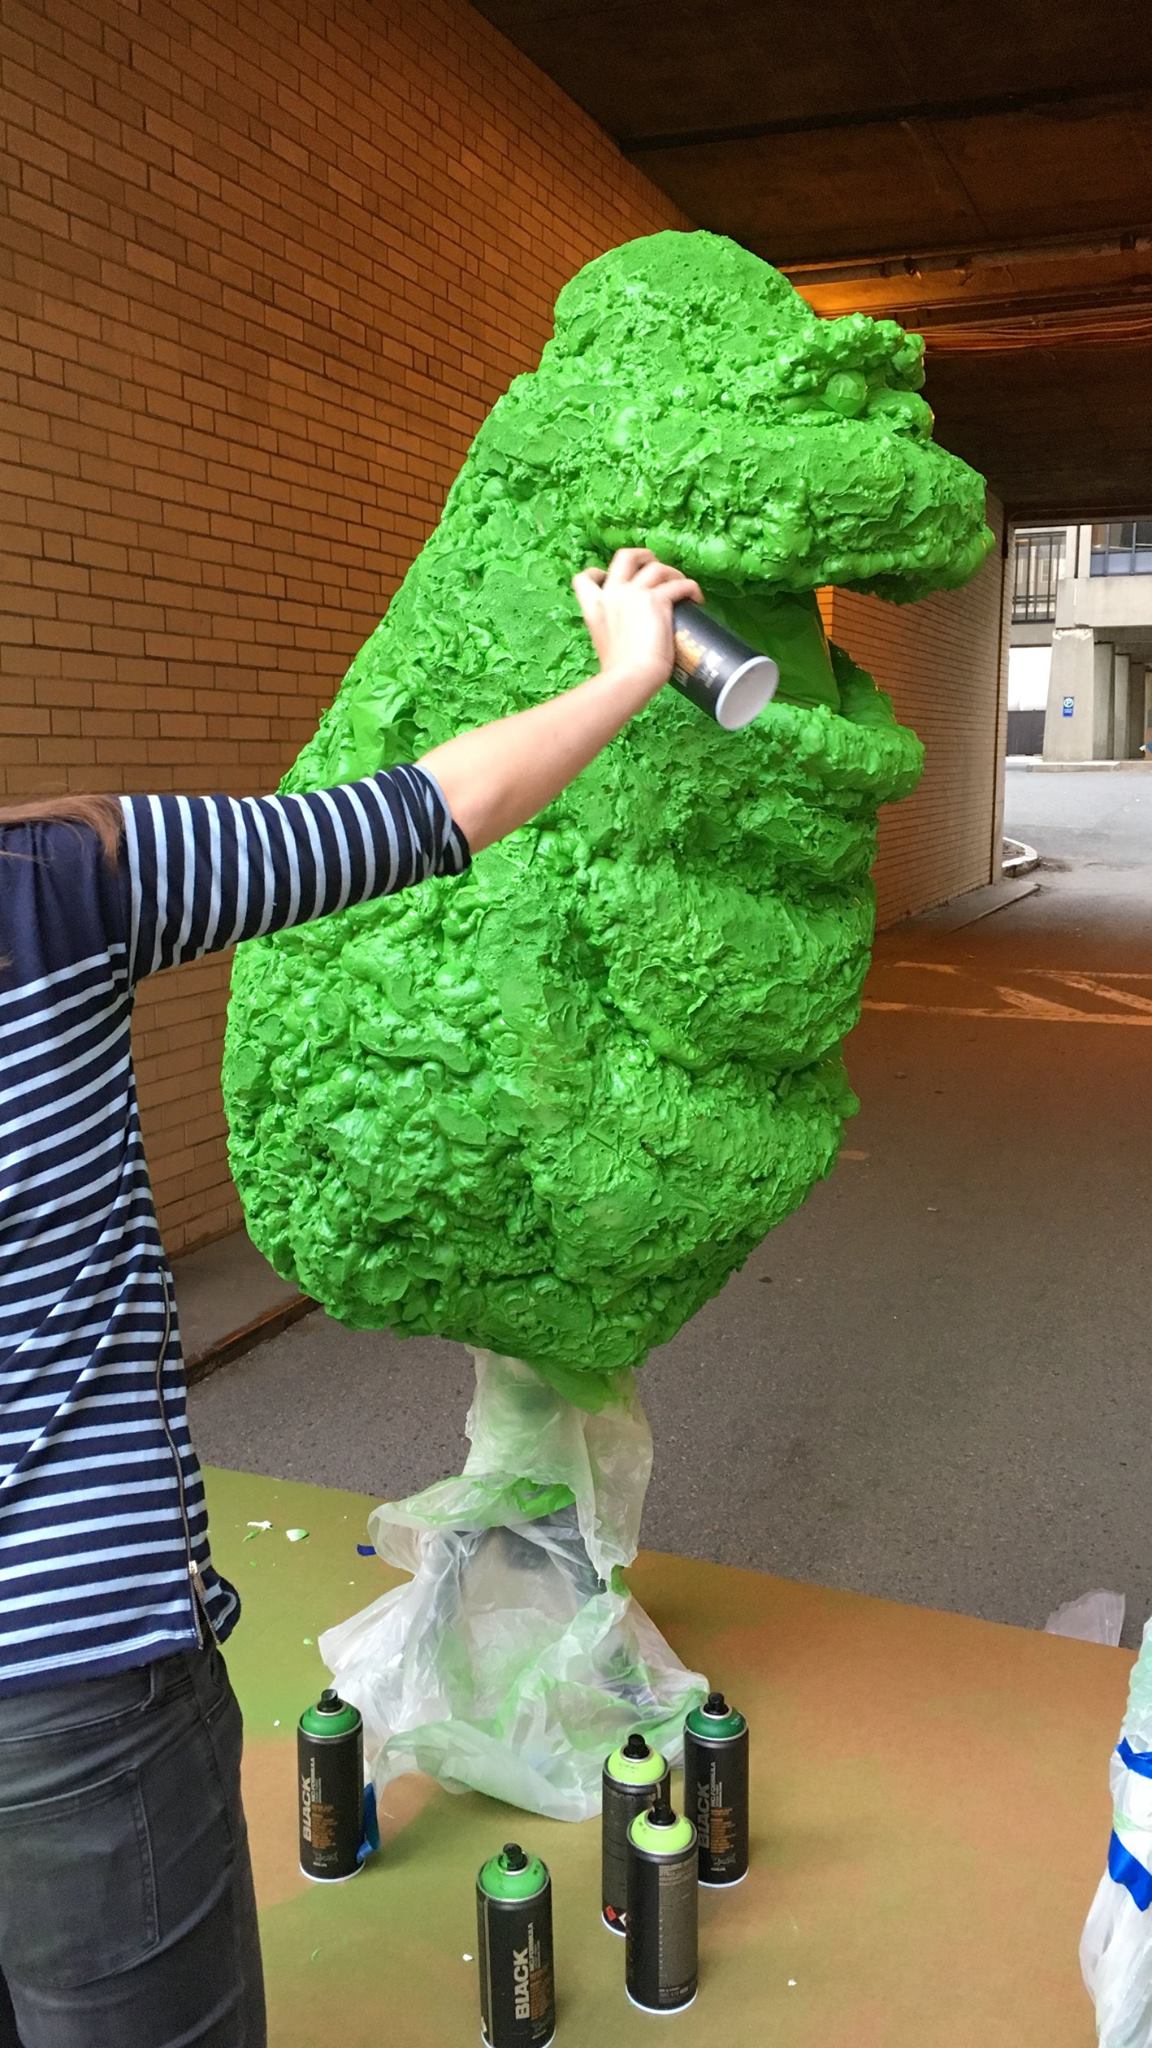
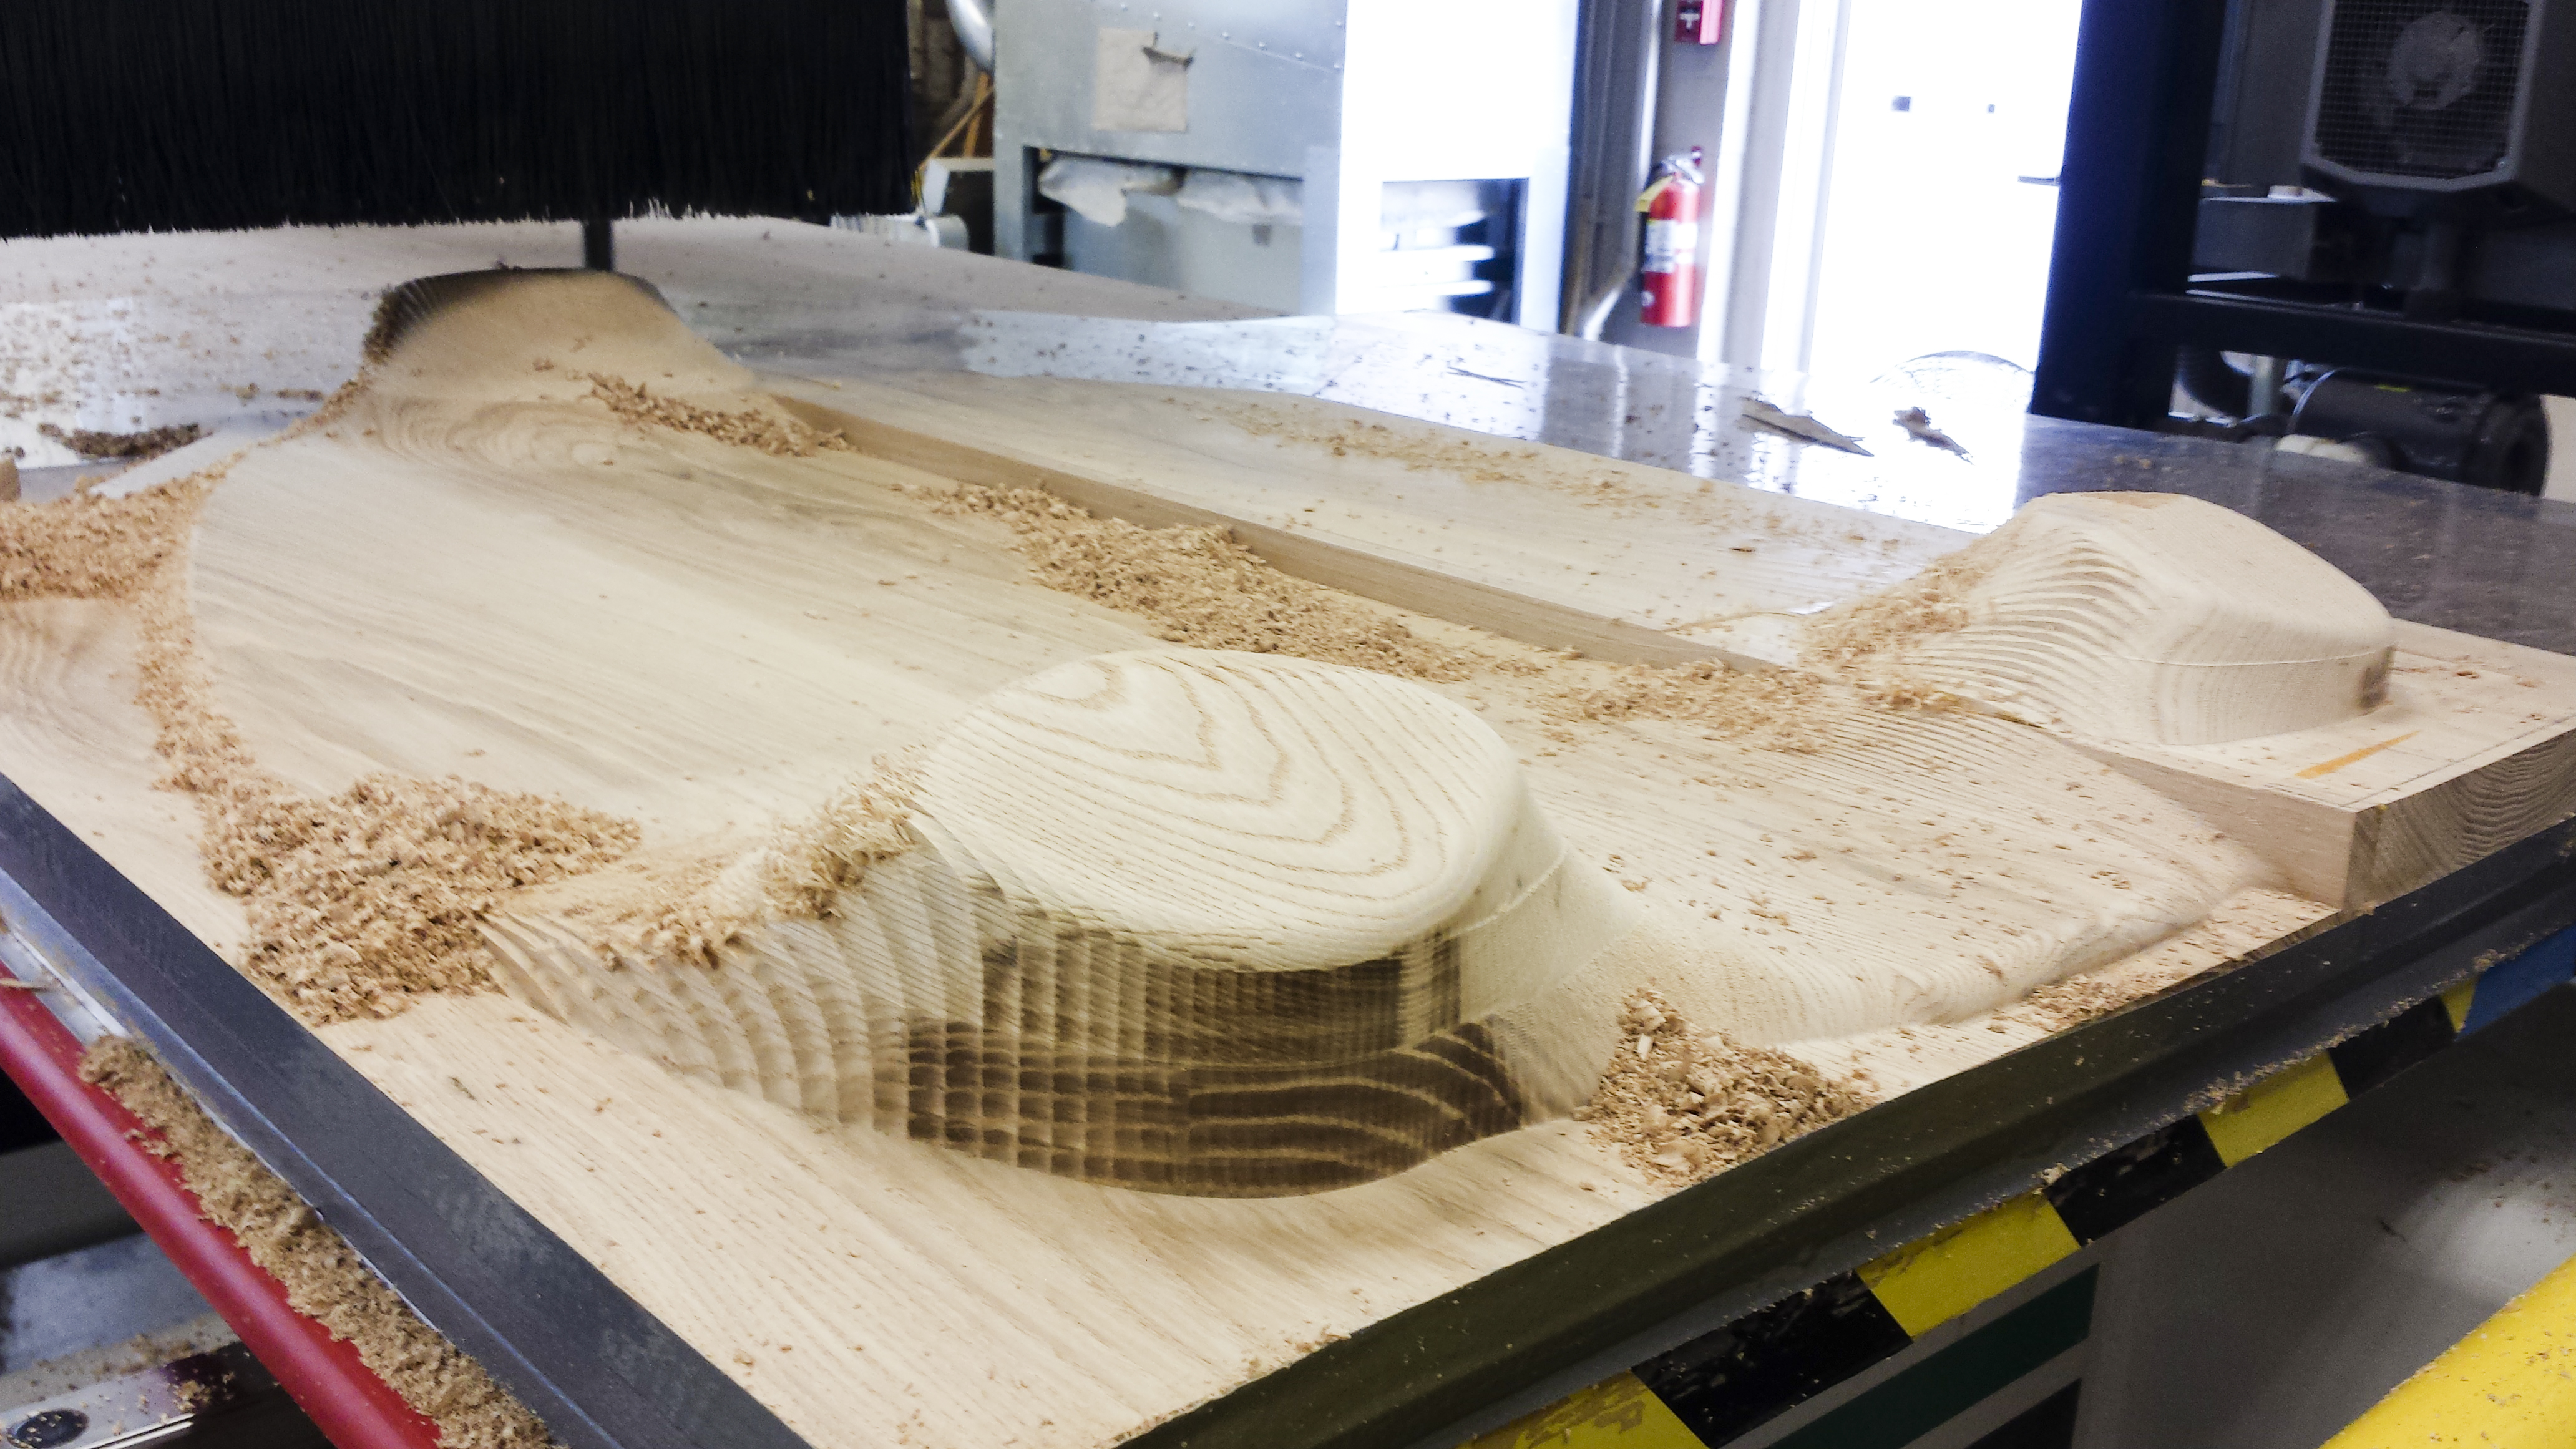
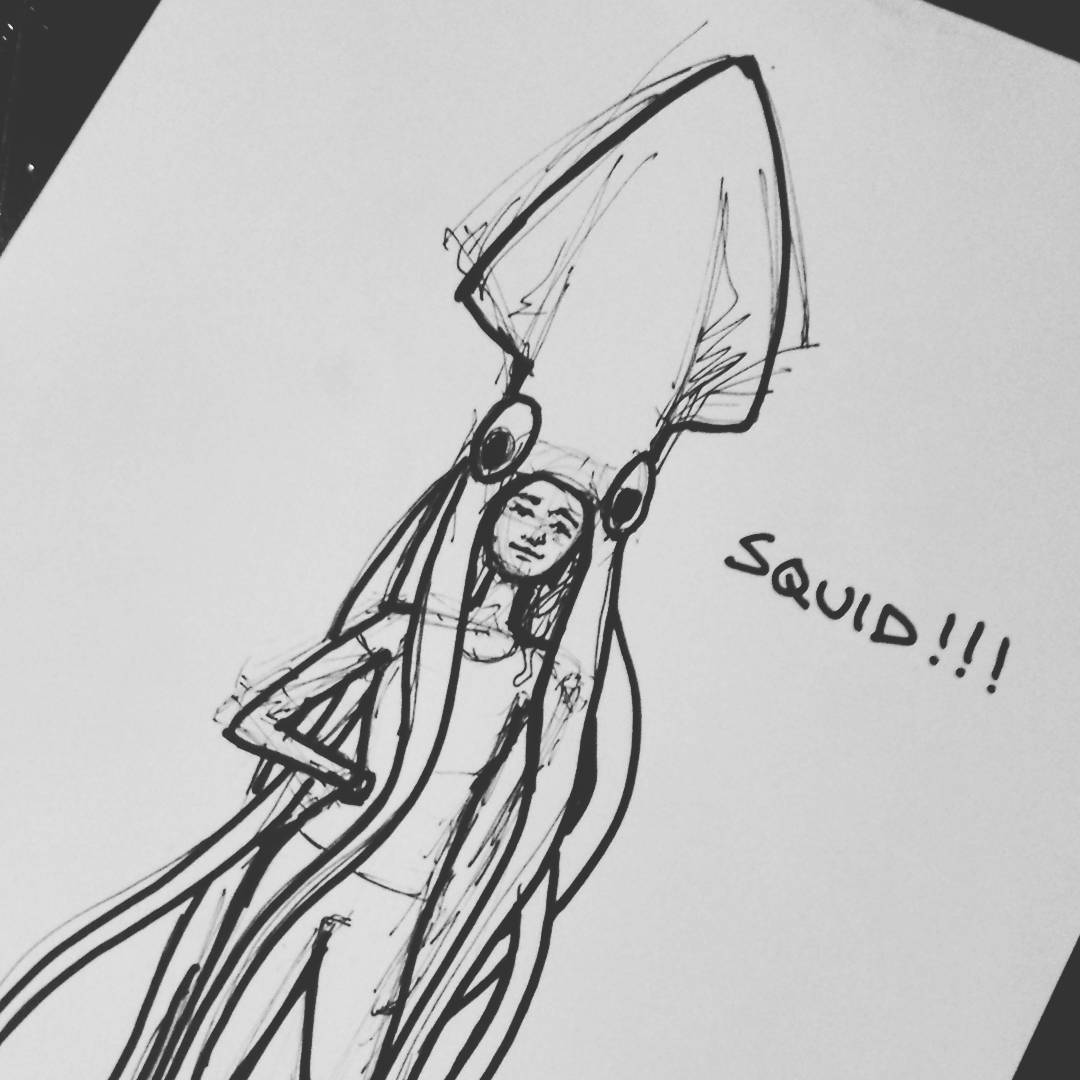
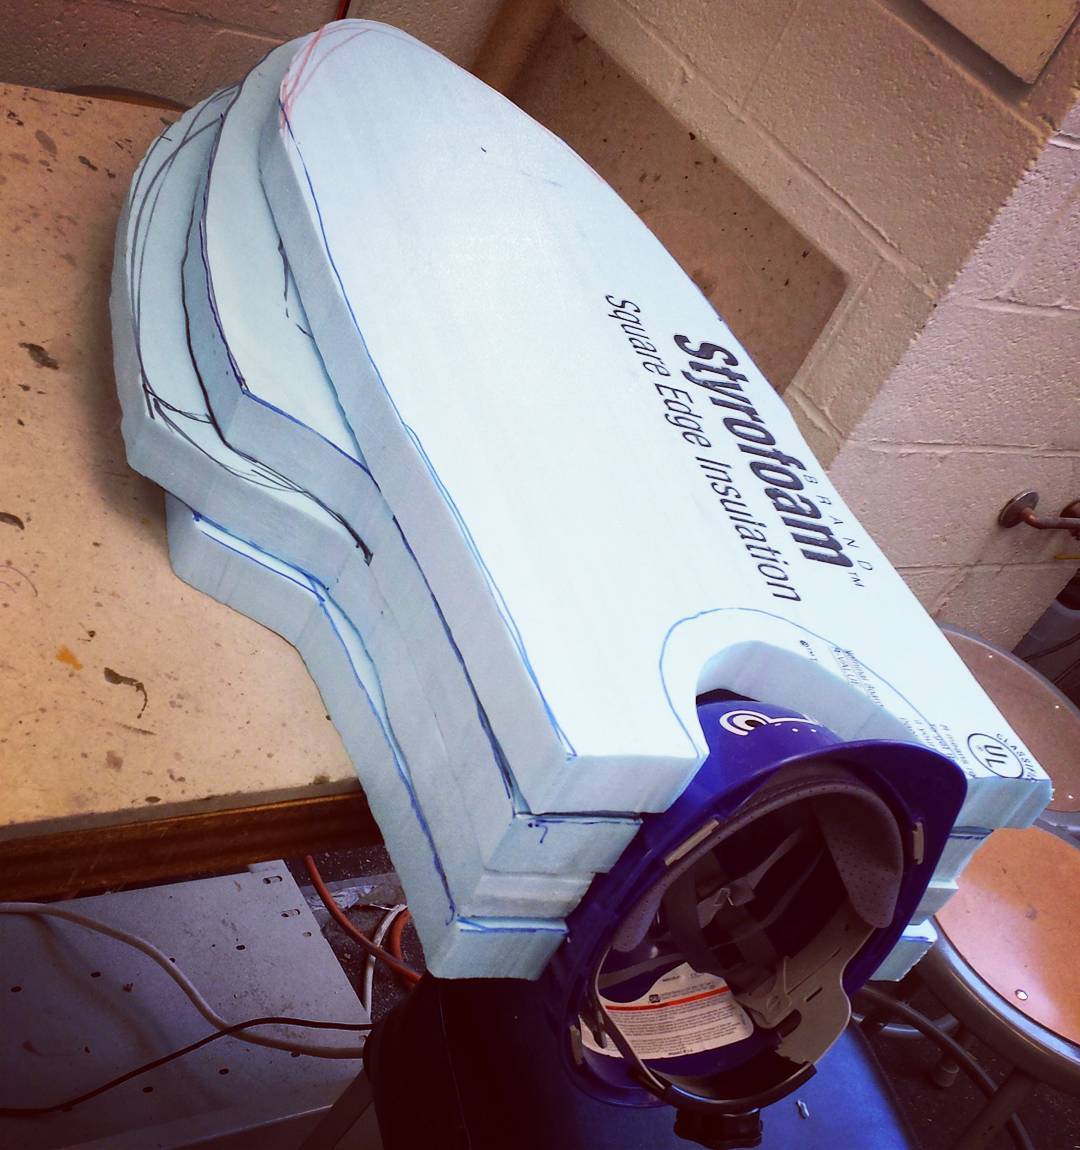
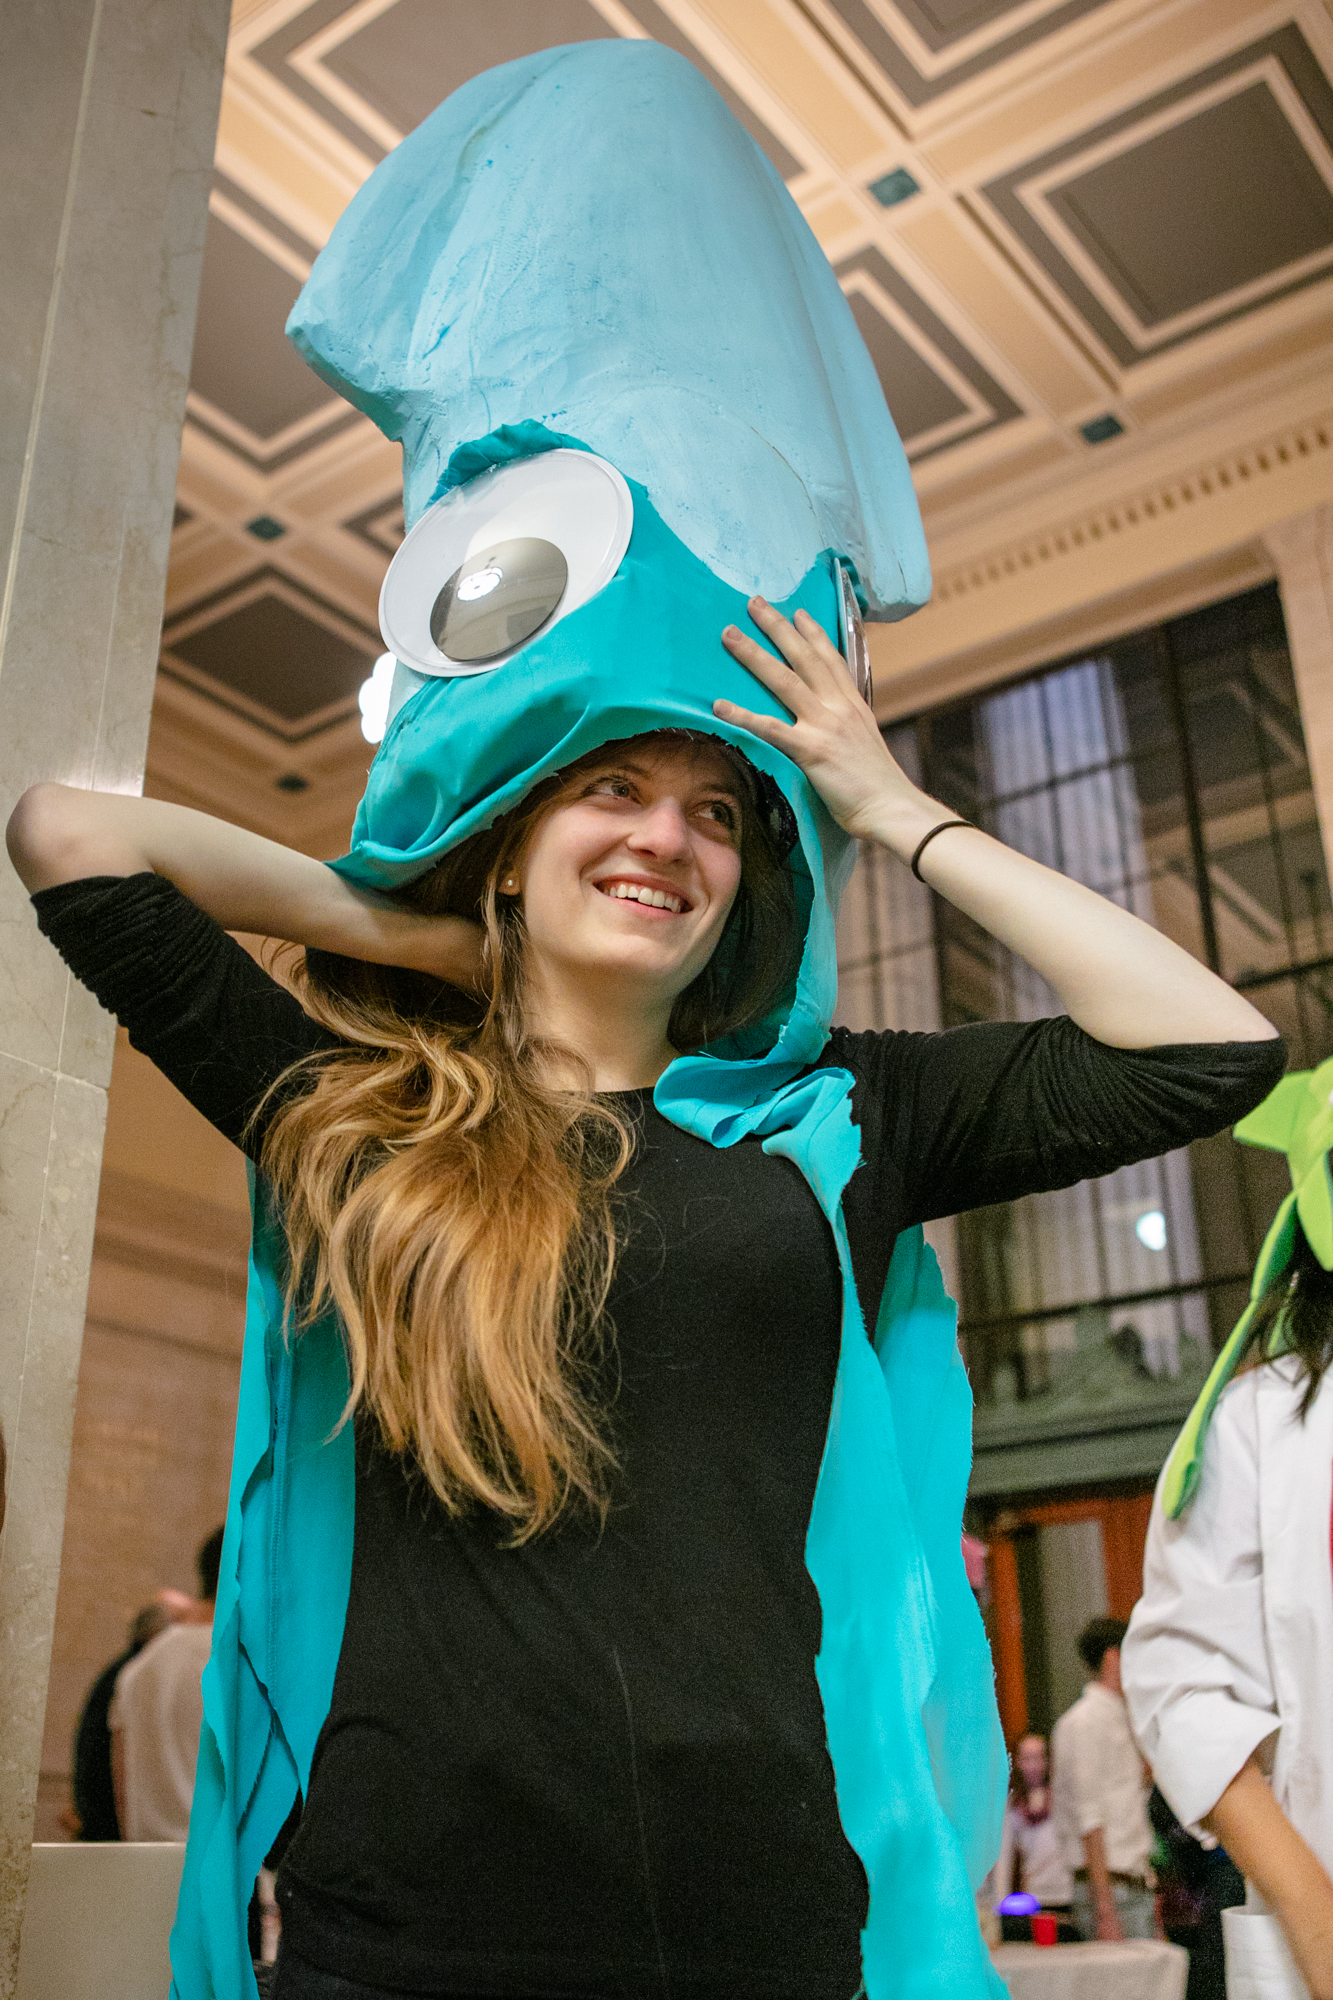
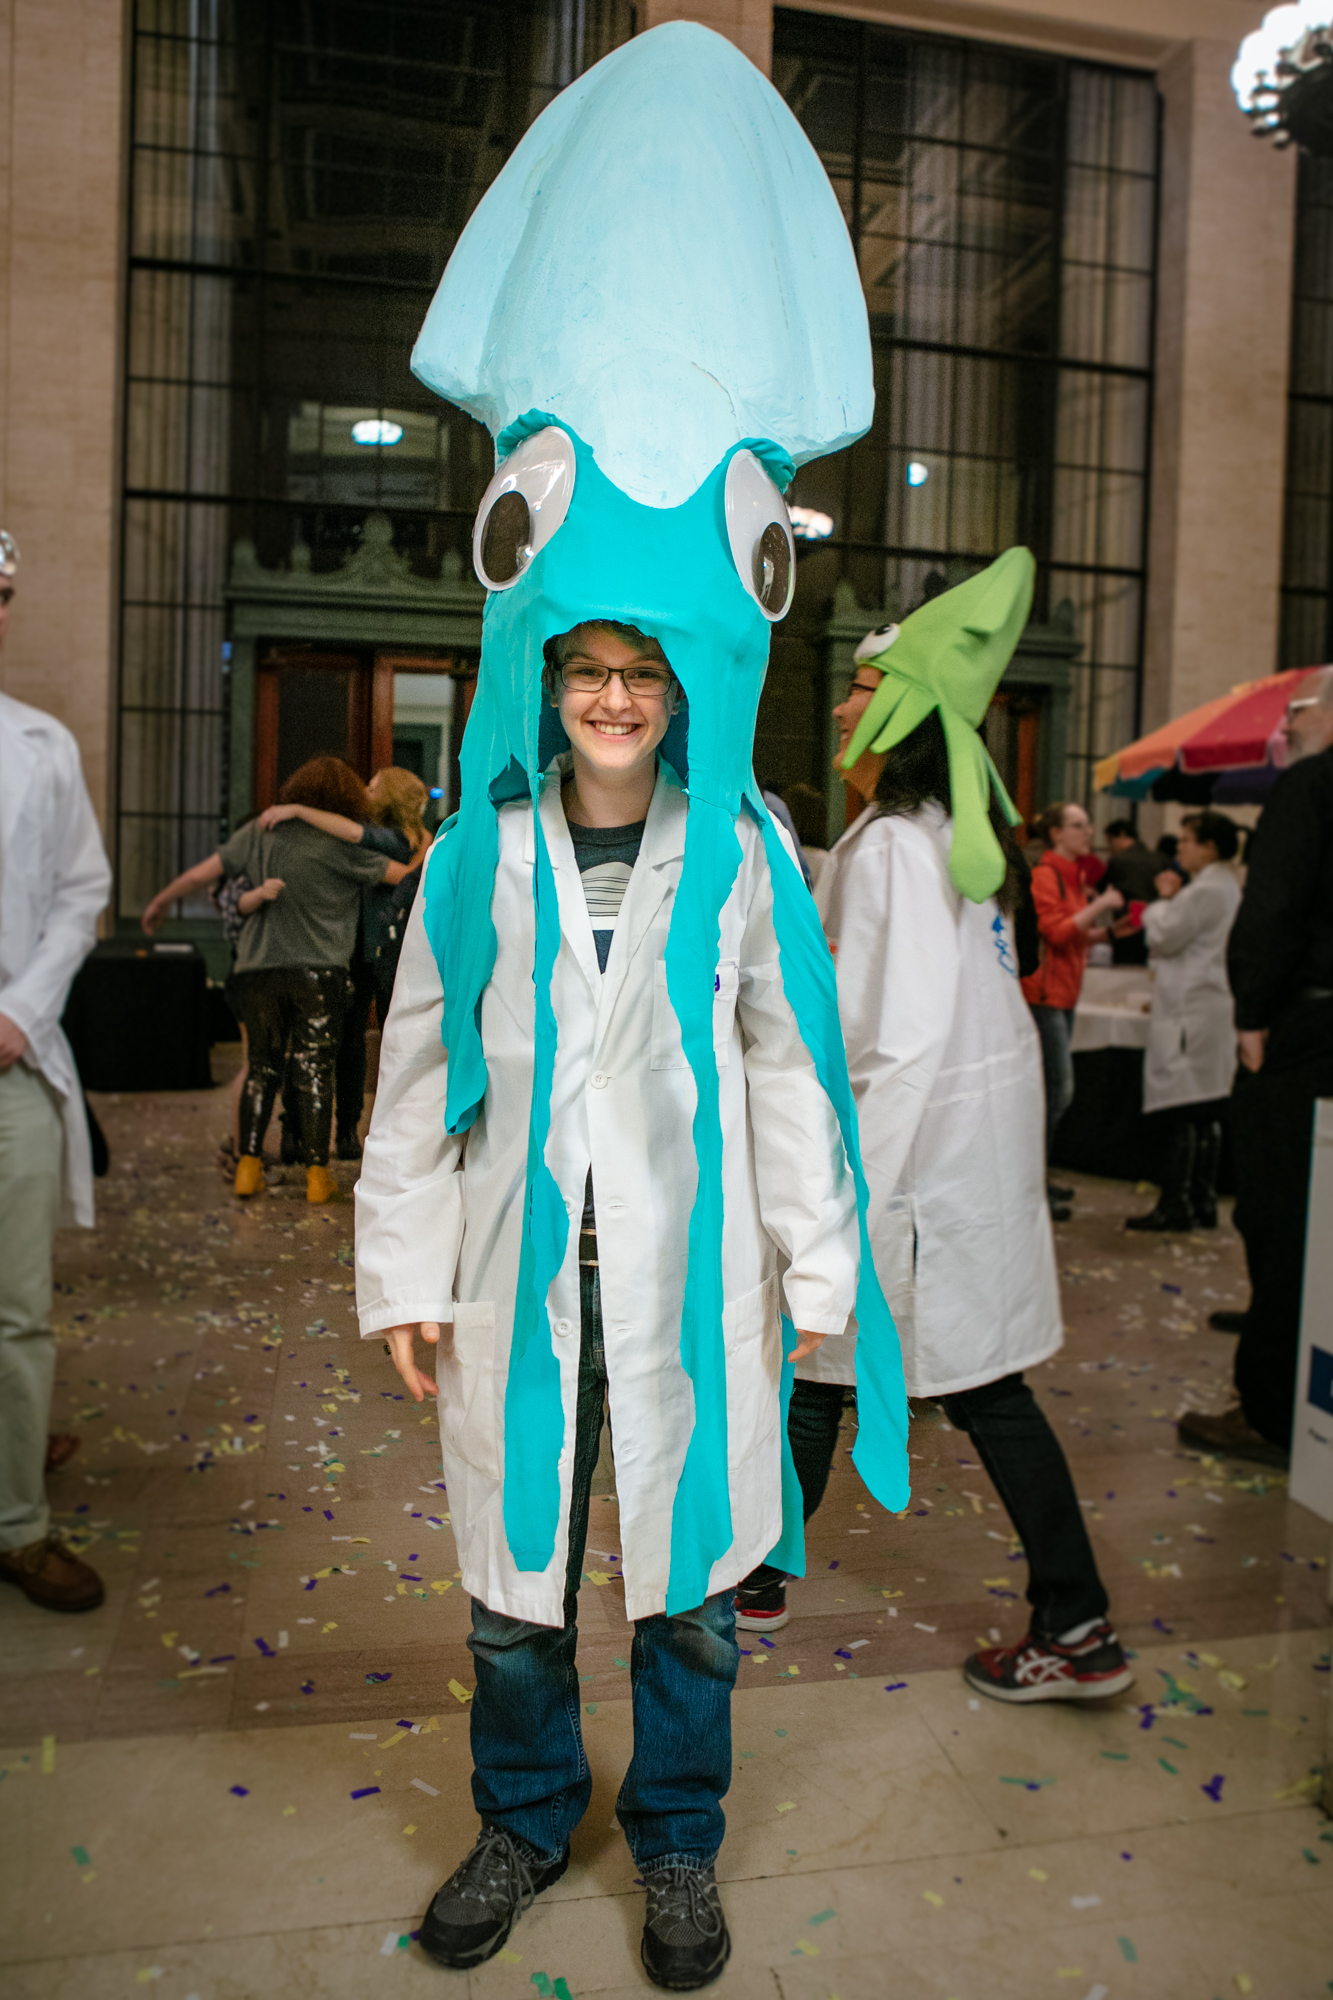
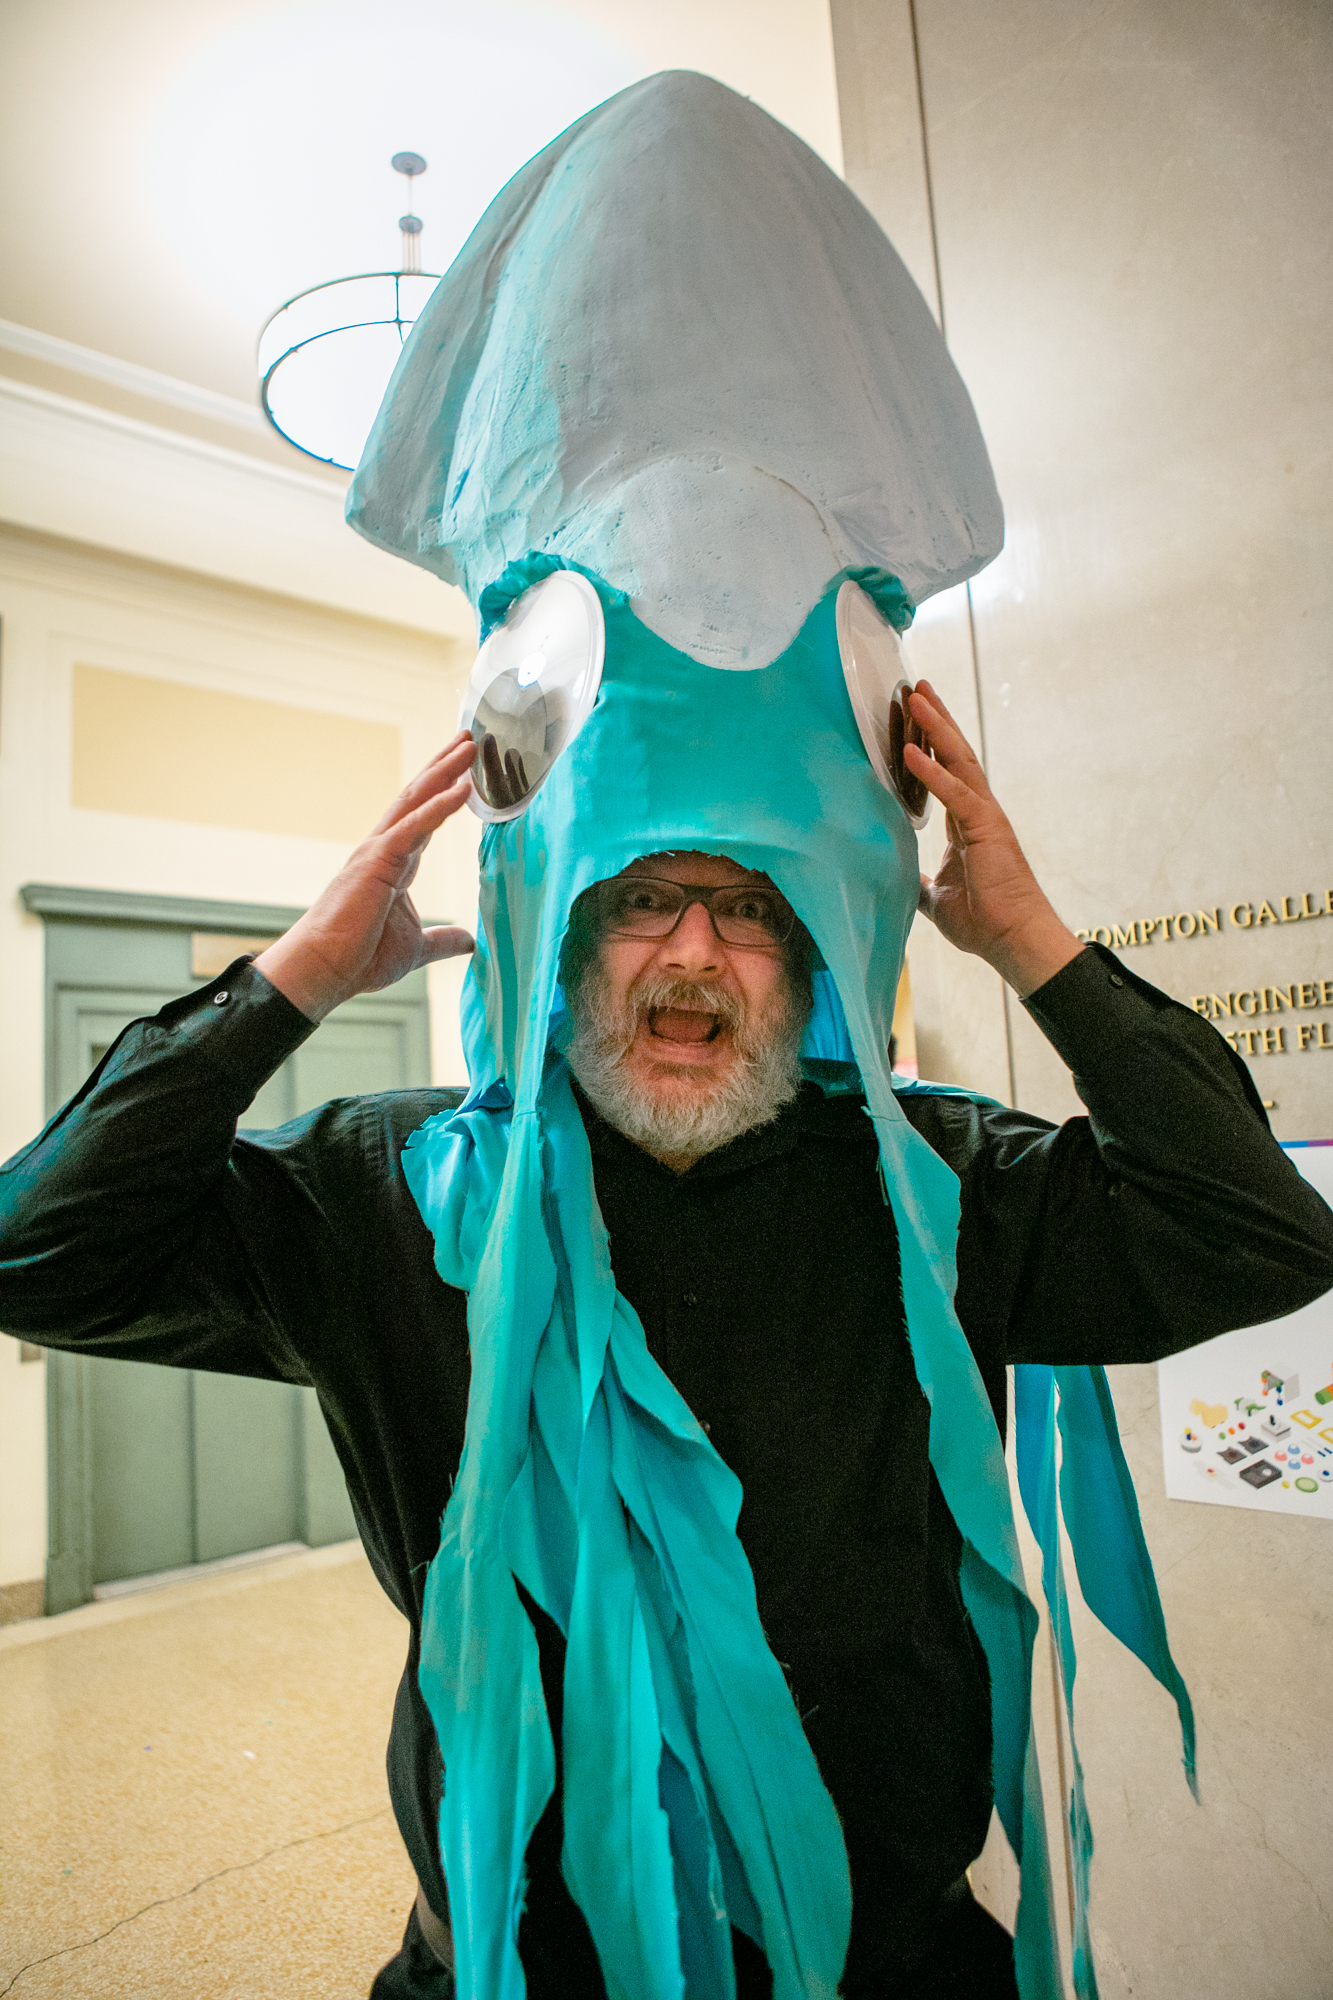
One of my favorite tools is a good knife. You can see the one I was using here to carve the foam
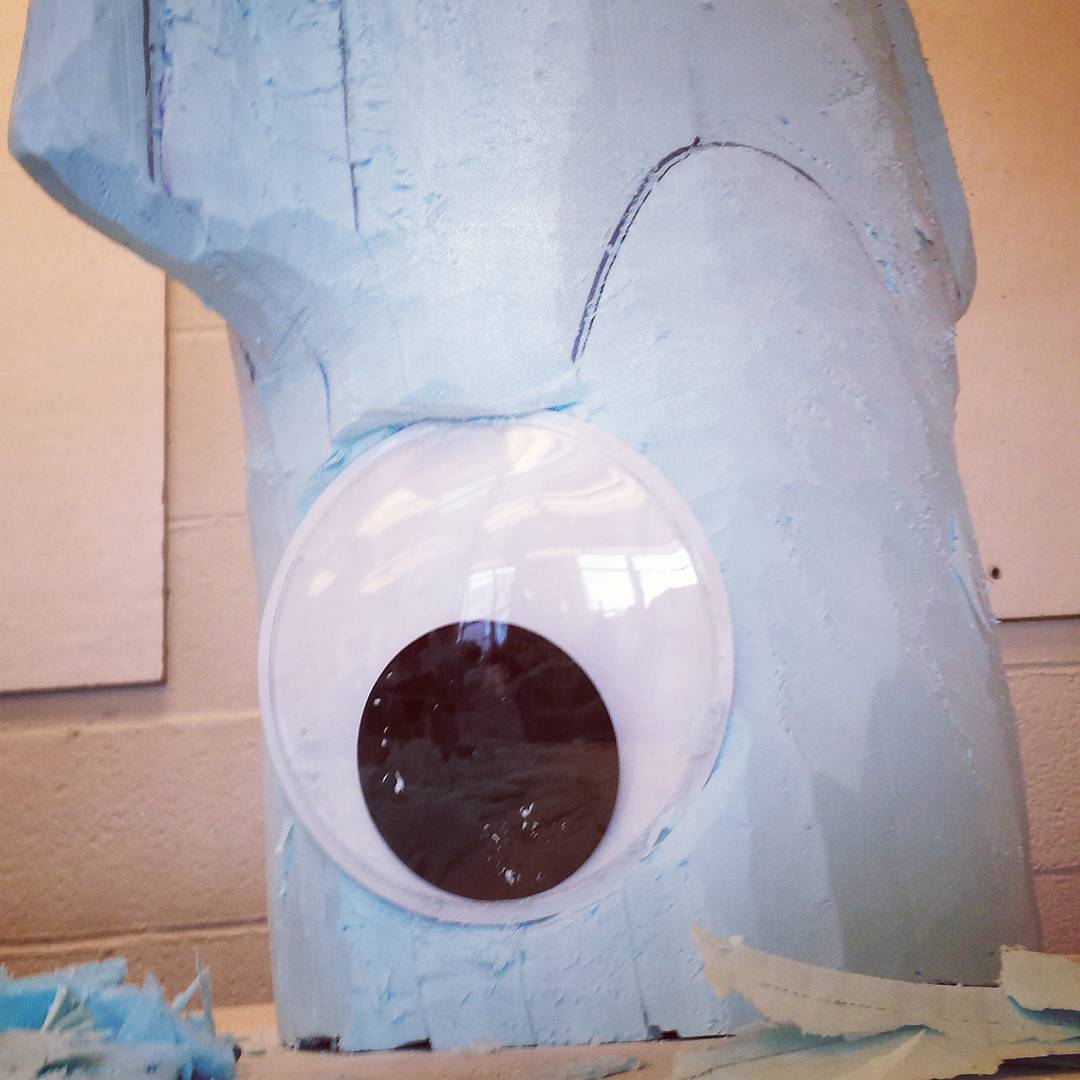
Adding a pair of giant googley eyes really made the squid come to life. The eye is mostly held in as a press-fit


The Completed Costume:


The final (and very last minute) touch was to add “tentacles” which were made using a thrift-store dress. I attached the dress to the squid body and then cut it in the shape of tentacles.

Here I am with the studens of team squid, their incredible toy (Infect It!), and their mentor Jonah:


It was finished just in time for playsentations (this is me):

other people may have worn it better though:


Custom Masks


The mask patterns that I found online didn't fit Geoff's face, so I made a custom pattern using a 3D scan that I had. After a few iterations and tweaks, I've landed on a mask design that fits him really well.

If you'd like to make this mask yourself, here is a PDF pattern (to scale) with some instructions!